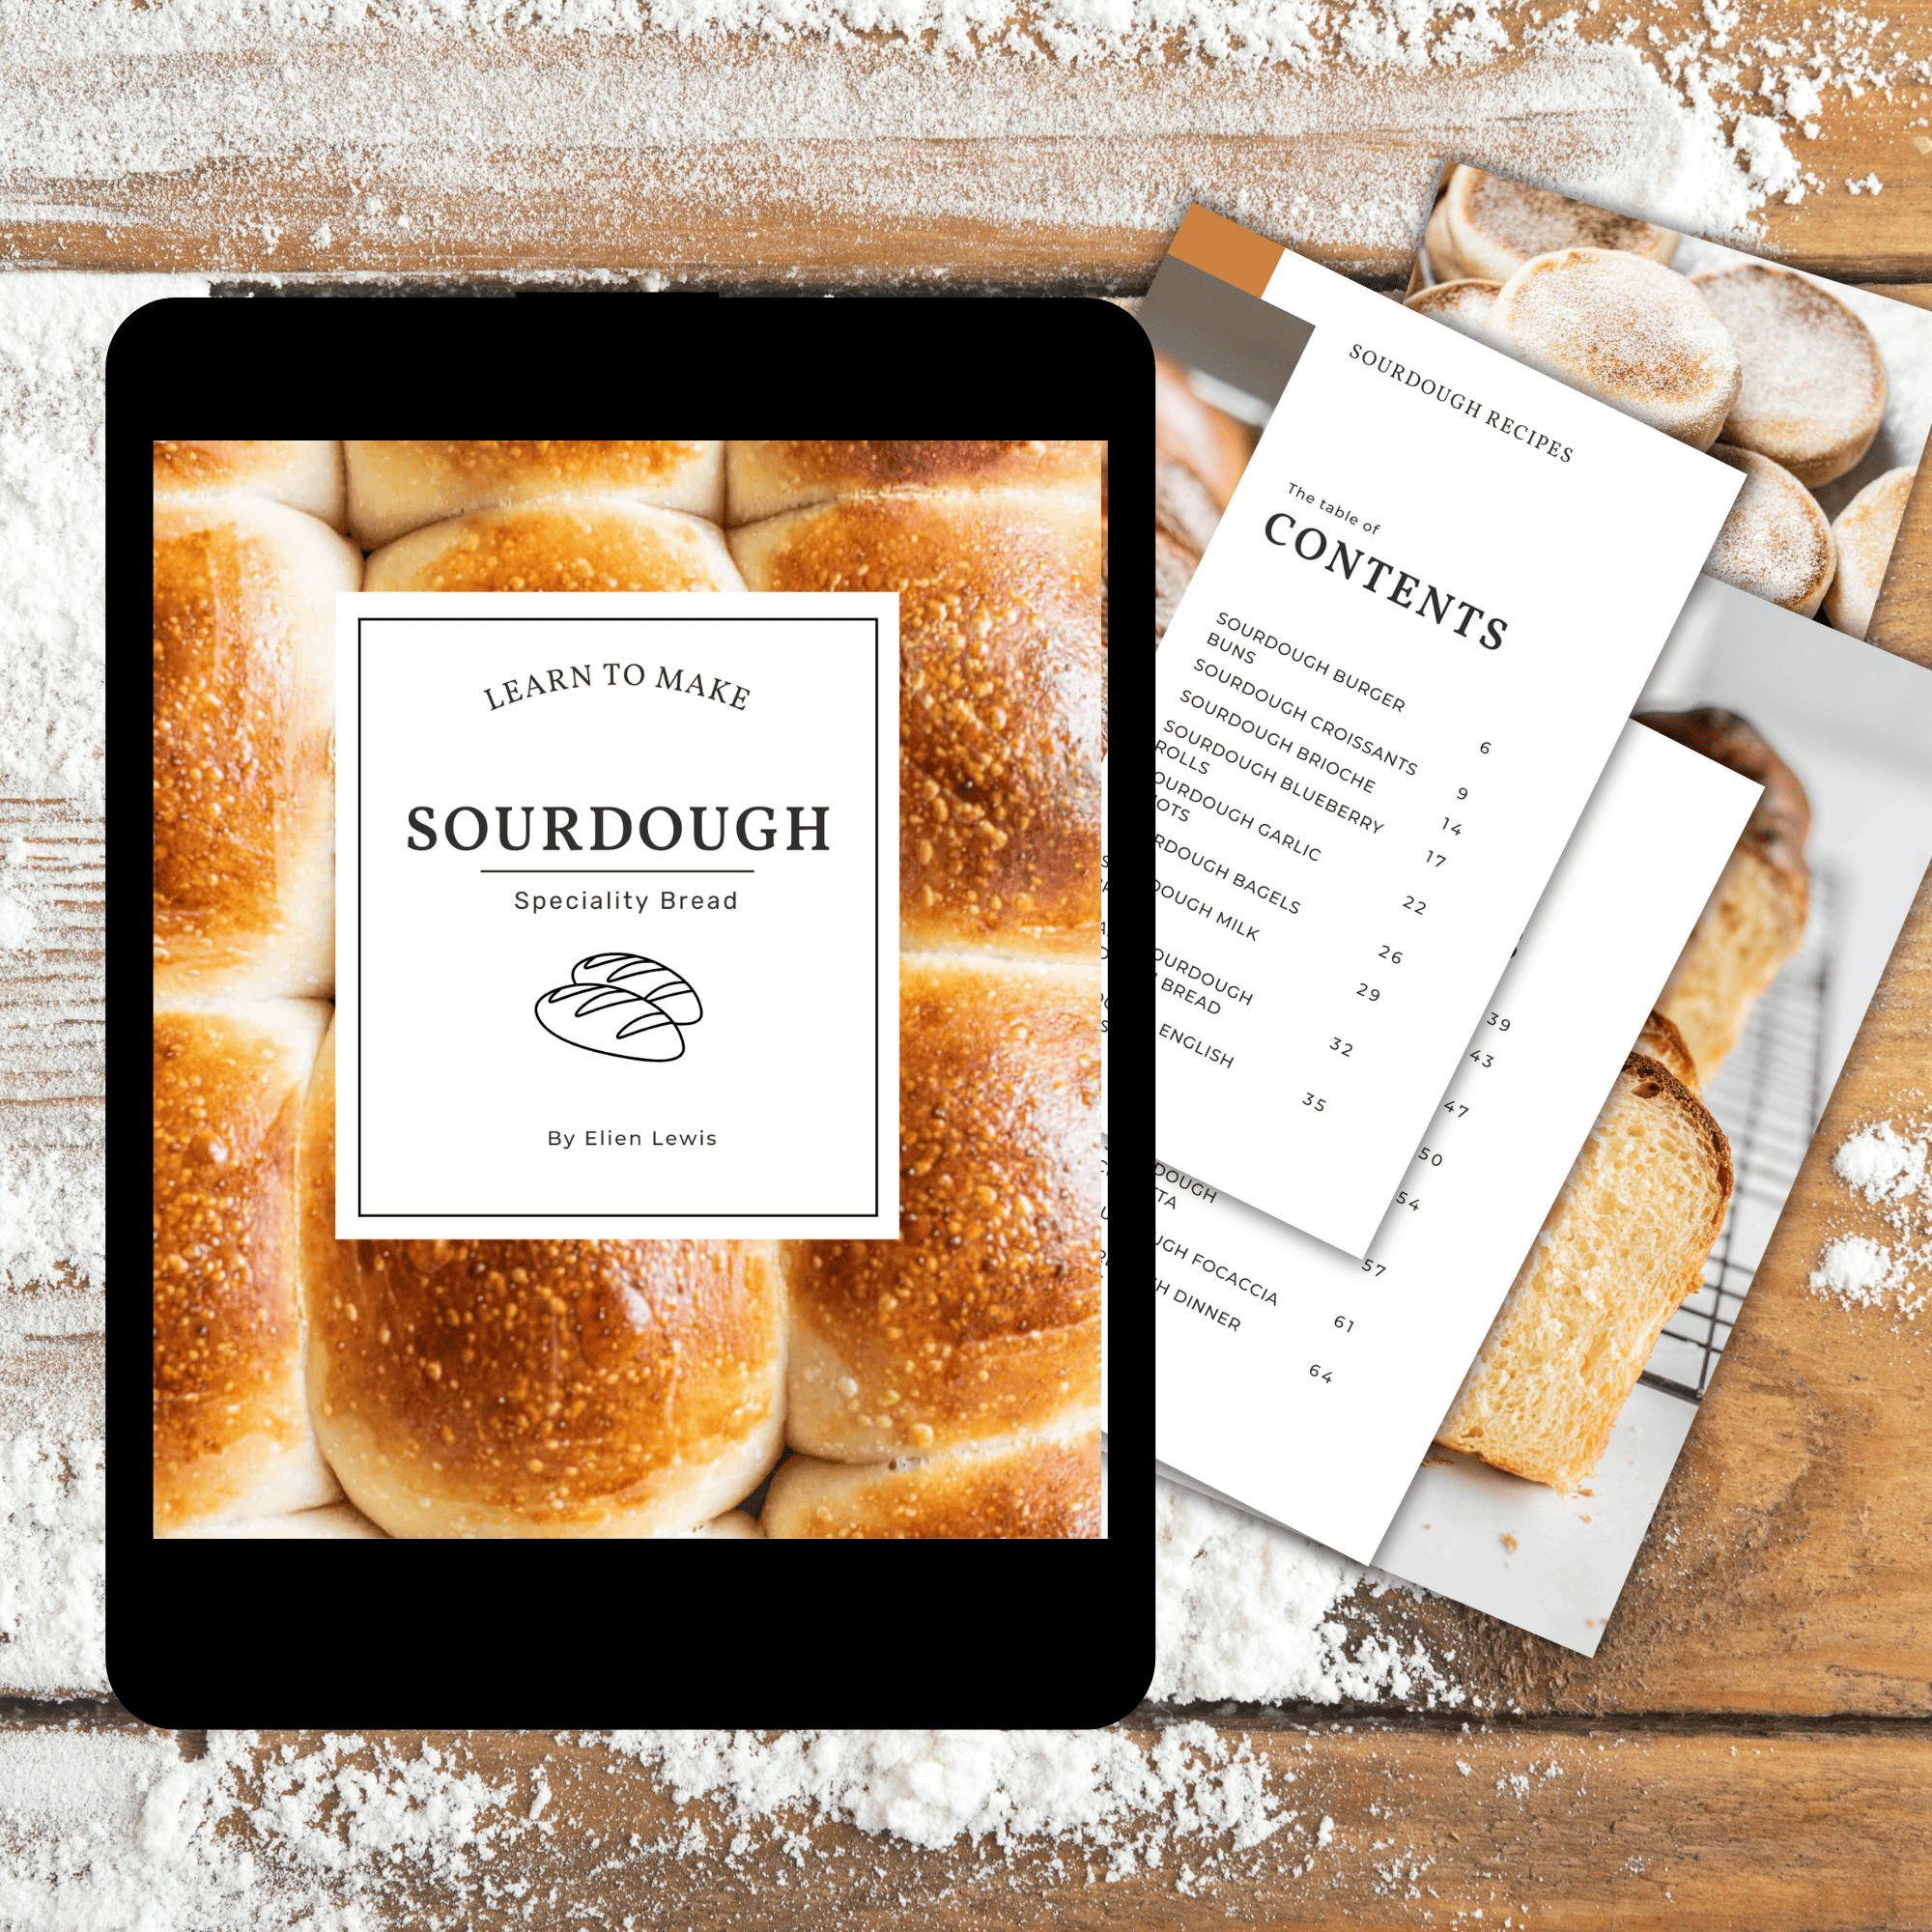
How to Make Sourdough Starter
This sourdough starter recipe shows how to make a sourdough starter from scratch.
Take the time to read through this post. I walk through the entire process and sourdough starter troubleshooting in detail so that you can get your own sourdough starter up and running. It may seem daunting at first but once you get the hang of it, it is a simple process.
For a sourdough bread, troubleshooting guide, check out this Sourdough Bread Troubleshooting post or how to maintain a sourdough starter.
What is an active sourdough starter?
A healthy and active starter is the heart of homemade sourdough bread, english muffins, or rolls. Making a starter that will become the rising power for these loaves isn’t hard to do but it requires time and patience.
A sourdough starter is a living thing. It is essentially a collection of wild yeast and bacteria that feed off a mixture of flour and water. Flour and water are added daily to provide a fresh food source.
Initially, when starting a starter, it’s a gradual process of catching and nurturing these wild organisms and giving them food and the ideal environment to grow.
Later on, when the starter is ready to bake with, the wild natural yeast will be responsible for the bread’s rise as it releases carbon dioxide. There is no need for commercial yeast in a bread recipe made with sourdough.
What bacteria is in sourdough starter?
The bacteria in the starter, which is the lactobacillus strain, also release carbon dioxide, but not as much as the yeast. The bacteria is responsible for the sour flavor and tang in sourdough bread. This is due to the lactic and acetic acid they produce.
It is important to nurture and grow the yeast colony in the new starter so it is strong enough to leaven your bread. This takes time, but it’s crucial if you want a good result.
How to make a sourdough starter
Creating your own starter can be different for everyone. It depends on the temperature of the room, humidity, yeasts in the air, and different types of flour. This can all change how quickly or slowly your starter grows and becomes active. Here is a basic guide on getting started.
To create a starter, you need flour and water, and for best results use a kitchen scale for measuring. You will need equal amounts of flour and water, measured in weight.
What flour for sourdough starter
Different flours can be used but I recommend using unbleached all-purpose flour or bread flour for this process and saving the nicer flours for the actual bread baking. Any grain-based flours can work whether it’s rye, whole wheat flour, or einkorn, but general unbleached all-purpose or bread flour gives the most consistent results. A starter made with white flour can still be used in whole-grain flour bread later on.
Rye flour is often used in starter creation as this can make the starter appear active faster. However, the signs of fermentation are often due to extra bacterial action which may look bubbly and active but doesn’t necessarily mean your starter is ready to go.
The bacteria grow much faster than the yeast. Because the bacteria also produce a little carbon dioxide, this can create bubbles in the starter very early on. However, these early bubbles do not indicate your starter is ready to bake yet.
Water for sourdough starter
What water to use with sourdough can be a hot topic. Some water sources can contain amounts of chlorine and other elements that could affect the starter process. Filtered water or tap water that has been boiled and left to cool is best to use.
Personally, I just use tap water. My tap water doesn’t seem to affect my ferments or sourdough starter, however, if you feel your tap water may hinder the fermentation process, it’s better to be safe than sorry and use filtered water.
The best temperature for sourdough starter
Yeast likes warmer environments in which to multiply. Keep your starter in a space between 70°F and 80°F (21°C and 26°C).
If the environment is too cold, a starter can slow right down. In hot environments, the fermenting process will be sped up and your starter may need extra feeding.
Cooler temperatures tip – In a cooler bag add a sealed jar of hot water, along with your starter. Close the bag to keep the heat in. This works well to create a warm space in the cold wintertime.
The sourdough starter feeding schedule
Here is day by day how to feed sourdough starter steps. The flour measurements below use 50g of flour and 50g of water as a base starting guide. If you like, this can be lessened to 30g or 40g, as long as you keep all the amounts consistent.
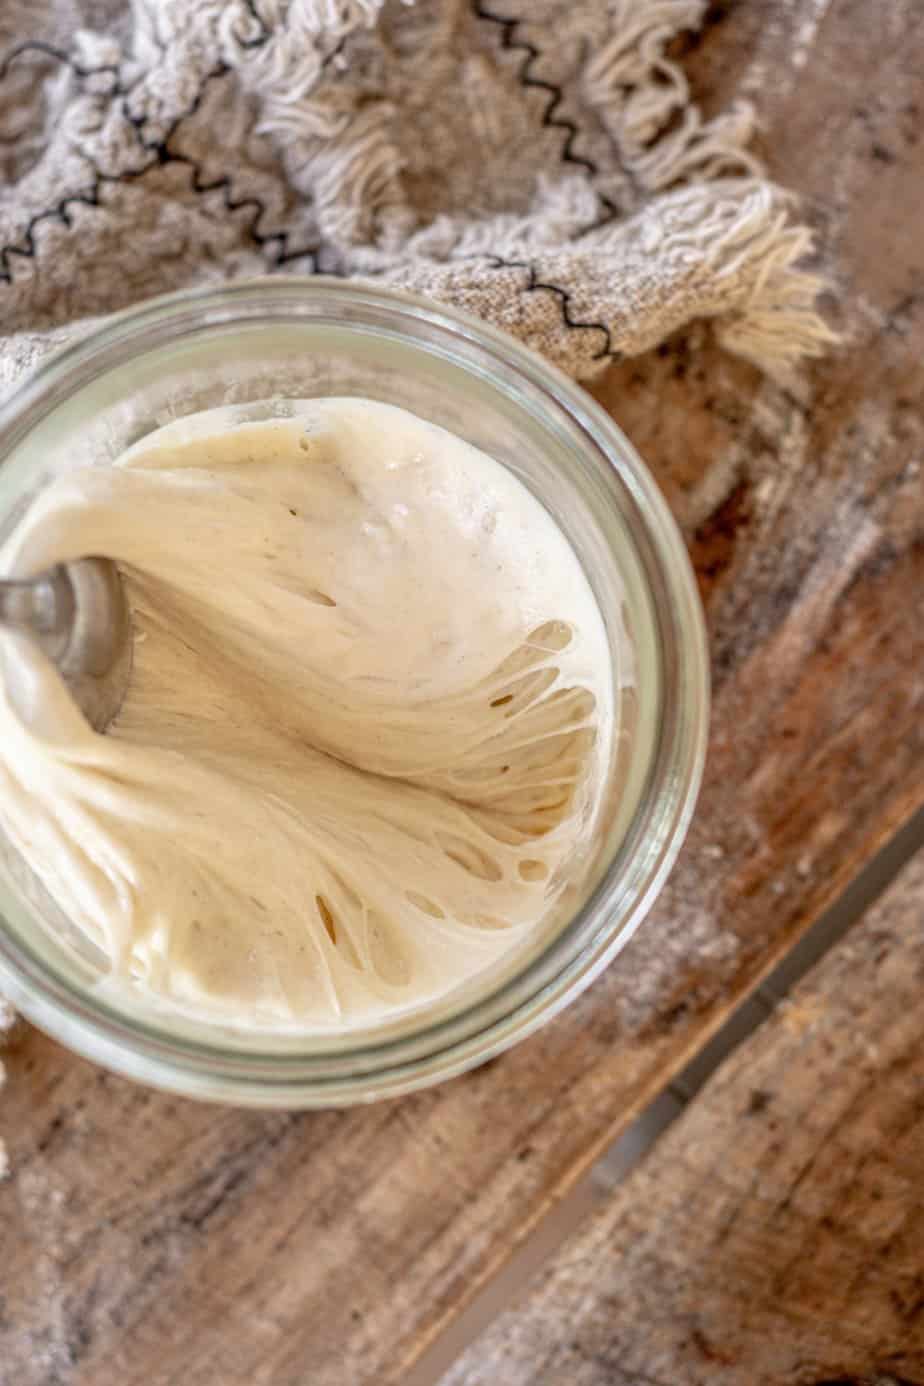
Day 1: combine 50 grams of flour and 50 grams of water in a glass container and stir very well. Leave in a warm place, out of direct sunlight, covered with a cloth.
Day 2– Feed your starter 50 grams flour and 50 grams water. This means, adding in a fresh 50g of flour and 50g of water and mixing it really well with yesterday’s mix.
Day 3: Pour 50g of the starter into a bowl and feed it 50 grams flour and 50 grams water. Mix it well. Discard the rest. Tip this freshly fed starter into a clean jar and use a rubber band to mark where the starter comes up to.
Making sure the new jar is clean and marking it with a rubber band will show clearly if the starter has risen or fallen.
Day 4-10: Pour 50g of the starter into a bowl and feed it 50 grams flour and 50 grams water. Mix it well. Discard the remaining starter. Tip this freshly fed starter into a clean jar and use a rubber band to mark where the starter comes up to.*
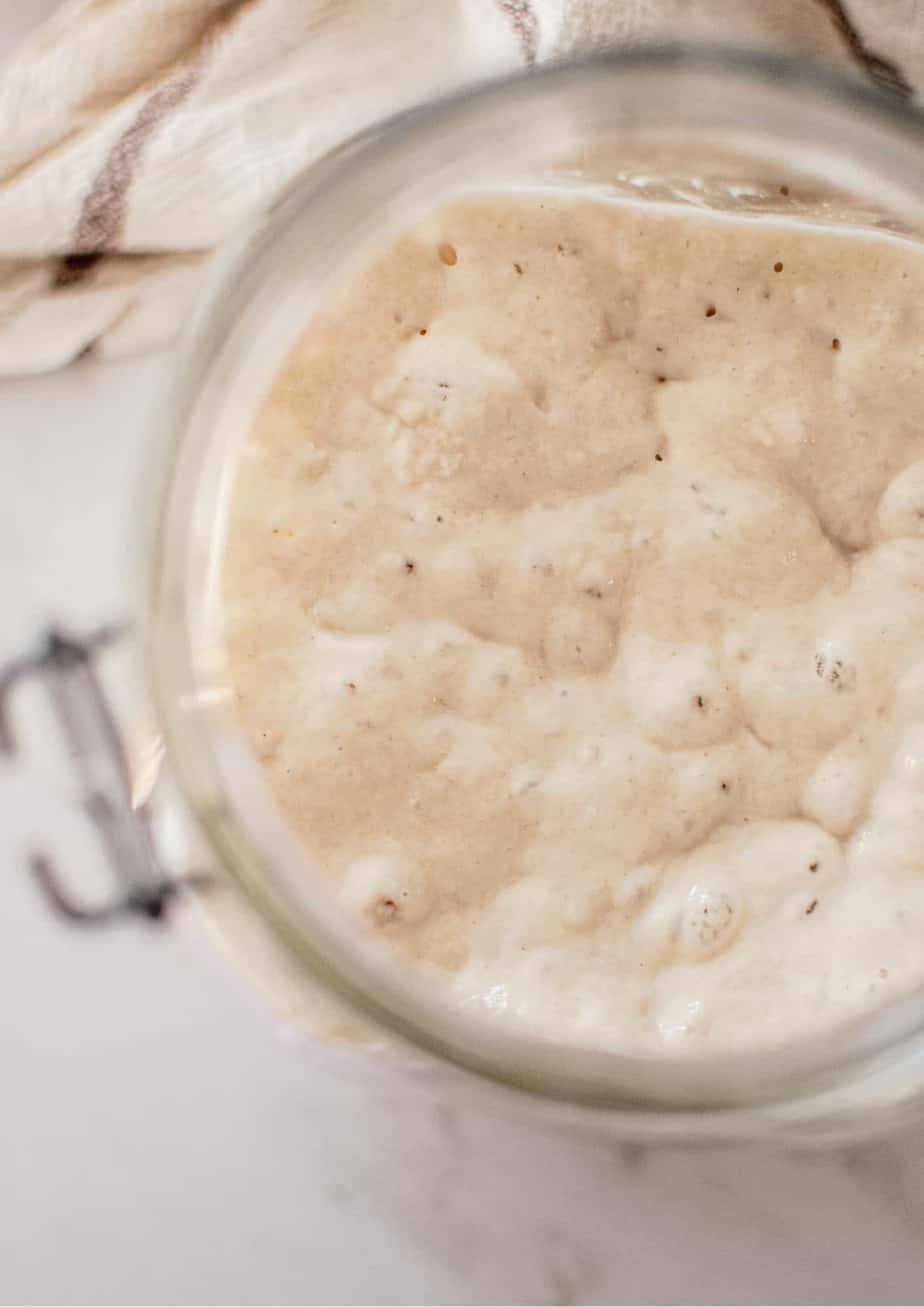
By day 4 or 5, your starter may have bubbles (or it may not yet and that’s fine!) and have a slightly sour smell. It’s not ready to bake bread with but it should have enough acid to be used in sourdough discard recipes like pancakes and cookies.
Things to watch for
You may not notice the starter is quite runny when it’s time to feed it again. This is due to the acid created by the bacteria and the alcohol from the yeast.
If your starter is splitting and forming liquid on the top or the bottom, check that the environment in which you are keeping your starter isn’t too hot. You may need to increase the feedings to 12 hourly if this keeps happening.
Sourdough starter feeding ratio
While you are creating your starter, you will be feeding it at a ratio of 1:1:1, which is equal parts flour and water measured in weight. It is important to measure the ingredients for a starter this way to keep it consistent.
Measuring in volume isn’t consistent as water weighs much more than flour so your starter will become too liquid.
The flour measurements above use 50g of flour and 50g of water as a base starting guide. If you like, this can be lessened to 30g or 40g, as long as you keep the amounts consistent.
If your starter is doubling easily by day 6 or 7, within 6 hours of feeding, you can start feeding it 1:1:1 twice daily.
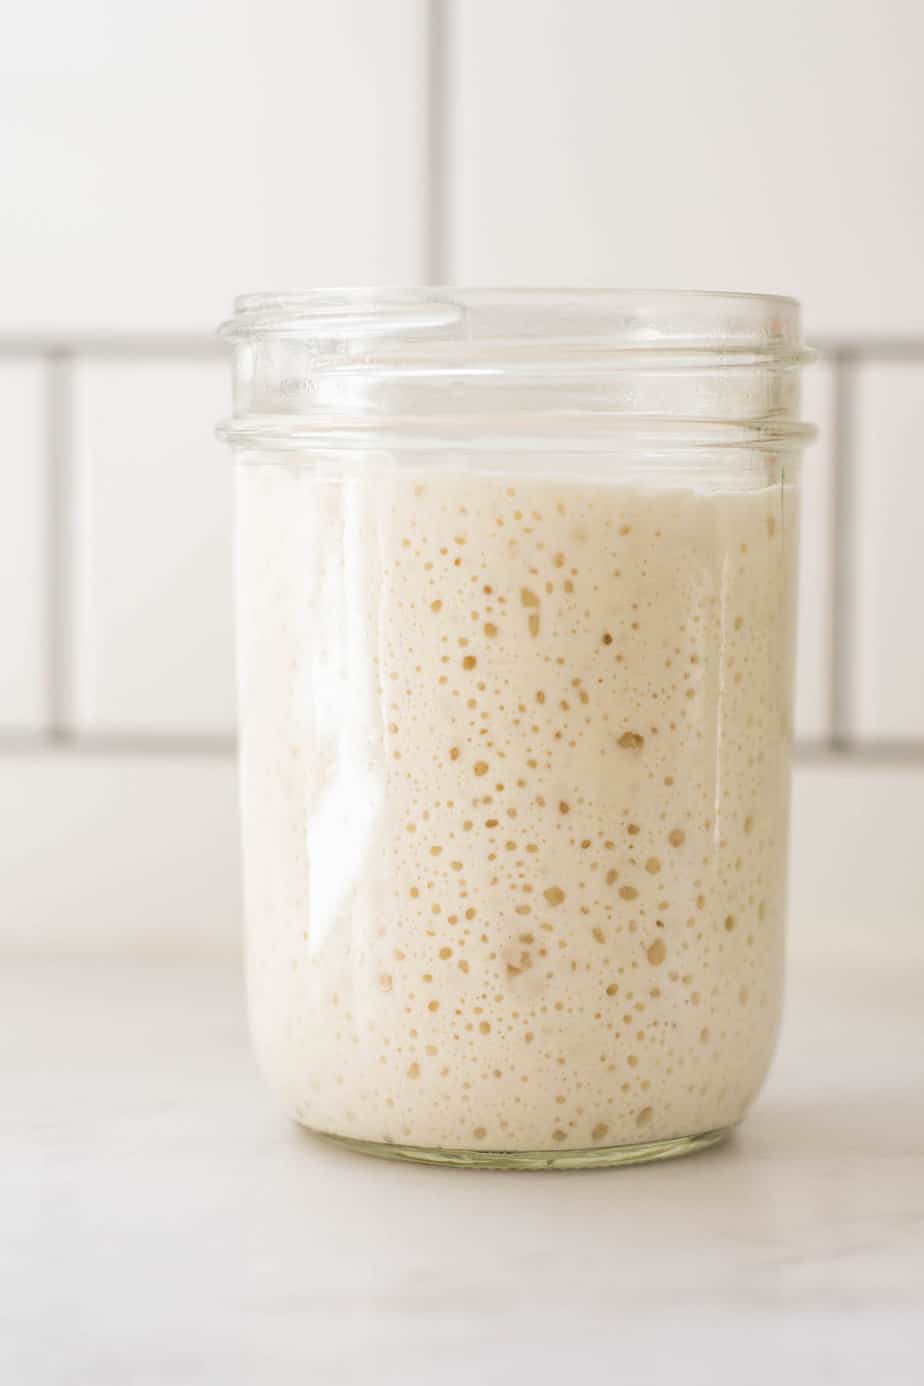
By day 10 it may be ready to use. Test your starter’s activeness, as shown below.
Starter activeness test
To test how active your starter is and if it’s ready to bake with, you’ll need your starter to double within 6 hours at a room temperature of 70°F – 80°F (21°C- 26°C).
You will also feed your starter at a higher ratio of flour and water to check if the yeast colony in your starter is large enough to inoculate this extra flour in under 6 hours. If it’s too slow, it will show the starter isn’t quite ready to bake a successful loaf.
This time you will increase the feeding ratio to 1:2:2 (starter:flour: water)
Take 1 part starter and feed it 2 parts flour and 2 parts water. Mix it well in a jar or glass. If you tie a rubber band around your glass jar to mark where the starter came up to before it rose, you’ll be able to see how much it has risen later on.
Pop the starter in a warm place, out of direct sunlight.
If it doesn’t double or triple within around 6 hours, keep feeding your starter for a little longer. Continue twice feeding 1:1:1 and try the test again later on.
Why discard sourdough starter?
Because you want to nurture your yeast and bacteria with ample food. By keeping only a small amount of starter and feeding it, there will be plenty of food to feed those organisms.
If you feed the entire starter new flour each day, it starts compounding and soon you’ll be going through an overwhelming amount of flour.
Delicious discarded sourdough starter recipes
- Sourdough Waffles
- Discard pizza dough
- Sourdough discard doughnuts
- Banana bread with sourdough discard
Sourdough starter troubleshooting FAQs
Chances are it was the lactobacillus bacteria in your starter forming those bubbles, and not the yeasts. Bacteria also create bubbles while they are converting sugars to lactic and acetic acid, but it’s the yeasts in the starter that will give rise to your bread. The yeast colony takes a little longer to establish itself. Be patient and keep feeding and refreshing your starter
Be patient and keep regularly feeding your starter and ensure it’s in a warm spot. If you’ve been feeding your starter for at least 6 days and it’s not bubbling you could experiment with an extra feeding, or check your water source and that it’s not hindering the starter.
This is a sign that your starter is hungry. Your starter might be fermenting a little too fast and the yeasts have run out of food. This can happen if the room your starter is in is too hot.
Check the temperature and fix it if it’s too hot before continuing. Then, carry on with the 1:1:1 feeds, but you can switch to 12 hourly feeds if it keeps splitting.
It is normal for a starter to rise, reach its peak, and collapse once it has run out of food. Once your starter can double within 5-6 hours after being fed 1:1:1, switch to 12 hourly feedings.
If it doubles within 4-5 hours with the increased feedings, try the starter activeness test.
Has the temperature changed? If it’s colder your starter will take longer to double. Have you increased the feedings? If you increase the feeds before the starter is ready, it will slow things down a bit.
If you keep up with regular discarding and feeding, in a fresh jar each time, your lactobacillus colony will thrive. As they do, the amount of lactic acid they produce will inhibit mould growth and harmful bacteria.
A contaminated sourdough starter is pretty rare. If you do see mould growing on your starter or it develops a pink, red, or orange tinge, discard it and start again.
Sourdough starter maintenance
Sourdough starter maintenance and looking after your starter are just as important as creating one. It’s important to keep it refreshed often so there is not a buildup of acid.
An overly acidic starter can ruin the gluten structure in sourdough bread, which can make it hard to work with.
To keep the acid content low, you can keep refreshing your starter 2-3 times a day at 1:1:1, or twice a day at 1:2:2. This may need to be increased if the environment is very warm.
Your starter will rise to its peak, after which it will collapse when the yeast has run out of food. Ensure you use your starter when it has at least doubled but before it passes this peak.
Once your starter is well established, it can be refrigerated when it isn’t being used. However, do feed it before placing it in the fridge. Either 1:1:1 if you plan to use it within the next day or two, or 1:2:2 if it will be longer.
The aim is always to keep the yeast active and happy and the acid content low.
–> For more in-depth information on how to maintain a sourdough starter.
Mature starter
The longer the time between the feeding of your starter the more mature your starter is and the more acid that accumulates in your starter. A starter fed and used within 6 hours will have less acid than if it was fed and used 12 hours later.
In the same regard, a starter fed 1:1:1 has a higher amount of seed starter than one fed at 1:2:2 and will have more acid.
Using a ‘young’ starter with a low acid content allows your dough to be a lot more stretchable and easy to work with. A starter with a high acid content can make it very runny and tricky to manage. It can turn your dough into a wet mess.
For a sourdough bread troubleshooting guide, check out this post here — Sourdough Bread Troubleshooting.
The world of sourdough is an exciting place and everyone has a different take on their bread and a different recipe. One thing I’m sure everyone will agree on is that a healthy active starter is a key ingredient.
Sourdough bread recipes

Sourdough Starter Recipe
A sourdough starter recipe to make your own simple sourdough starter + how to maintain it
Ingredients
- Unbleached all-purpose flour
- Filtered water
Instructions
- Day 1: combine 50 grams flour and 50 grams water in a glass container and stir very well. Leave in a warm place, out of direct sunlight, covered with a cloth.
- Day 2- Feed your starter 50 grams flour and 50 grams water. This means, adding in a fresh 50g of flour and 50g of water and mixing it really well with yesterday's mix.
- Day 3: Pour 50g of the starter into a fresh jar and feed it 50 grams flour and 50 grams water. (A ratio of 1:1:1.) Discard the rest.
- Day 4: Pour 50g of the starter into a fresh jar and feed it 50 grams flour and 50 grams water. Discard the rest.
- By day 3 and 4, your starter might be bubbling and have a slightly sour smell.
- Day 5-10: each day pour 50g of the starter into a fresh jar and feed it 50 grams flour and 50 grams water. Discard the rest.
- If your starter is doubling easily by day 6 or 7, within 6 hours of feeding, you can start feeding it 1:1:1 twice daily.
- By day 10 it might be ready to use, though it could be earlier. Test it using the starter activeness test as written below.
Notes
To test how active your starter is and if it’s ready to bake with, you’ll need your starter to at least double, or triple within 6-8 hours. You will also feed your starter at a higher ratio of flour and water to check if the yeast colony in your starter is large enough to inoculate this extra flour in under 6-8 hours.
Take 1 part starter and feed it 2 parts flour and 2 parts water. Mix it well in a jar or glass.If you tie a rubber band around your glass jar to mark where the starter came up to before it rose, you’ll be able to see how much it has risen later on.
If it doesn’t easily double within this time, it will need a bit longer of twice daily 1:1:1 feeds.
Nutrition Information:
Serving Size: 1 gramsAmount Per Serving: Unsaturated Fat: 0g


Thank you for the directions. I’ve watched several “Bake With Jack” video clips and he has one called “The Scrapings Method”
https://www.youtube.com/watch?v=Uj6YpNCUYYQ&t=8s
that sounds promising to avoid throwing any away.
Cool 🙂 I myself rarely throw starter away as we use the discard in so many recipes!
I am I the process of starting my starter. I have had lots of people ask for a starter when my starter is ready. Do I give the discard away as a new starter or is there another process for doing this?
Heya, I would wait to give it to others until it’s at least doubling within 5-6 hours. Otherwise they’ll have to also feed and discard for a few days until it’s ready.
Once it’s doubling easily, the next time you discard, you could take that discard and feed it and divide that up to give away 😊
Hello! Thank you for your directions! It’s about Day 10 for me and I just did the activeness test! It seemed like my starter barely grew, but when I removed the lid from my mason jar a bunch of gas released from the jar and my starter grew all the way up to the top of the jar right then and there in less than a second! Does that count as doubling in size? Also, I’m not sure why that happened. Maybe I’m closing the lid too tightly?
Heya the jar shouldn’t be sealed with a lid. Try the test again but cover it with a tea towel or cloth
Excellent instructions but please tell me two things:
1. whilst maintaining the starter, when I feed it and put it in the fridge, do I first let it rise and then put it in the fridge or just feed it and immediately put it in fridge?
2. On your You Tube video for ‘Easy No Knead Sourdough’ you don’t cover the dough at all whilst doing the 30 minute interval folding? Is that correct?
Thank you
Hey you can feed it and pop it straight back in the fridge. On my video I don’t show it but I actually place a plate over that pie dish to cover the dough. If I see it drying out I’ll place a damp tea towel over instead.
Sometimes i forgot to cover it completely though and it’s still fine!
About the activation test… Are you supposed to DISCARD ALL but 60-65 grams of the starter that has been fermenting for at least 5 days and add the 60 grams from that starter to a clean jar with 130 grams flour and 130 grams water?
In other words, does the “activation test starter” with 1:2:2 ratio become the new starter if it doubles within the 6-8 period of time? And if it does not double in size within the 6-8 hour period, do you then continue feeding the activation test jar the 1:1:1 ratio until it is ready, or do you discard that jar entirely and continue on with steps 3 & 4 from your sourdough starter recipe with the original?
This is the only point I am not exactly clear on, and would really appreciate your
advise.
Thank you in advance,
Melissa
Hey Melissa, you can actually do either but I find it easier to use the ‘activation starter test’ as the new starter and if it doesn’t double, go back to feeding that test 1:1:1 until it’s ready 😊
Thanks so much Elien… I am so grateful for your amazing explanation on this.
Do you use the ‘float test’ as well after your ‘activation test’ because mine actually tripled, but when I did the float test in water most of it stayed on top, but little strands fell to the bottom after 4 minutes so I took your suggestion to go back to steps 3 and 4… still in the process…😀Definately a challenge…
I don’t find the float test that reliable! I much rather judge it on when it doubles after a 1:2:2 feeding (it’s not enough for it to to double after a 1:1:1 feed though). If you try the 1:2:2 feed and it doubles in time it’s good to go!
I have been making your sourdough for the last few months and love it…just one thing though, I had been feeding the leftover starter after the activation test with 1:2:2 and putting it in the fridge for the next loaf but it looks as though I should only be using 1:1:1…if this correct, would this be why my bread is quite holey…more like ciabatta than sourdough (but it’s still really nice, holes and all)
Thanks
Bron
Hey! The only difference the ratios make are the speed in which the starter doubles. Eg, if I feed mine 1:1:1 then it will double within 3-4 hours, whilst a 1:2:2 takes 6-8 hours.
If you feed your starter 1:1:1 and use it after 8 hours it will most likely have already peaked and fallen, and it’s passed it’s prime.
So yeah you can use whatever ratio works best with your schedule (I use a 1:3:3 when feeding my starter overnight as that takes about 10-12 hours to double).
I’m unsure that how much you’re feeding your starter has much to do with your holes bread. Big sporadic holes can be a sign of either not enough structure being built, or being underproofed. You can add a few extra folds in, or do a little slap and fold kneading before starting coil folds to add extra structure and make sure you let your bread bulk after all the folds for long enough, it needs to be 50% bigger and puffier before being shaped. A long bulk ferment will give a tighter crumb. 🙂
Hi, I’m about to make my starter and wanted to check that chlorinated tap water is OK (or do you use bottled water)? Also can you use a half white/half rye combination? I’ve seen this in other starter recipes.
Hey I use chlorinated tap water with no problems ☺️. You can also use half white half rye if you like. I personally like an all white flour starter because white is cheaper. Especially while it’s establishing and you’re discarding. But it’s totally a personal preference!
I am curious if I absolutely have to discard of any starter? What if I just wanted to feed it again without discarding it?
Hey so if you don’t discard your starter you’re going to have to feed it a lot more to keep all those yeasts and bacteria happy. Every time you feed it more are created and the more there are the more they’ll eat.
It’s better to take a small amount each time and feed it fresh water and flour so that the organisms in there are happy and well fed.
If they go hungry they create a lot of acid and this makes a hard to work with starter.
However if you don’t want to discard it, once your starter is on day 3 or so you can use it in discard recipes.
Hope that makes sense!
I have started a white and a whole meal starter (day 3) my white is starting to bubble and rise up the jar, the brown isn’t, is that normal?
Heya yup that’s totally normal, at day 3 the bacteria and yeasts are slowly still working their way up to colonising the flour. The fact that one starter is showing activity just means more bacteria were present on that initial flour. Give it time and the wholemeal starter will catch up ☺️
Hello There,
FIRSTLY: Thank you for your wonderful recipe and instructions, like others I’ve recently been battling to find yeast (and flour), so thought now would be the perfect time to start that sourdough I’ve always wanted to try. Additionally I really appreciate a recipe from New Zealand!!!!!!
SECONDLY: Is discarding half the starter only for size and feeding purposes? In other words could I just keep feeding a compounding starter and end up with a huge starter without discarding? Or could I start small, or really small, and avoid discarding as I continue feeding? In short: to avoid discarding could I start a starter with say (for example) 12.5 g and then feed 25g, then feed 50g and so on and so on?
Thank you for your time, keep well and stay safe,
Kia Kaha.
Hey! That’s awesome you’re giving sourdough a go!
I wouldn’t start with compounding the starter as it will quickly become too big, even if starting really small.
However, you can absolutely start with really small amounts! Your suggested amounts would work very well, it’s just about staying consistent.:)
Good luck and have fun!
I put the discard in another jar and started a second jar and continue doing so, that way if one fails I have a backup , also can gift the extra to a friend
I love this article. I’ve been trying to find yeast in the shops but not having any luck. I’m definitely going to try this. You say when making your starter to use 50 g, can it be more? ie, 100g or one cup etc. Thanks Betina
It can be more but you’re doing to be discarding a fair bit so that’s why most people would prefer to keep the amount small.
If you do change the amounts, just keep the consistent with weight, 100g as opposed to 1 cup, because 1 cup flour is going to weight differently to 1 cup starter
Hi, on day 7 of the starter and it has not grew at all. It is bubbling though. Should I feed it more?
Thank you
Just continue with the 1:1:1 feeds 😊
I’ve been feeding my starter for 10 days & it has a few holes in top & smells sour but hasn’t increased in size at all in 8hrs after a 1:2:2 feed. I’m not sure what I’m doing wrong. It looks nothing like your picture on the tab for this post that has nice bubbles all the way through… should I discard & start again?
Hey, the 10 days is just a guide and some starters take longer than others.
I wouldn’t do the 1:2:2 test until my starter is doubling easily within 4-5 hours when being fed at 1:1:1.
I would wait 24 hours now and go back to discarding and feeding it 1:1:1 and wait for it to double. Once it doubles within 4-5 hours, you can switch to 12 hourly feeds of 1:1:1, and once that doubles within 4-5 hours it should be good to undergo the 1:2:2 test.
Do check that your temp for your starter is not too hot or too cold, between 21-25 degrees Celsius is good. Too hot will also slow a starter, as well as too cold.
But apart from that patience is key.
The pictured starter on my photo is what it will look like when properly active, when it can easily double, if not triple a 1:2:2 feed.
It’ll get there!
Thanks for the recipe and I have just started my Starter but 50gms flour and 50gms water made quite a gluggy mix not liquidy at all. Is that right? What consistency would you say it is?
Yup like a thick muffin batter ☺️. As the starter gets going, acid will be produced which will start making it runnier
If my starter has doubled in size within 5 hours of the feed on day 3 do I need to be feeding it less?
Nope just keep feeding it ☺️
How many actual weeks can you leave the starter sealed in the fridge? Do you only have to feed it the one time before putting it in the fridge? Or can I leave it in the fridge for 2-3 weeks without feeding it again? Thanks, G
Hey once it’s properly active, you can feed it 1:2:2 and it will last a 2-3 weeks in the fridge no problem 😊
Hi Elien, thanks for this site and your very clear instructions. I’m on day 4 but I cheated a little by adding a bit of yeasty water at the beginning, so the starter seems quite active already, I’m leaving it overnight and feeding every 24 hours, but I notice it’s quite liquid underneath and like chewing gum on top before I feed it again. I guess that’s the sign it’s hungry. When I mix it up (before feeding) it becomes quite runny but also stretchy and gelatinous, like egg white almost – is that normal?
Heya Kay, Im sorry but as I’ve never added yeast water to my starter I can’t really trouble shoot what’s going on with your one or if that has affected it
No worries. I have continued to feed it and look after it as per your instructions and now it is thick and bubbly and I’m baking with it, so thanks! I have visited other sites where they use a little commercial yeast in their starter to speed up the process and they say that after a while the wild yeasts will outcompete the one you started with, for that distinctive tangy sourdough flavour.
Hello! Thanks for all the info! It looks as if my starter more than doubled at some point but it had “fallen” back to its starting level. Is it ready to be fed and stored or fed and leave out still? Thanks!
Hey Alie, have you tried the 1:2:2 test? If it rises within 6-8 hours after a feeding of that it’s good to go. You can then feed it and keep it in the fridge, though you’ll do no harm if you keep leaving it out and feeding it. The more time it has to grow, the better your starter will be .
Hi my sour dough has been going well up to day 4 , then I had it o bench and noticed kids had moved it it was in direct sunlight for a few hours . since then I’ve been discarding half and feeding it. Ones on day 8 and obesity on day 7 but they are not rising after a feed at all. They have bubbles always but not rising . what should I do
Hey don’t worry the sun didn’t ruin it. Just keep feeding it regularly, but stick to the 1:1:1 ratio of equal weights of starter, water and flour. Not just discarding half ☺️. It’ll get there!
Is it OK to collect/combine multiple days worth of discard in order to have enough to use in a recipe? For example, A KAF sourdough pancake recipe calls for 1 cup of discard but I think I’ll only get ~50g of discard each day, if I’m understanding your instructions … which I’m not entirely sure that I am. Newbie outed!
Hey yup you can combine your discards in a separate container for discard recipes ☺️
Hey Elien – to maintain the starter, do you only store it in the fridge if not using every day? If using every day do you just feed it & leave it out? And if using from the fridge does it take longer to activate because it’s cold when you start the 1:2:2 process? Initially my dough was working well but I’m now finding it quite wet & sticky for the fold & coil process & I can’t figure out why. Thanks Adelle
Hey I store mine in the fridge after using it even with baking every day because it’s such an established starter now and not much slows it down. If you’re still building your starter up, keeping it out on the bench and feeding it regularly will help establish it more. If it’s a cold day when I feed my starter, I’ll pop it in a warm spot and then it doubles well within the time frame, even though it had been in the fridge.
Thank you! I think mine might be too acidic now. How do you reduce the acidity?
By keeping the seed starter amount small when feeding it fresh flour and water ☺️
I’m going to give this a go, but I’ve never baked bread before so will see how it goes. When I’m making the starter, should I seal the jar with a lid or just cover it with a cloth?
Cover with a cloth or a loosely balanced lid 😊
So the sourdough recipe I found asks for 250g starter, is this starter going to be enough or will I need to make double the 50g daily?
Heya,
How much starter your future recipe needs isn’t important at this stage. You need to create an active seed starter first, following the steps and checking that it’s properly ready. That’s what this recipe is for, and that’s what takes around 10 days to set up.
Once that’s done, you can feed your seed starter enough fresh flour and water to bulk it out to however much you need for your recipe, and always keep a little bit left over to feed and use the next time. 🙂
If you have a look at this recipe, you’ll see how I bulk out my seed starter so I have enough for bread: https://homegrownhappiness.com/homemade-sourdough-step-by-step/
Hi! thanks for this info! Question: can i use different flours to feed my starter? eg: say i start with rye for the first week till my starter is going strong, then I swap to bread flour/plain flour? (I’m thinking this would save costs as rye is more expensive than plain flour) and if all I’m doing is feeding it to keep it alive, then it really doesn’t matter what flour I use?
Hey yup you can absolutely do that 😊
I feed my sourdough starter and after a night, it starts separating with water on top(hungry), but it hasn’t increased at all. Does it still mean it’s hungry? Should I discard the liquid before feeding it? I’ve been mixing it in before feeding it. Bubbles are at a minimum too.
Hey I have some details already in the post about what to do if it splits. 😊 you can stir in the liquid or pour it off, it doesn’t matter too much.
Hey, my starter was doubling after 24 hour feeds so I switched to 12 hour feeds and now it’s hardly rising after 3 days (temperature monitored). Was it to early to start increased feeding?
Yup too early, just wait now for it to catch up (It will). Only switch to 12 hourly feeding when it doubles quickly within the first 5-6 of feeding.
Thanks! So to be clear should o go back to feeding once per day until it rises within 5-6 hours then switch to feeding twice per day?
Yup exactly that ☺️
Hello again Elien – I’m struggling a little with my starter. I have made 2 loaves over the past couple of weeks, but each time the starter hadn’t quite doubled when I made my bread (8 hours after I fed it 1:2:2). Because I had made my autolyse at the same time as I fed it, I felt I had to make the bread so I didn’t waste the autolyse. I notice in your comment to Bree yesterday, that you shouldn’t switch to 12-hourly feeding until it doubles within 5-6 hours of feeding. Is it OK then just to keep feeding it every 24 hours, even if has doubled after 8 or 9 hours? I have been feeding it when it has doubled and maybe that is where I’m going wrong.
Hey you are probably over feeding it a bit and it’s not having a chance to catch up. I would go back to 1:1:1 feeds 12 hourly until it’s ready ☺️. You can bake with that too, it doesn’t have to be 1:2:2. Just make sure to use it before it peaks and is too acidic.
I also wouldn’t worry about over doing the autolyse. I often start mine the night before. A long autolyse is great!
Thanks so much for that Elien – So just to be sure (because I’m super keen to make this a regular thing in my life): So long as it’s doubling within 5-6 hours of feeding I can continue to feed it 1:1:1 every 12 hours. So long as it’s doing that, I can use it to make my bread at any time to suit my schedule. I take it the peak is when it’s used all the food and starts to deflate (and becomes acidic and grumpy!) because it needs feeding again? Is there a sign when it is about to peak, or is that a matter of getting to know your starter?
yup that’s right. And if it would start rising and peaking too quickly, that’s when you could change the ratios to 1:2:2, to slow it down if need be, so it can fit within your schedule.
It is a matter of knowing your own starter to gauge that, but yes when it has peaked is when it starts to collapse on itself. It also can be quite runny at that stage. How quickly that happens depends on the temperature of your room as well as the ratio it is fed at.
Thanks so much for this awesome blog post Elien. Really easy to follow. Will be recommending your blog post to anyone wanting to start their own sourdough starter 🙂
Hi! I just want to ask if i can start a starter using just Bread Flour? That’s the only one i have aside from APF but it’s bleached. Also, when you do a 2nd feed every 12 hours, do you also discard something or just feed? Thanks.
Heya you could use bleached flour if that’s all you’ve got but I think it may take a bit longer to establish itself since it probably won’t have as many wild yeasts present as on unbleached flour. And the second feed every 12 hours you do discard, it’s still 1:1:1. Only on day 1 and 2 is there no discard 😊
Thanks! That clears it up. As a follow up question, if i do not want to maintain a “discard jar” or if plan to bake bread maybe once of twice a week only, can i follow the “seed” method for my starter? I read it somewhere that you can take some “seed” starter from the “mother” starter (ex. 50 grams), put the “mother” back in the fridge and feed the “seed” to be your new starter so as not to have discards? If so, how long do i feed the “seed” before i can bake with it? Do i just do the 1:2:2 ratio and if it passes, i can go ahead and use it or do i have to strengthen my seed starter for a couple days?
You are awesome thank you from Calif you should write a booklet. Your explanations are very helpful
Thank you very much! 😄
This is my first time making bread and I hope its not a disaster! I do have one question (I know not a good sign since its the first direction!) I don’t have a food scale…would this be 6 tablespoons flour to 6 tablespoons of water?? When I do the conversions it states 50grams of water is 3.38 tablespoons but this cant be correct as it is way too dry??
Hey use the conversion, that’s correct. You want equal weights flour and water and water is nearly twice the weight of the flour, so it makes sense it needs less tablespoons worth 😊. The consistency should be of a thick muffin batter when mixed
Hi. I’ve set up my starter and it’s been fine and I’ve been making bread for the past 7 weeks, I feed me starter 1:2:2 and pop into fridge. This last week it’s not risen at all in the fridge and despite taking it out and referring it and leaving in in the hot water cupboard (stable in range temp) it hasn’t risen at all in 3 hours. Do you think it’s gotten contaminated? It still has bubbles through but it’s not rising. TIa
No I don’t think it’s contaminated. I would leave it on the bench for a couple of days and switch to feeding it 1:1:1 twice daily.
Hi, this is an awsome guide, thank you! I am in the beginning of the process. However, mistakenly I used flour/water 2/1. How can I continue with the feeding? Thanks for your help.
Hey that’s no worries, just continue from now on with a 1:1:1 ratio ☺️
great . thanks for the prompt reply.
Hi, second day and my starter has more than doubled. When I fed flour/water 1/1, water separated atat the bottom. What should I do?
Hi, I am still having problem with water separation on the third day and its only a bit bubble on the surface, the bottom is only flour. appreciate your tip.
Hey did you read through my FAQs in this post? There’s a question I’ve answered about water on the top of your starter”
If I have 2 different sourdough starters, can I keep their discards together and use them together for other bakes or should I keep them separate?
You can keep the discards together 😊
Can I use a plastic food grade container instead of glass?
Yup 😊
Hi Ellen, my starter 2 day rise up but the 3rd day was watery n fell..I feed my starter but forgot to discard the water from top. Today is 5th day I have been feeding it everyday but it’s not risen like it did the 1st 2 days. Is my started gone bad or it can still rise n be used . Please advise. This was my 1st time making a starter for sour dough.
Thanks Ritika
Just keep feeding and discarding 😊 day 5 is still very early
My starter is on day 10. I’m using unbleached AP flour. I’m not seeing any rise at all yet. I’ve beed through all the trouble shooting checklists: water temp, room temp, type of water. Do I just keep going?
Second, at some point can I add in a different flour into my starter? I was wondering particularly about whole wheat or rye. Is it ok to add a mix, or should I just stick with my original AP flour?
If you’ve been through all the troubleshooting, I would just keep going. If you do want to to add some different flours, it’s okay to add those to the mix and see if it makes a difference.
Hi, day 10 I fed my starter 1:2:2 at 4pm and have left it overnight? Has it passed it’s peak now? Do I feed it 1:2:2 again and wait another 6-8hrs or go back to 1:1:1 and if so for how long?
Hi Loretta, if you saw it double easily within 6-8 hours it passes the test. Try 1:2:2 again during the day when you can see the rise.
I have tried for three years to cultivate a sourdough starter with dismal results. Until now! I followed your recipe and tips and finally have an active starter. Through trial and error mine does best and really becomes active at around 94 degrees F. So, I keep it in my oven with the warmer on low which turns out to be perfect. That’s really a good thing to need a warmer temperature since I live in Texas. Thank you so much for the recipe and guide. Happy sourdough baking!
So glad to hear you liked the guide! 🙂 Happy baking!
I don’t understand what 1.1.1 means 🤪sorry
1 equal part starter, 1 equal part water 1 equal part flour, measured in weight
How long can you maintain a starter in the fridge?
Hey once a starter is properly active, you can keep it in the fridge for a long time. If I go away for more than 2 weeks, I’d feed it 1:3:3 and it can then stay in the fridge for ages. However, when you want to use it again after such a long time, it pays to feed it 1:1:1 at room temperature a couple of times a day until it is nice and active again, and to reduce the acid build up.
I haven’t fed my starter for a few weeks but its been in the fridge. When i took it out to finally feed it there was a lot of water on top. I think i should just spill the water out and feed it like normal again and continue until its back to normal? Or have I killed it?
You’ve not killed it, it’s just very hungry. Tip off the liquid and give it a few twice daily feeds to get it back up to scratch ☺️
Do you have a recipe for sourdough bread that you recommend if we are to succeed in a starter?
Hey I sure do. It is this recipe here 🙂
Hi Elien, thanks for your wonderful recipes! Just wondering, if I’m giving my starter a regular feed (1:2:2 and not planning to bake), should I put it in the fridge right after feeding, or should I wait till it’s reached its peak before doing so? Thanks!
Hey Anna, you can just pop it straight in the fridge after feeding it 🙂
My starter has almost like a dried texture on top. Any idea what this could be from? My starter is 6 days old.
Hey is it in a very warm place or the sun? You could try balancing a lid on the jar instead of a cloth to keep it a little more humid in there. 😊
Hi there,
Im on day 4 and things are looking good. Just wondering how you get a decent amount of discard going – can I collect the discard in a seperate jar over a few days and keep in the fridge? Ive started a batch of pancakes today but ive had to divide the Recipe by 4.
Hope that make sense I am a definite newbie
Hey Ali, you can definitely save up all your discard in one jar so that you accumulate a decent amount 🙂
Awesome thank you! How exciting, I feel so wholesome 😬 its like having a third child
Hi Elien!
My starter is about a month old, I have successfully baked a few loaves with it, but something I’ve noticed lately is that it is runnier than before. Is this normal? This is what I do before using it
I take the starter from the fridge the day before in the evening. When it’s come to room temp (after 4 hours more or less) I feed it in a 1:1:1 ratio. Then I use it the next morning.
Today I’ve made a loaf with it and it came out pretty well, and also today I tried to make your croissants (Hope they come out right!) but I’m afraid they won’t come out as expected because of my runny starter. I guess I have to bake them first and see.
Please let me know how can I fix this if you think it’s necessary. Love your content!
Hey. 🙂 it sounds like your starter is too acidic and likely exhausted. 1:1:1 is a very small ratio for an overnight feed. Over that time it’s likely the yeast have run out of food. I would use either a 1:2:2 feed (if the room is cool overnight), or even 1:3:3 if the room temperature is warm overnight.
Hello
what type of flour are you using?
best
Hi! I was wondering can you save the discards and use them at other times?
Yup absolutely 🙂
Hi, can the discards be used before day 10?
Hey yup it should be acidic enough to use in discard recipes. Though if you want to test it, take a small amount and stir in a sprinkle of baking soda. If it aerates the starter then you know it’s acidic ☺️
On day 3 within 4 hours of sitting my starter already has a thin layer of water…is this normal?
Do you know if gluten free flour works, too? Is all purpose okay?
Thank you!
Hi! I’ve made your starter up to day 10 and have used the discard in pizza and crumpets – both fantastic, so thank you. Now it’s going well, can you explain the the process about refrigerating a little bit more? I read your notes above, but I was wondering how often (E.g. once a week?) and how much to feed it each time (is it then 1:2:2 every time?) Do you then carry on discarding? Thank you for sharing! 🙂
Hey, I feed it 1:2:2 before putting in the fridge and it can stay in there for a while. If I use it within a couple of days I’ll just feed it 1:2:2 when I next use it. However if it’s been in the fridge for a longer time and I see it has split and become runny ill feed it maybe twice before using it. Once 1:1:1 to get it active again, and then 1:2:2 to use it. Hope that makes sense!
Hi
I’m in the South Island of NZ and want to start a starter. The daytime temperatures are around 18-20 degrees and drop at night.
How can I maintain a warm environment for the starter?
Thanks
Hey you could pop the starter jar in a freezer bag along with some jars of boiled water to keep it warm in there 🙂
Hi! Question…i dehydrated my aged starter bc we were going south for a few winter months. When i tried to reactivate it on our return (as per recipe instructions) it never doubled…only very minor rising so i have continued to feed and just using as discard. It smells good and sour but never rises much. I am afraid to try bread. Any suggestions? Thank-you, Helene
Hey Helene, I wouldn’t use it for bread yet until you get decent rising. You could try some extra 1:1:1 feeds during the day to get it active again.
when to feed it? what if I missed feed for the day?
I’m into day 11 now of 1:1:1 and although i have some bubbles starting to form, it definitely isn’t anywhere near doubling in volume. I am also getting a skin forming on the top some days which i remove (or should i be leaving this?)
Thanks
Yeah remove that, it sounds like the top is drying out if it’s forming skin. I’m not sure what you’re covering it with but it might need a loose lid. I would suggest feeding it in the morning in a clean jar with a rubber band so you clearly see the rise during the day (if feeding at night sometimes you might miss the rise and fall of the starter.) If it is rising, albeit slowly, just continue what you are doing with 1:1:1 feeds. You could also switch to 12 hourly feeds and see if that helps. Unfortunately starters can differ in how long they take for all sorts of reasons so it can be a bit of trial and error!
HI there, i have been following your starter recipe and enjoying seeing if I can make sourdough. It is day 13 now and I have not seen my starter rise really at all. It gets a couple of little bubbles in the very top, but that is all. I have fed it 1:1:1, once a day until about day 8, and then tried 1:1:1 twice a day, but no change. So from day 11 I went back to once a day. I also tried it in the oven at 35 degrees, but still nothing. Most days I fill a thermos with hot water and sit it next to it to stay warm. I have tried adding some wholemeal rye flour, and mixing it with my hands (to add some bacteria), all with no effect. Any suggestions? Should I start again? Thank you.
Hey Justine, I would probably start again. Perhaps it could be your water that affecting the starter? It’s hard to know exactly what’s wrong, often trial and error is needed. You could try with some filtered water, or boiled and cooled water and see if that makes a difference.
I will try that. I am just in central Auckland..
Hi, thought I’d say that your water idea worked. I have used cooled, boiled water and it is working very well. Thank you!
That’s awesome!! I’m so glad!
When the starter is ready, how much of it is needed for a loaf of bread? Also I assume 50g can be kept back to continue growing for future use?
How much is needed will depend on the recipe you’re using, and you can create as much as you need with only a small bit of seed starter, just by feeding it 1:1:1 or, 1:2:2 or even 1:3:3 (starter:flour:water). Yes you always keep a little bit to feed for next time.
Do you have a favourite bread flour? I’m confused about which one to choose for starter AND for making the bread
Hi Elien,
Thank you for this easy, well explained sourdough starter recipe.
So I tried this recipe twice. The first time I failed to.use filtered water each time so I did it a second time. However, I found the same results. The first and second day showed bubbling and doubling of starter. But by day 3 and 4 there was no bubbling and the water had separated from the flour. And this trend continued for a week.
Any idea what would have gone wrong?
Thank you,
Tahiyya
Hey, don’t give up with that starter just yet. Keep feeding it. Is it splitting or is there just a layer of liquid on the top? If it keeps doing that you might try an extra feeding
Elian,
I’ve been making your sourdough for over a year with much success. Within the last couple of months, I don’t seem to be getting as much lift out of my starter as I used to. I read through all your troubleshooting stuff.
This stood out to me. “If it doesn’t double or triple within around 6 hours, it will take a bit longer. Continue twice feeding 1:1:1 and try the test again later on.”
My starter used to double within the four-hour window but now takes longer. It is colder in the house. So I thought that was the issue. When you say, “continue twice feeding” do you mean to feed the starter twice per day?
Hey Alex! That test is for a newly established starter. And when I say twice feeding, I do mean twice per 24 hour day, or once every 12 hours.
But for yours, it sounds like temperature could definitely be the issue! You can feed your starter the same way you always do but create a warmer spot for it. If it gets very cold at my place I put my starter jar in a bowl of warm water, that helps a lot!
Once you have a mature starter and it’s being stored in the fridge, how often should you feed it?
Hey if you feed it before it goes in the fridge and use it weekly, you don’t need to feed it extra in between while it’s in the fridge. Though, once you’re ready to bake with it again, give it a feed or two before using it again to get it nice and active.
I am brand new at sourdough baking and in the beginning stages of my starter. Could you tell me what 1:2:2 ratio in actual grams?
Whatever amount of starter you use in grams, use twice the amount of flour and water, also in grams. Eg, 20g starter, 40g flour, 40g water
I started with dark rye and bottled water, no luck after weeks. Changed to unbleached flour and bottled water.More runny but still no luck. 25gm starter and 25gm flour 25 gm water. Discard half every day for 10 days now. Temp constant at 27c in Brod and Taylor proofing box.Upon stirring bubbles are visible but unlike your thriving picture of vibrant bubbles.
Hey Rosalind, you say you discard half every day. That’s not the same as this recipe which instead uses a 1:1:1 daily feeding. Discarding half each day will give you a bigger build-up and you could be underfeeding your starter quite a bit. It’s best to take 25g each day and feed that 25g flour and 25 water. Once it starts rising within 4-6 hours, you can increase the feedings to 1:2:2, or feed it 1:1:1 twice daily. Good luck!
I made flour sourdough for decades. Now I must be gluten free. Can you use this recipe for a sorghum flour starter? I’d love to make a sandwich or piece of toast again.
Hey Sharon, I’m afraid I don’t know! I have no experience with gluten-free starters.
Hi, I started making sourdough using your recipe at the start of Covid in 2020. I have had no fails and prep a loaf each Friday and bake Saturday morning. When my family is loosing enthusiasm for eating it, I gift loaves to my friends who are most appreciative and complimentary, even stating mine is better than the local artisan producers!! Thanks for the thorough method and measurements! I love the whole process!
This is such a lovely review to read Diana! I’m so pleased you’ve been enjoying your sourdough journey so much and thank you for using my recipes!! 😀
How long will a sourdough starter last for ? Does it just continue going if you still feed it daily ?
It can be fed less if stored in the fridge and last forever if stored properly. Here’s more information about
sourdough starter maintenance
🙂
Hello! Questions! This may have been addresses already, but here we go. Im on day 7 of my sourdough starter. It’s hasn’t doubled In size or grown at all since about day 3 but it smells sour and has a lot of bubbles. More of the consistency of pancake batter. Is this normal would you say? I’m feeding it a 1:1:1 ratio of 50g every 24 hoursish. The consistency is thicker after a feeding. Filtered water, King Arthur unbleached bread flour, weighing out the ingredients and putting in a new glass jar daily. Advice?
Hey Sheri, what temperature are you keeping the sourdough starter at? It could be a bit too cool maybe.
I’m not sure, it’s by my oven , not too cool in here. We keep the house at 72 degrees. Live in Lincoln , Nebraska
That’s a good temperature :). I would just keep feeding it as you have been. 7 days is still quite early, and some starters take longer than others.