The Best Homemade Sourdough Bagels Recipe
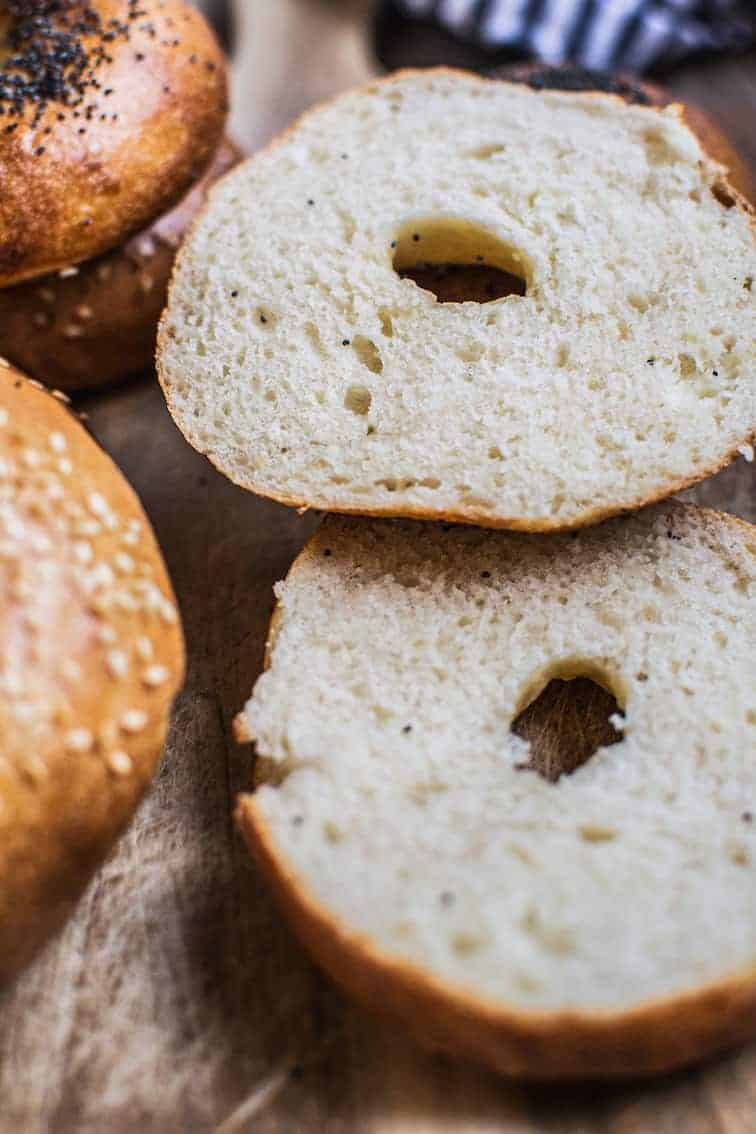
These sourdough bagels are delicious and thick with that iconic chewy crust that you get with New York-style bagels.
This sourdough bagel recipe is super easy to make. Read on to make the perfect bagel recipe with step-by-step instructions or see the video showing the whole process to make homemade sourdough bagels.
Don’t have a sourdough starter yet to make this recipe? Check out my sourdough starter guide to get an active sourdough starter ready for baking!
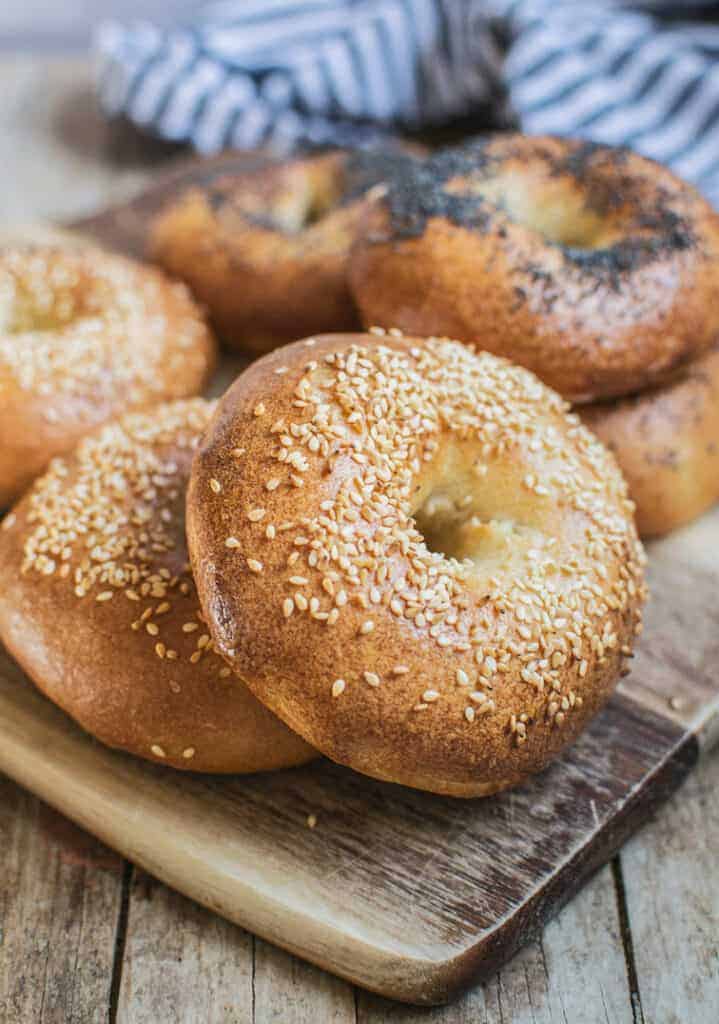
I fell in love with these New York-style sourdough bagels from the first time I made them. They’re so flavourful and I was so happy with how they turned out! Unlike dinner rolls which have a light and fluffy texture, New York-style sourdough bagels are denser with a chewy texture.
A strong flour with a high protein content is needed to develop the structure and give that texture.
The bagel dough
The dough for these sourdough bagels is a lean and stiff dough, with a low hydration level (around 56%) unlike many of my other sourdough recipes like sourdough brioche or sourdough cinnamon raisin bread.
It means it’s easy to knead it by hand, but it needs thorough working! A good 10 minutes of gluten development is best.
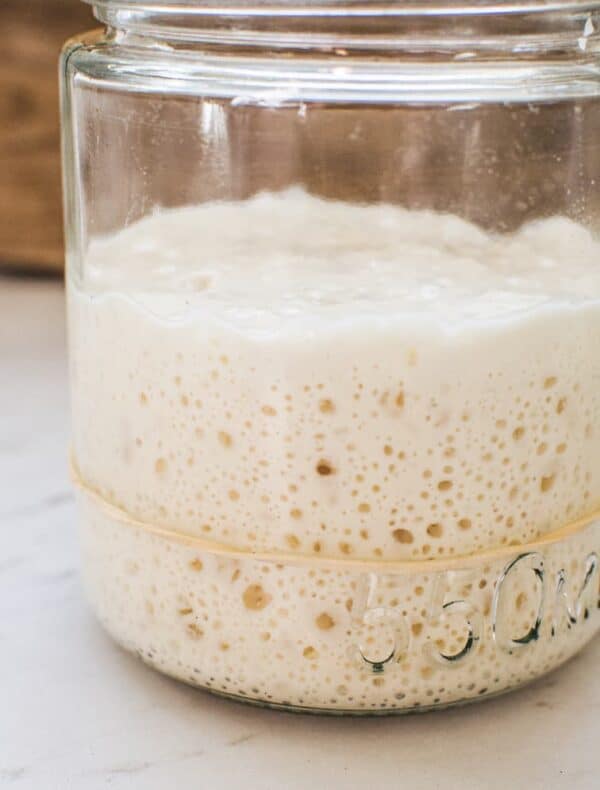
The starter
This sourdough bagels recipe needs 150g of active, fed starter. I feed the starter for this recipe at a ratio of 1:1:1 (equal weights flour, water, and starter) and expect it to double within 4 hours at a room temperature of around 21-23°C.
I use it once it has doubled or tripled but before it passes the peak and collapses.
My starter is always getting refreshed so it has low acid content and the wild yeast colonies can thrive. This is crucial to all my sourdough bread recipes as an acidic starter can break down the proteins in the gluten. You can avoid creating an acidic starter by refreshing it often, using it before it passes its peak, and keeping the seed starter amount small.
If you want to know more about sourdough starters then check out my sourdough starter guide and also my sourdough troubleshooting guide.
Ingredients
This bagel dough is a lean dough with minimal ingredients. The full ingredient amounts are in the recipe card at the bottom of this post. To make these sourdough bagels you need –
- Strong bread flour –
A good bagel has a decent amount of toothsome chew to it. Flour with a higher protein level is required for the chewy interior – a level between 11-13%. Some all-purpose flours have a protein level of over 11% in which case you can use that sort of all-purpose flour for homemade bagels. A higher protein level will give the best chewy bagel results.
It’s best to check the protein level of each flour rather than going by the name of the flour. I have not tested this recipe with whole wheat flour.
- Sourdough starter – An active starter.
- Salt
- Brown sugar
- Water
- Honey (for poaching the bagels)
- Sesame seeds, poppy seeds or bagel seasoning for topping
Step by step
Step 1 –In the morning feed your sourdough starter.
Step 2 – Once the starter has doubled and is ready to go, add it to a large mixing bowl with the rest of the dough ingredients and use a fork to combine it into a thick and rough dough.
Tip the dough onto a lightly floured surface and knead it until it is smooth and strong. For optimal gluten development, the dough needs to be worked and kneaded for around 10 minutes. Alternatively, mix the dough in a bowl of a stand mixer fitted with a dough hook attachment on low speed.
Step 3 –Once worked, place the ball of dough in a greased large bowl and cover with a damp towel, lid, compostable plastic wrap, or beeswax wrap to stop the dough from drying out. Let the dough proof in a warm spot until bulked out by around 50%
Cover the dough and place it in the fridge overnight.
The following day
Once the dough has chilled, remove it from the fridge and pull it from the bowl onto a clean work surface.
I use my dough scraper to cut the ball into 8 equal pieces (I guess these because I don’t mind my bagels a bit rustic, but weigh them on a kitchen scale if you like.)
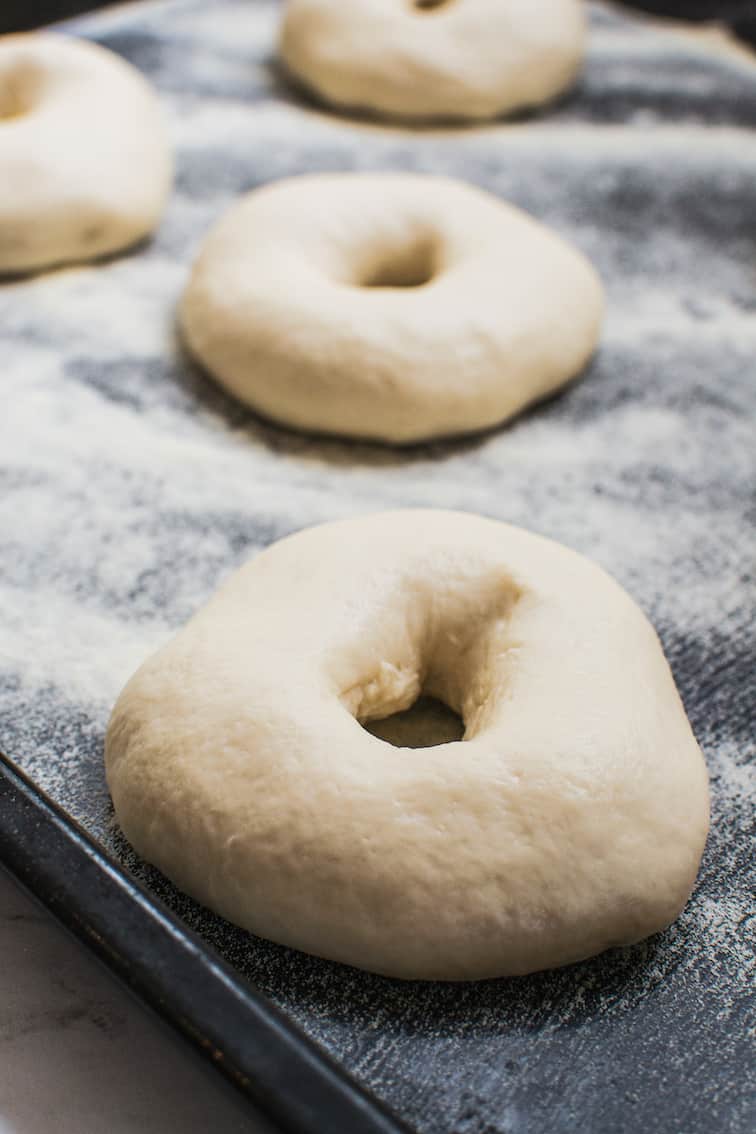
Shape each piece into a tight ball and rest them on the bench. Let these sit for 10-15 minutes whilst the glutens relax. Once they’ve relaxed, it’s time to give them their bagel shape.
- Grab a large baking sheet and generously dust it with semolina flour, or line it with parchment paper.
- Use your thumbs to make the hole in the middle of the dough ball and roll the dough ball around your thumbs and index fingers to widen the hole. Make the center hole quite wide because it will shrink back a bit as it rests. Then place it on the baking sheet and continue with the remaining dough balls.
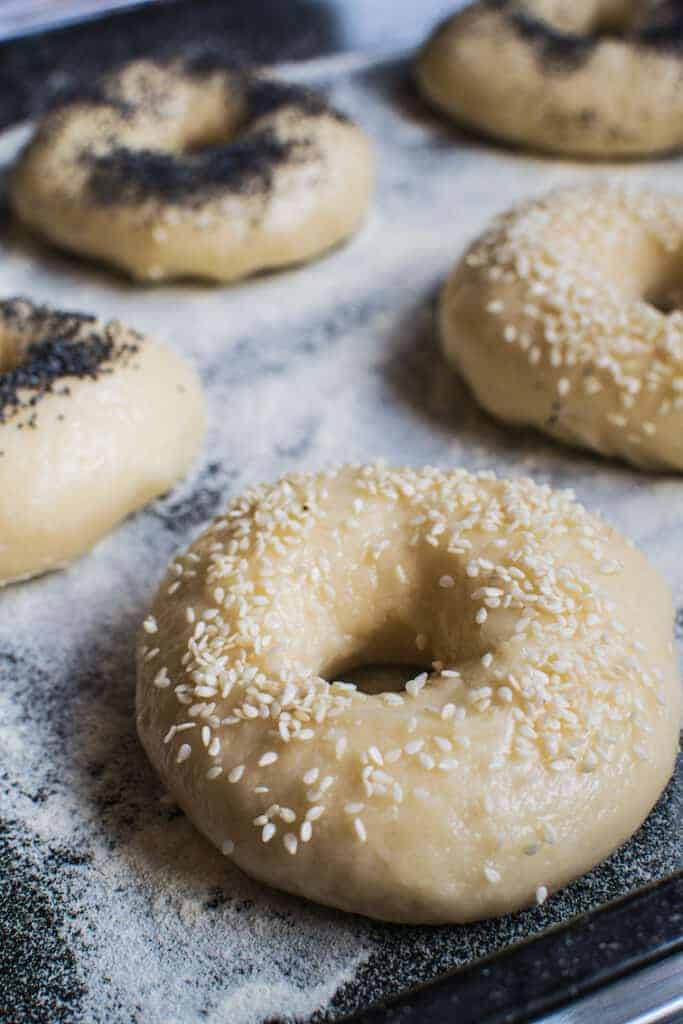
Let the shaped bagels proof at room temperature for the second time, for around 1-2 hours until lightly puffed.
Bring a large pot of water to the boil and preheat the oven to 220°C fan-bake, or 240°C regular oven.
Poaching bagels
Once the water is boiling, stir in a heaped tablespoon of honey. When you boil bagels in this honey water it is going to help set the chewy crust on the outside of the dough and give the bagels a golden sheen. This eliminates the need for egg wash. Trust me, it’s good!
Some bagel recipes use baking soda instead of honey to give the golden colour. I don’t because I think it gives the bagels a different flavour from baking soda. One that resembles soft pretzels. Try sourdough pretzels instead!
Dust off any excess flour off the bagels and drop them in the boiling water one at a time. If your pot is small, boil them in batches, but work quickly.
Let them poach in the water for 1 minute, flipping them after 30 seconds. Remove the bagels from the water using a slotted spoon.
Drain the boiled bagels on a wire rack and sprinkle over any seeds or bagel seasoning for toppings whilst they are still sticky from the water.
Baking the bagels
Generously flour a baking tray or cookie sheet with semolina flour or use parchment paper and gently place the bagels on it.
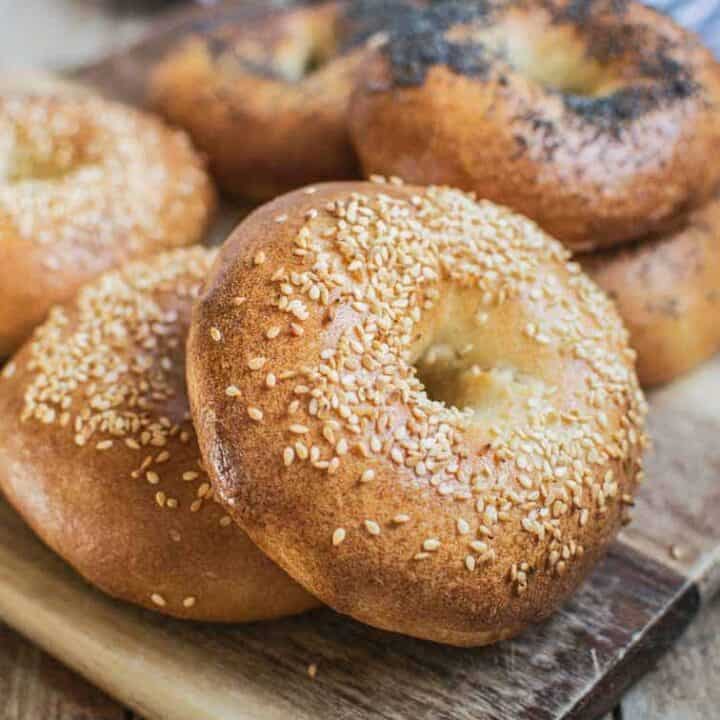
Bake them in the hot oven for 2-3 minutes before turning the oven down to 200°C. Bake for another 18-20 minutes until deep golden brown.
If they are baking unevenly, turn the oven tray around after 15 minutes of baking. Remove the baked bagels from the tray and let them cool on a cooling rack for 30 minutes before slicing.
Serving and storing
They are delicious when served fresh on the day, with cream cheese or avocado. When eating them on the following days they are best toasted.
Looking for regular yeast bagels? Check out this homemade bagel recipe.
Sourdough bagel FAQs
Some brands of all-purpose flour have a protein level that’s more than 11%. In this case, those brands of all-purpose could be used. However, a bread flour with higher protein levels will give the best chew.
If you make the initial holes too small when shaping the bagels, the dough will shrink back too much and you’ll lose the bagel holes.
Yes
Bagels are poached right before baking. This helps give them their iconic chewy golden crust.
Yes, if left too long the bagels can overproof and they can collapse. Bagels shouldn’t rise too much, just puff slightly before poaching.
Sourdough bagels freeze very well which will prolong their life. They can be thawed in a toaster, microwave, or low-temperature oven.
Spices can be added at the same time as the other ingredients. Larger additions such as dried fruits, nuts, or seeds can be added at the end of the kneading period.
Up to 36 hours.
Related recipes
Try my sourdough bread recipe, sourdough pretzels or sourdough croissants!
Sourdough Bagels
Delicious and thick New York-style bagels with that iconic chewy crust. They are easy to make and naturally leavened with sourdough starter.
Ingredients
Levain
- 50g sourdough starter
- 50g flour
- 50g water
Dough
- 450g strong all-purpose flour or bread flour , with a protein level of at least 11%
- 220g water
- 12g salt
- 12g sugar
For Boiling
- 1.5 litres water
- 1 Tbsp honey
For Topping
- Sesame and poppy seeds , optional
Instructions
Day 1
- Mix together the starter ingredients. Leave it to rise. It should at least double, if not triple within 4 hours (but not collapse). See the post for more information.
- Once the starter has risen, add it to a bowl along with the dough flour, water, sugar, and salt. Knead it together to make a ball, then tip it onto a clean bench.
- Knead the dough for 10 minutes to develop the gluten. If you get tired, take a break and let the dough sit, then come back to it after a few minutes.
- Once kneaded, place it in a greased bowl, cover the bowl with a plate and let it proof in a warm spot until bulked out by around 50%. If necessary, create a warm space by placing the dough in a turned-off oven next to a mug of boiled water.
- Place the bowl in the fridge to cold-proof overnight (a minimum of 10 hours.)
Day 2
- In the morning, pull the dough from the bowl and place it on a clean bench.
- Cut it into 6 or 8 even pieces.
- Shape each piece into a tight ball and let it sit and relax for 10-15 minutes. Take a large baking sheet and generously dust it with semolina flour, or line it with baking paper.
- Take a ball of dough and use your thumbs to make the hole in the middle of the dough ball and roll the dough ball around your thumbs to widen the hole.
- Place it on the baking sheet and continue with the rest of the dough balls. Let the bagels sit at room temperature for around 2 hours to slightly puff.
- When they have nearly finished proofing, bring a large pot of water to the boil and preheat the oven to 240°C.
- Once the water is boiling, stir in the tablespoon of honey.
- Drop the bagels in the water one at a time. If your pot is small, boil them in batches, but work quickly.
- Let them poach in the water for 1 minute, flipping them after 30 seconds.
- Drain the bagels on a rack and sprinkle over any seeds for toppings whilst they are still sticky from the water.
- Generously flour a baking tray with semolina flour or use baking paper and gently place the bagels on it.
- Place them in the oven and let them bake for 3 minutes before turning the one down to 200°C. Bake for another 18-20 minutes until deep golden brown.
- If they are baking unevenly, turn the oven tray around after 15 minutes of baking.
- Remove the baked bagels from the tray and let them cool and soften for 30 minutes before slicing.
Nutrition Information:
Yield: 8 Serving Size: 1 gramsAmount Per Serving: Calories: 330Total Fat: 1gSaturated Fat: 0gTrans Fat: 0gUnsaturated Fat: 1gCholesterol: 1mgSodium: 598mgCarbohydrates: 66gFiber: 3gSugar: 4gProtein: 12g