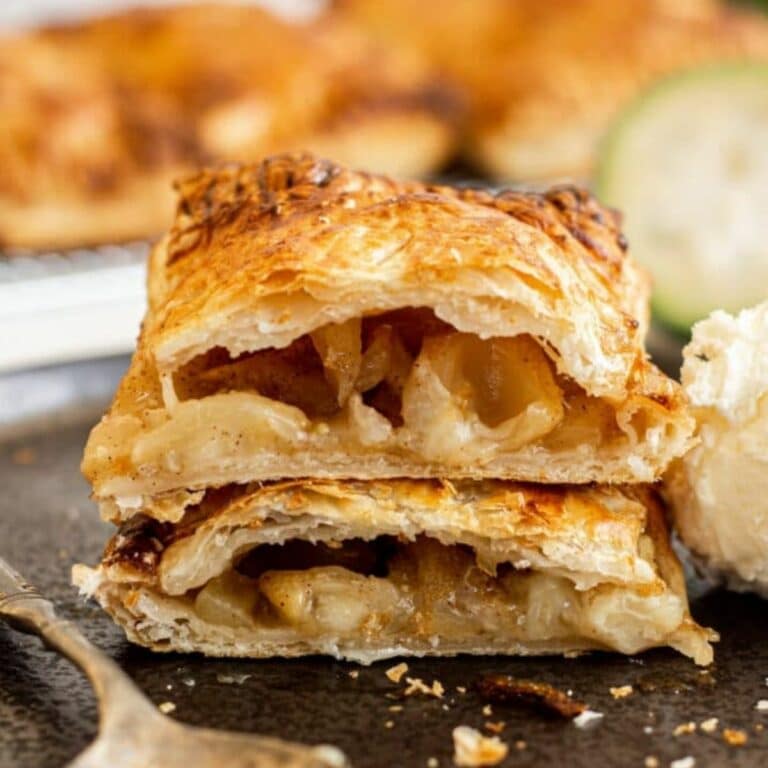
Sourdough Danish Pastries
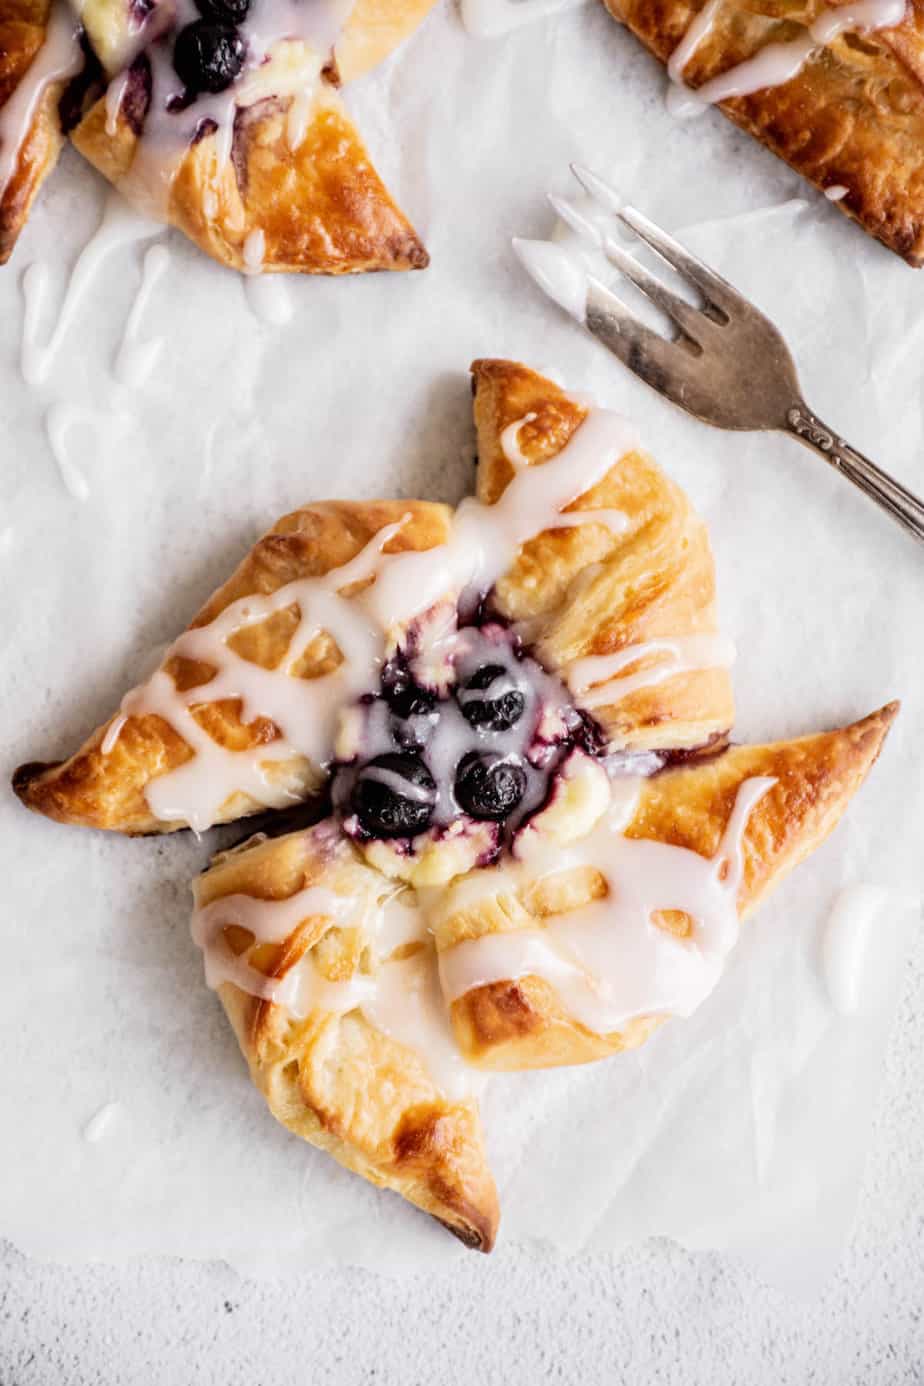
These sourdough danish pastries are buttery and flaky, topped with sweetened cream cheese and berries.

The dough in this sourdough pastry recipe is similar to my sourdough croissants but it’s more enriched, with milk, egg and an optional touch of fragrant cardamom.
Like the croissants, making sourdough Danish pastry is a drawn-out process. However, it’s not too difficult. I’ve changed the timings a little in this recipe, compared to the croissants, so you can do most of the steps in one day and then shape and bake the dough when you’re ready.
Note: If your room temperature is above 25°C / 77°F you may struggle to keep the dough and butter cool.
Ingredients
Find the ingredient amounts in the printable recipe card at the bottom of this post. Here is a run down of what you will need.
- Active sourdough starter
- All-purpose flour
- Water
- Milk
- Large egg
- Granulated sugar
- Ground cardamom
- Salt
- Unsalted butter
Method
In a large bowl, mix all the dough ingredients to form a sticky dough.
Tip it on the bench and knead it for 5 minutes, pushing it forward and pulling it back until it smoothens. Shape it into a ball and place it into a clean, greased bowl.
Cover the bowl and leave the dough to proof in a warm spot for 3 hours.
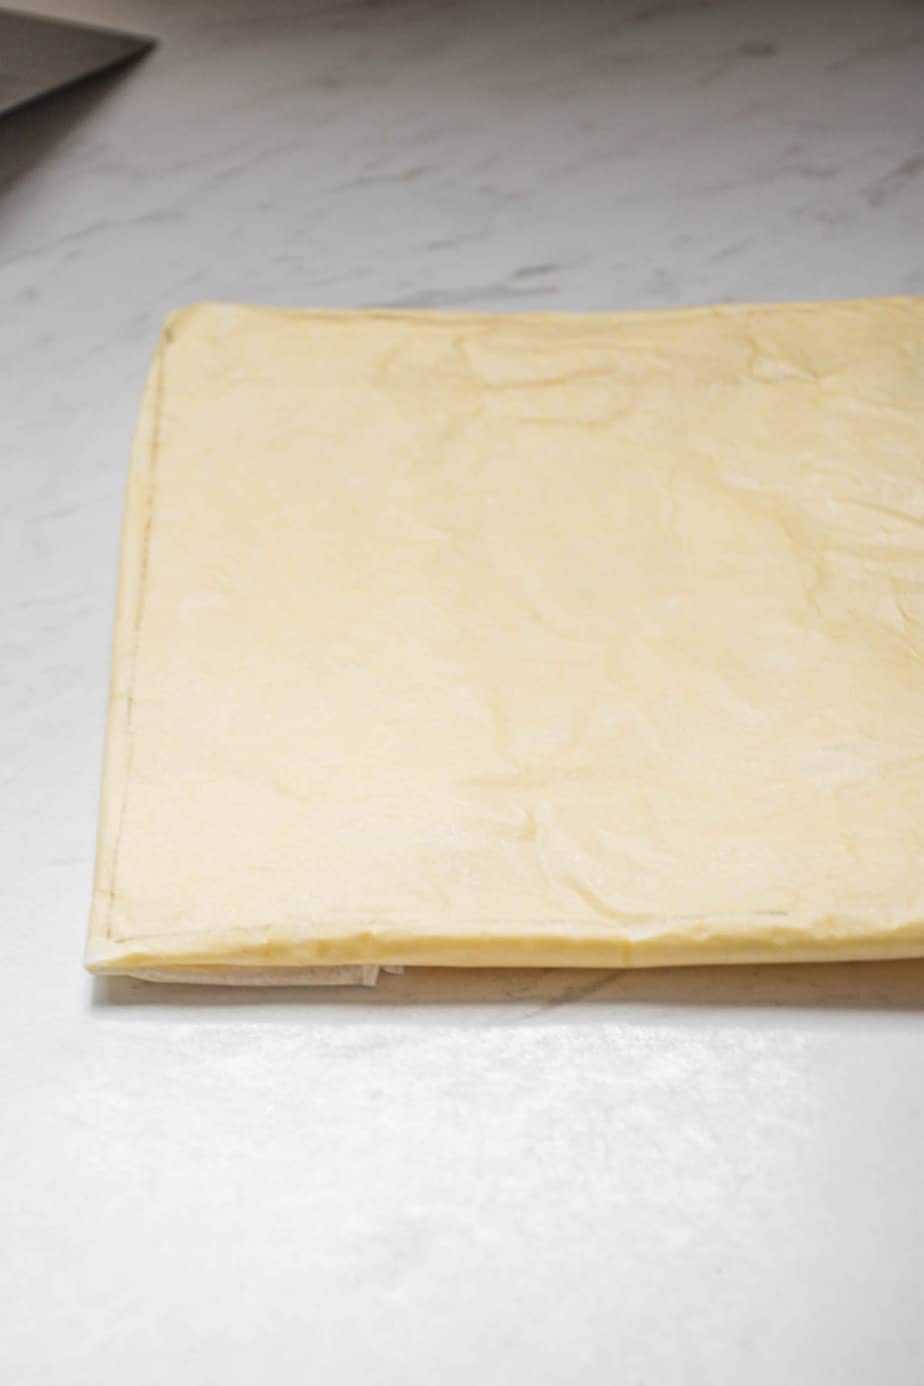
Butter packet
Beat the softened with a bit of flour to create a butter mixture that is nice and malleable. Place it on a sheet of parchment paper, then place a second sheet on top.
Roll this butter into a rectangle measuring 6×8 inches / 15x20cm. Once rolled, if the butter is squishy and starting to melt, place it in the refrigerator to firm up a bit. Later, this butter needs to be consistent with the dough, so you want it cool but still nice and pliable, not rock hard.
Rolling the pastries
After the dough has finished its 3 hour ferment, roll it out on a lightly floured bench into a 20x40cm(8x16inch) rectangle.
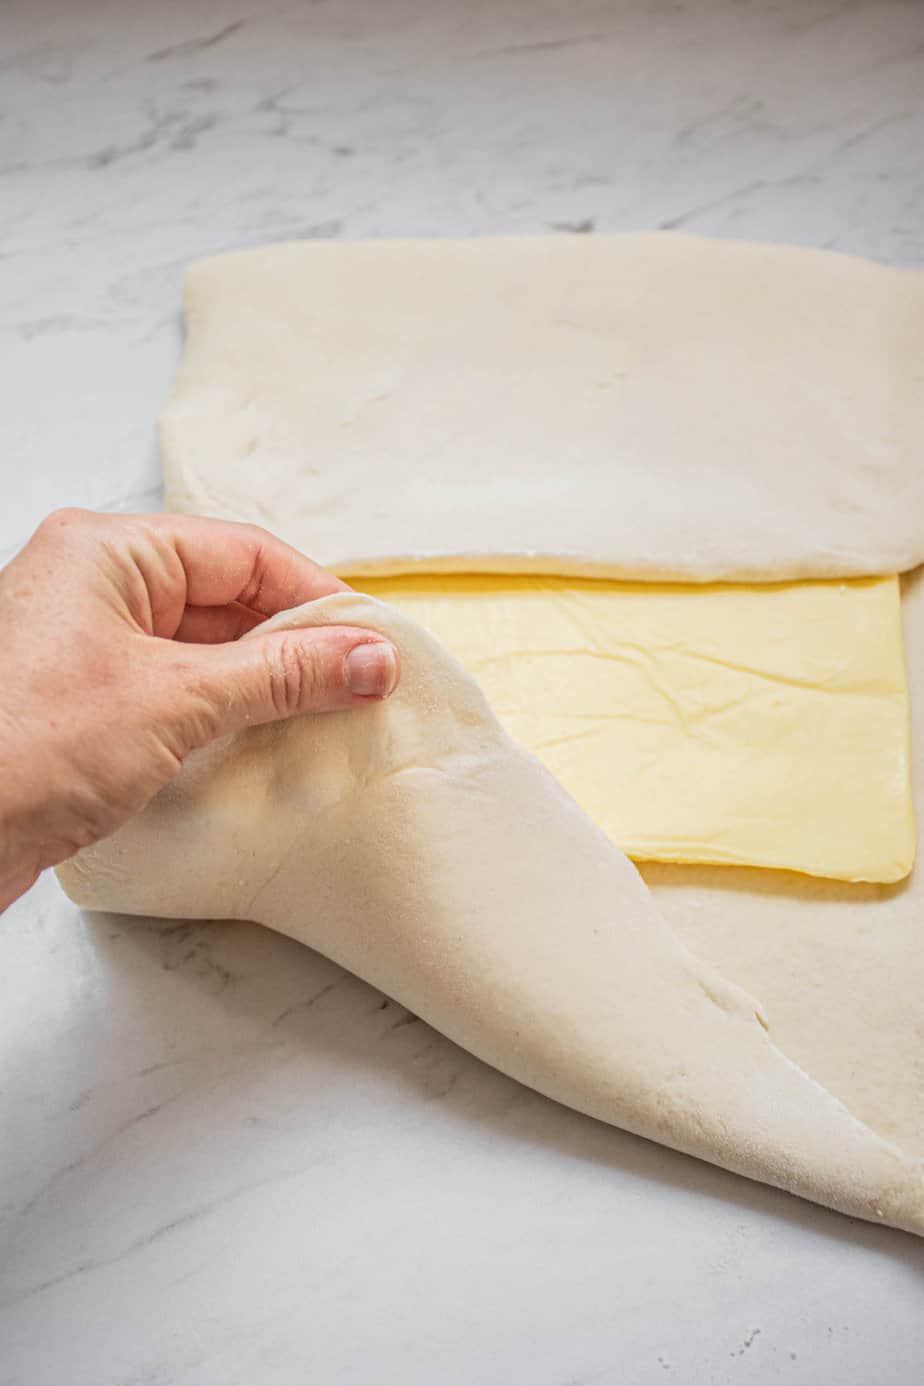
Check first that the butter isn’t too hard. Then place it in the middle of the dough. Bring the top of the dough down and the bottom of the dough up to meet in the middle and tuck in the butter.
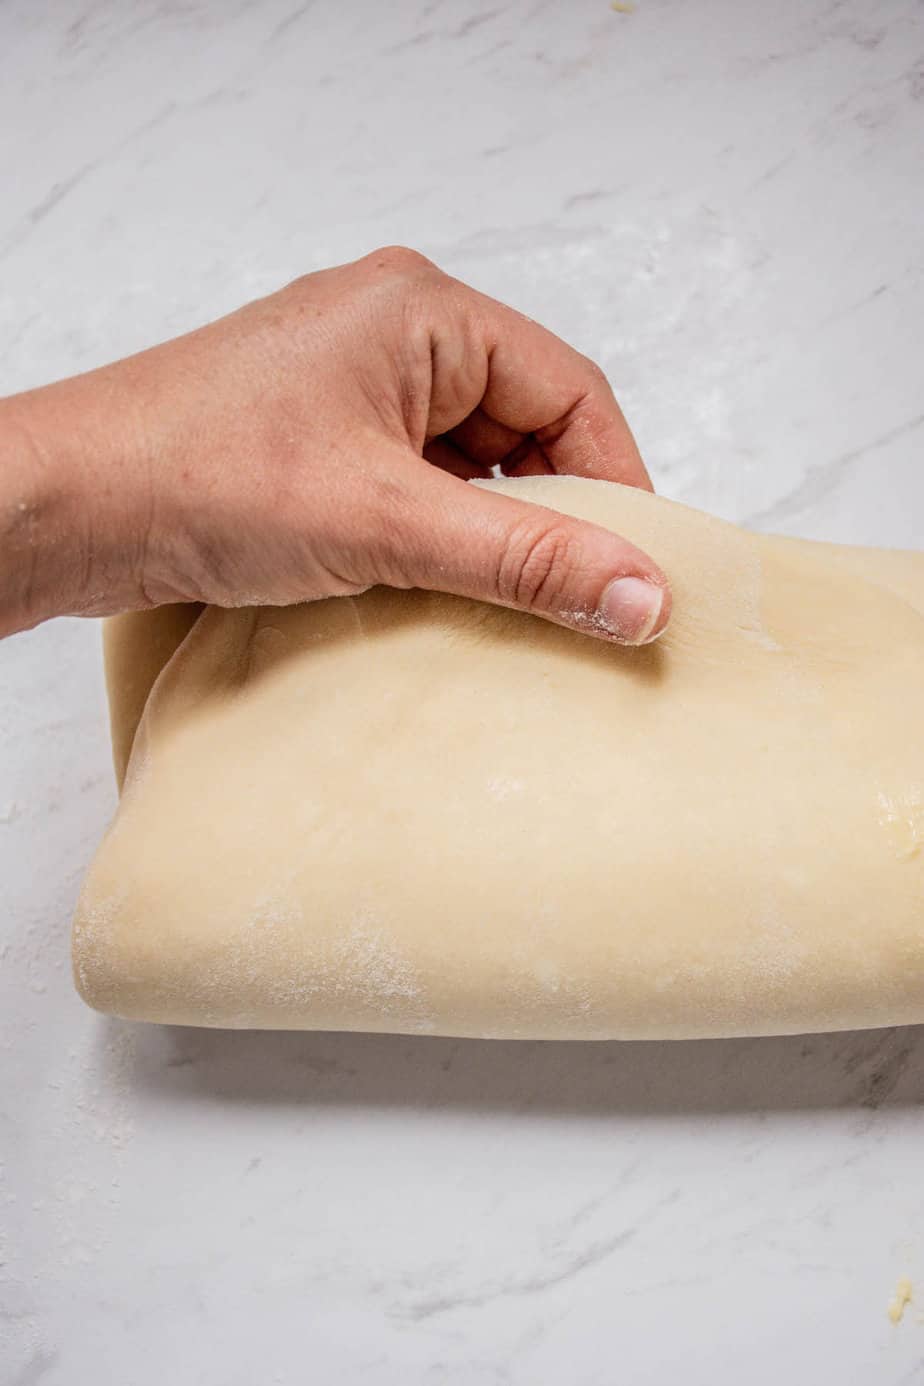
Turn the dough a quarter turn. Use a rolling pin to push on the dough to help disperse the butter gently. Roll this dough out into a 25x50cm (10x20inch) rectangle, and focus on lengthening the dough rather than making it wider. While rolling, check that the dough isn’t sticking to the bench and dust it with flour if it is.
Once it has been rolled out, it’s time to fold the dough like a pamphlet. Take one end and fold it into the middle, then take the other end and fold it over the first end.
Wrap the dough up in parchment paper or plastic wrap and place it in the refrigerator for 20-30 minutes.
Fold 2 and 3
Repeat this process two more times, so that’s three turns in total.
If you find that during the rolling out, that the butter is shattering, it may mean the butter is too cold. If this happens you can leave the dough to rest on the bench instead of the fridge before rolling it out again.
At the same time, ensure the butter does not melt into the dough or you won’t achieve flaky layers. It’s a bit of a balance that will get easier with practice.
After the third turn, the dough needs to be kept in the fridge for at least 8 hours. I leave it overnight.
Shaping
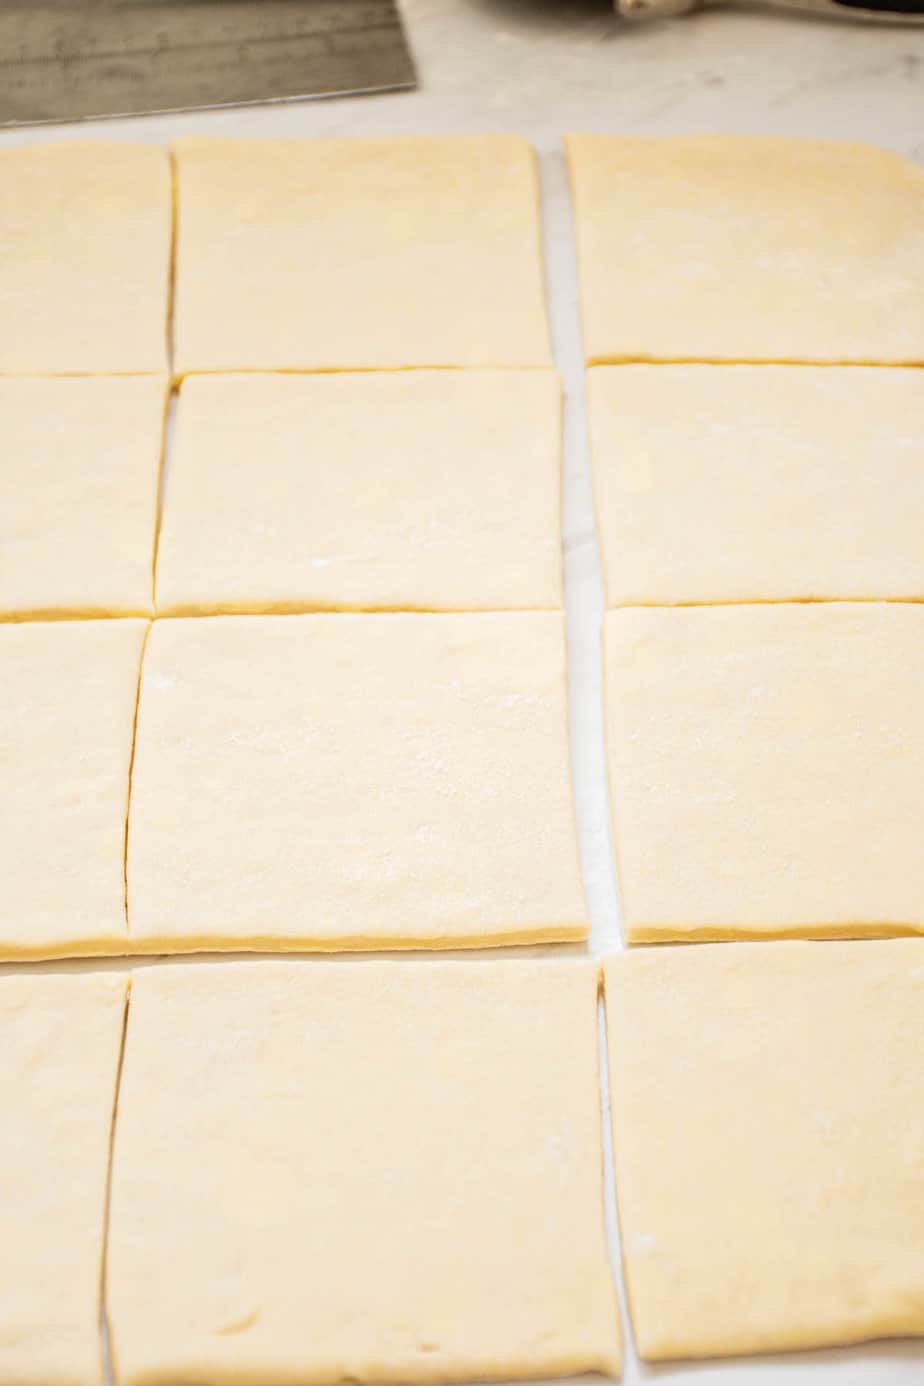
When ready to bake the dough, take it from the fridge. Roll the dough into a 16×16 inch / 40x40cm square.
Cut the square into 16 smaller squares with a pizza cutter or sharp knife.
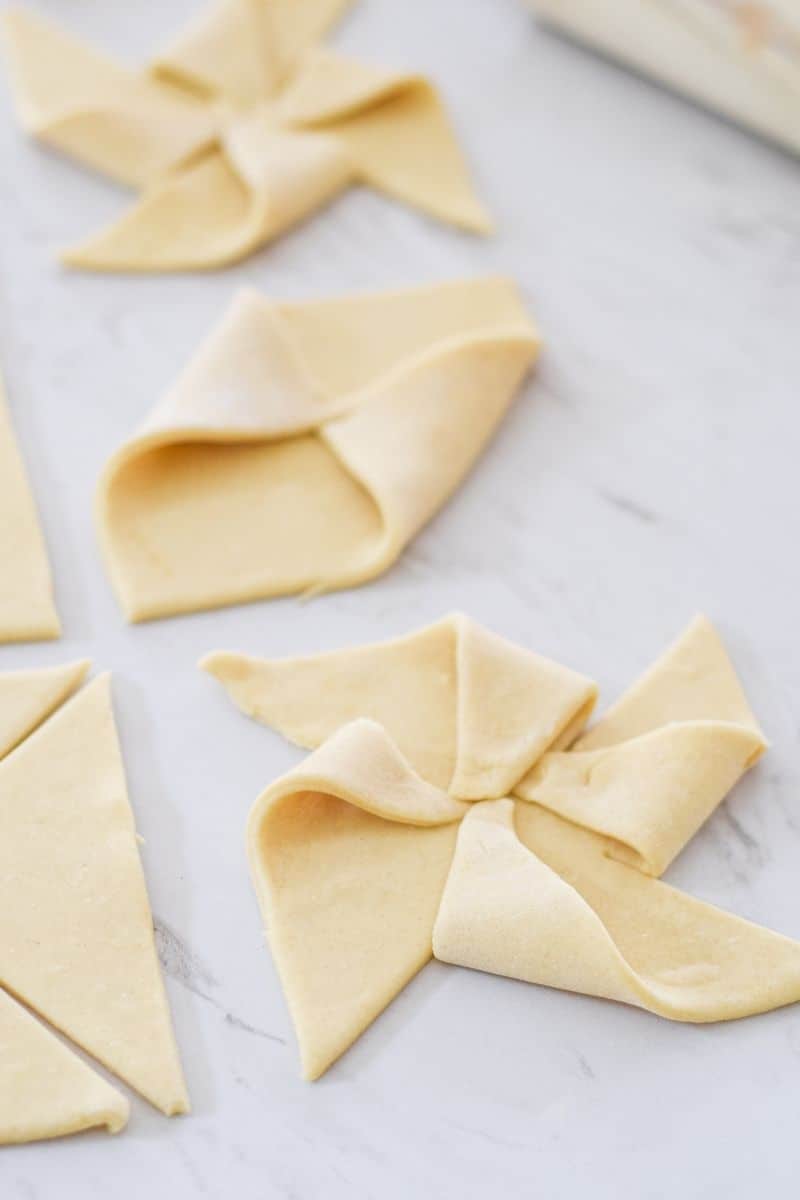
Shapes
I stick to two basic basic shapes. The first is a simple square with each of the corners folded in to meet in the middle.
The second is a little more intricate looking but so simple to make. Take a pastry square and make a slit from one corner to nearly the middle. Do this on each side, but ensure they don’t meet in the middle. Then take one side of each cut piece and fold it into the middle, folding up the same side on each piece.
Proofing
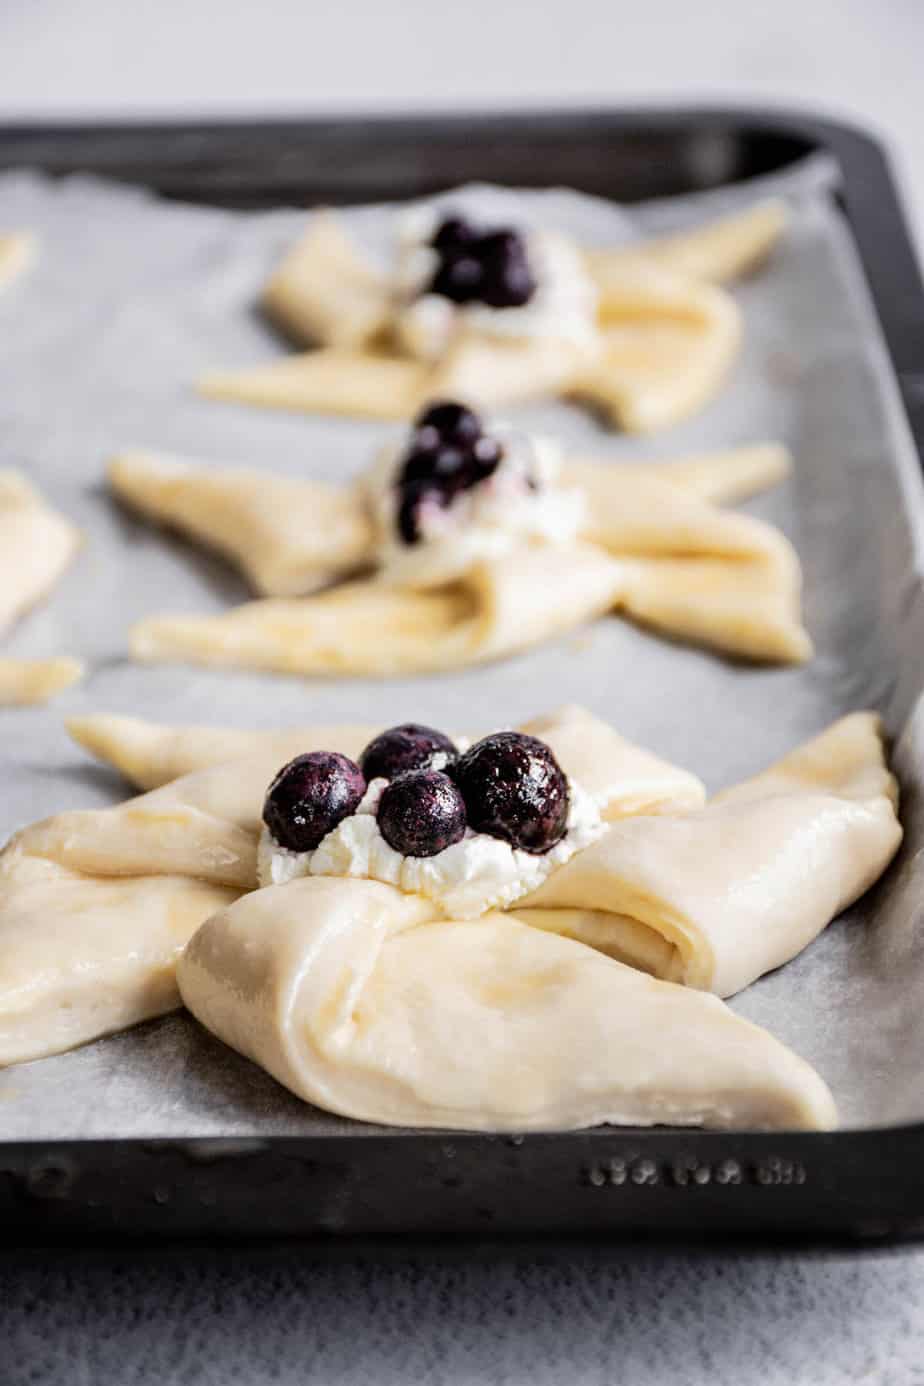
Place each shaped piece on the baking paper used previously and let them proof for around 4 hours. They should become more puffy.
Then, add the toppings.
We like either a spoonful of cream cheese mixture and a couple berries or custard and canned peach slices.
Baking
Then they’re brushed with an egg wash and into the oven. A hot oven will ensure they puff up quickly, but just watch that they don’t burn, especially the windmill style danish. The thin points cook quickly.
Once baked, let the sourdough Danish pastries cool for about 30 minutes. Then, drizzle with an icing glaze or simply dust with powdered sugar.

Related recipes

Sourdough Danish Pastries
These are delicious flaky pastries leavened with butter and sourdough starter.
Ingredients
Starter
- 30g starter
- 60g flour
- 60g water
Dough
- 450g all-purpose flour
- 50g granulated sugar
- 1 large egg
- 100g milk
- 80g water
- All the starter
- 1 tsp salt
- 1/4 tsp ground cardamom, optional
- 50g unsalted butter, softened to room temperature
Butter packet
- 250g unsalted butter, softened to room temperature
- 1 1/2 tablespoons all-purpose flour
Cream cheese filling
- 113g cream cheese, room temperature
- 1 Tablespoon lemon juice
- 1/2 Tablespoon lemon zest
- 2 Tablespoons powdered sugar, plus more for dusting
- Fresh or frozen berries
Egg wash
- 1 large egg
- 1 Tablespoon water
Instructions
Starter
- In the morning, feed your starter by combing the starter, flour, and water in a bowl and mixing it until well combined. Tip it into a clean jar or glass and let it double.
The dough
- When the starter has doubled, mix all the dough ingredients together in a large bowl to form a sticky dough.
- Tip it on the bench and knead it for 5 minutes, pushing it forward and pulling it back until it smoothens.
- Shape it into a ball and place it into a clean, greased bowl. Cover the and leave this to proof in a warm spot for 3 hours.
- Mix 1 ½ tablespoons flour and 250g softened butter when the dough has been proofed. Spoon the mix onto parchment paper and place another sheet on top. Roll the butter into a rectangle of about 6x8 inches (15x20cm).
- Place the butter in the fridge for around 15 minutes, so it is cool. Ensure it is cold but still easily pliable. Aim for the butter and the dough to be similar consistencies.
Folding
- Roll the dough out on a lightly floured work surface into a 20x40cm(8x16inch) rectangle
- Check first that the butter isn't too hard. Then place it in the middle of the dough. Bring the top of the dough down and the bottom of the dough up to meet in the middle, and tuck in the butter.
- Turn the dough a quarter turn. Use a rolling pin to push on the dough to help disperse the butter gently. Roll this dough out into a 25x50cm (10x20inch) rectangle, and focus on lengthening the dough rather than making it wider. While rolling, check that the dough isn't sticking to the bench and dust it with flour if it is.
- Once it has been rolled out, it's time to fold the dough like a pamphlet. Take one end and fold it into the middle, then take the other end and fold it over the first end.
- Wrap the dough in parchment paper or plastic wrap and place it in the refrigerator for 20-30 minutes.
- Repeat this process twice, so that’s three turns in total.
- If you find that during the rolling out, the butter is shattering, it may mean the butter is too cold. If this happens, leave the dough on the bench instead of the fridge before rolling it out again. Also, ensure the butter does not melt into the dough, or you won't achieve flaky layers. It's a balance that will get easier with practice.
- After the third turn, the dough must be wrapped tightly and refrigerated for at least 8 hours or overnight.
Baking
- When ready to bake the dough, take the dough from the fridge. Roll the dough into a 16x16 inch / 40x40cm square. Cut the square into 16 smaller squares with a pizza cutter or sharp knife.
- Shape the pastries as seen in the pictures above.
- Place the shaped pastries on baking paper and let them proof for 4-5 hours (at a room temperature of around 25°C/77°F.) They should puff out slightly.
- Place a damp cheesecloth or lightweight fabric over the top if they dry out. Alternatively, lightly brush them with water.
- Preheat the oven to 190°C/375°F.
- Mix together all the cream cheese filling ingredients except for the berries. Add a teaspoon of filling to each Danish, then top with berries.
- Mix the egg and water together, then brush the pastry edges with this egg wash.
- Bake the pastries for 18-20 minutes until deep golden brown. Bake them in two batches to ensure even baking.
- Dust the baked pastries with powdered sugar, or mix powdered sugar with enough water to make a pourable glaze and drizzle with glaze.
Recommended Products
As an Amazon Associate, a Mighty Ape affiliate and member of other affiliate programs, I earn from qualifying purchases.

Nutrition Information:
Yield: 16 Serving Size: 1 gramsAmount Per Serving: Calories: 310Total Fat: 19gSaturated Fat: 11gTrans Fat: 0gUnsaturated Fat: 6gCholesterol: 71mgSodium: 183mgCarbohydrates: 31gFiber: 1gSugar: 5gProtein: 5g


Hi! Can I use bleached all purpose flour? I’ve been struggling to find flour anywhere and only have bleached for now
Heya, I think it will still work 🙂
Hi Elien, I love your blog – thank you for the inspiration. Any reason why you don’t add flour to the butter slab as you do in the croissant recipe? I think that really made a huge difference in managing the temperature of the butter during the rolling & folding stages. I was able to leave my dough to rest on the bench top between rolling because the flour gave stability to the butter at room temperature.
Hey Emma 😊 the only reason I left it out is because I actually find that easier now. Just to roll it out without first mixing in flour, I’ve become much better at gaging the right temperatures of the dough and butter. But if it’s easier, by all means add some flour in and do it the same way as the croissants. Perhaps I’ll write that in to this recipe as an option!
Hi Elien, I have been intimidated baking with a new sourdough starter I created during this pandemic, so I wanted to thank you for such great recipes and detailed instructions. I have successfully made your croissants and now these danishes. They are both scrumptious. I was wondering if you have a recipe for the icing glaze you use on these?
Hey that’s great to hear! The icing is simply icing sugar with enough water to make a pourable paste 😊
Hi,. I am planning on trying this tomorrow. The pictures make it so easy. I appreciate it.
When you say “Repeat this process two more times, so that’s three turns in total.” Am I rolling it out each time and adding butter and then rolling it and folding it like a pamphlet (so basically repeating steps 7, 8, and 9)? Or am I rolling it out and folding it like a pamphlet and not adding butter.
I am new to baking. I am sorry if the question does not sound smart.
Heya, you are just repeating the rolling it out and folding it like a pamphlet, not adding butter each time :).
Thank you 🙂 I will share what it looks like when it is baked 🙂
I really enjoy this recipe and have used it before. I was looking forward to making these again and prepped everything last night–woke up today and the recipe has disappeared. Is it coming back or posted elsewhere?
I’m so sorry that it disappeared! That shouldn’t have happened! It is back now.
Dear Elien,
I have tried many Danish recipes and they are all too sticky and elastic. Yours is just very easy to work with. I have done it twice using half of the recipe. I was able to roll the dough into the size I want and the layers were even. I will permanently “adopt” this recipe for Danish and don’t have to test other recipes anymore. 😍😃.
Selena
Yay Selena I’m so pleased to hear you love it 😍
Hi! Can I leave out the cardamom? Or sub for something different?
You can just leave it out 🙂
Hi Elien! Can you use this recipe, with the egg and milk, for a richer croissant dough? Or would that not work….
Hey yes that would work! 🙂
Is it important to leave them to proof for 4 hours? Was hoping to shape these and have them in the morning 😊 enjoying the process so far!!
Hey, It is a very important step that last proof or you’ll have dense danishes that will seem undercooked
Can you freeze either ready made, uncooked, or half the dough?
Hey you can halve the dough, or freeze the cooked danishes 🙂
I had always put Danishes on my list of things that just weren’t practically possible for a home cook, but seeing this recipe I just had to give it a go. I am so glad I did. Pulling these babies out of the oven today was one of the highlights of my kitchen cooking, ever. I couldn’t stop smiling about the puffy laminated layers, and that was before I ate one. So so delicious. Relatively easy, but definitely a process!!!! Give it a go. You won’t regret it. Thanks for another great recipe, Elien!
Thus far I have tried baking your sourdough croissants and pain au chocolat Both were amazing! Thought I’d give these sourdough danishes a try. OMG they were like eye candy and the taste was so delicious loved the addition of cardamom!!!
My question is if frozen fully baked do I warm them in the oven to crisp them up? Or thaw them first then reheat? Or just thaw them? Thanks for sharing your amazing recipes!!
Hey! Thank you so much! And yup just reheat them, directly from frozen in the oven! No need to thaw 🙂
These looked so amazing up to the eating point… mine turned out over done on the outside and underdone on the inside. I have a ram whilst over and started out at the recommended temp 400F, my last batch I did at 350F and still turned out crusty. Suggestions? They were so amazing looking and surprisingly easy to this point.
Ah, sorry… I have a regular oven 🤦🏻♀️
Hey! If they seem underdone and gummy inside it’s likely that they were underproofed, not underbaked. Was your starter active and bubbly and well risen? If not that could affect their proofing. Or they may have needed a little longer to puff out on the bench before baking.
I want to make a bunch of these, but need them at different times. Would it work well to let them bulk rise, cut, shape and then freeze the dough? Then pull out what I need and allow to do their final rise before adding the filling and topping?
Thanks!
Yeah you could do it that way or freeze the filled and shaped pastries after their final rise. Then bake from frozen 🙂
Instead of kneading… could I do stretch and folds during the 3 hours to develop the dough?
yes you can! 🙂
It’s unfortunate that you have not indicated an approximate size for the squares to cut the 9 individual pastries from and/or the size those individual squares ought to be prior to the final rise.
I have added the sizes in 🙂
These recipes look delicious but I have a problem. I am one who barely gets my starter fed on time and then the discard sits on the counter all day. Once everyone else has gone to bed I start feeling guilty about wasting what’s left. Do you have any recipes you can recommend in this situation?
Thanks
Hey Dawn, I have lots of discard recipes on the blog! 🙂 You can see them here
Thank you for sharing this recipe! Do you think these would still work if I adjusted the timing to where the pastries were refrigerated after the final rise the night before and then in the morning filling added and baked?
Yup that would work! 🙂
Hello, I made these today, rather baked them and they are wonderful.
Never thought I would make Danish. Just wondering if I can freeze them some of them. Wish I’d thought of that before I baked them all.
Thanks, Cindy
They freeze very well Cindy! So pleased you enjoyed them 🙂
Hey there! I’m wondering how many grams of starter you use when you say “all of the starter”. I make a fairly large starter, so I was looking to just simply pull from that instead of making a seperate one. Thanks!
Heya use a round 120g starter 🙂
Thank you so much for such a quick reply! My husband and I had these for breakfast this morning, and they were an absolute smash!! I had a question for the next time I bake them- what is the dough supposed to look like when the first proofing stage is complete? Doubled in size, airy, etc? My kitchen is on the colder side, so I let the dough proof for 5ish hours instead of 3. Everything turned out excellent. Thanks again!!
Just slightly fuller, about 50% bulked. Sounds like you did it perfectly! So you happy you loved them 🙂
These are almost ready to bake. I wish there were more photos of the folding process. I feel like mine is far too thick compared to how thin the dough is when cutting into squares. Is it really just 3 folds when you’re done?
Hey, sorry you’re having trouble. I will update with newer photos at some point. It’s 3 folds, but then after the folds you’ll roll the dough out again to cut them into the squares 🙂
That’s when it becomes thinner
Hi! Just found this recipe and I’m excited to try – I have a fed starter at its peak and wanted to throw it in however I’m not sure how many grams since I didn’t feed at the written proportions? What would you say is an approximate anount of fed starter in this recipe? Thanks!
Heya, it’s around 120g starter 🙂