
An Easy Sourdough Recipe
This easy sourdough bread recipe is so straight forward. All you need is a little patience and time. It uses a coil fold to create its structure.
Ingredients
- 460 grams strong white flour with a protein level of at least 11.5%
- 330 ml water
- 8-10 grams salt
- 150 grams activer starter See notes on starter below
Instructions
Starter
- To make the starter for this bread, measure out 40g seed starter, 80g flour and 80g water and mix this well in a clean jar. Leave it to rise in a warm place. If your starter is active enough it should double within 4-6 hours and then it's ready to use. This makes approximately 200g starter. The remaining starter can be fed fresh flour and water and placed back in the refrigerator ready for the next bake.Use your starter before it has peaked and fallen, when it is still thick and airy, not runny. An exhausted or overly acidic starter, or one that takes too long to double can result in a sloppy and hard to work with dough that loses its structure during folding. Read more about starter activity and acid content in starters here.If you want to start your starter the evening before so you can start folding earlier the next day, feed your starter at 1:3:3 or 1:4:4 before you go to bed. Cover the jar with a tea towel and keep it in a warm place overnight. For example, 30g seed starter, 90 g flour and 90g water, or 20g seed starter, 80g flour and 80g water. The more flour fed, the longer the rise will take.

Autolyse
- In a large bowl, combine the 460g flour and the 330g water to start the autolyse stage. Simply mixing the flour with the water and allowing it to sit for a while will help develop the glutens in the flour. Use wet hands to mix it into a shaggy dough ball, then cover the bowl with a plate and leave it to sit on the bench.Start this step at least 30 minutes before the starter has finished rising.
Folding
- Add the doubled sourdough starter and the salt to the autolysed dough and combine together using wet hands. It will form a sticky dough. Place it in a flatter glass or ceramic dish.

- Over the next three hours, stretch and fold this dough every 30 minutes, using a coil fold (see video in the post above.) Always use wet hands. It is normal for your dough to stretch back out after each fold.

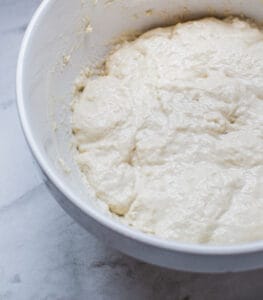
- Now leave the dough on the bench to sit for until it has bulked out by 50%. It should feel much bouncier and fuller. This can take anywhere from 2-6 hours depending on the room temperature. Cover the dish with a plate to stop the dough drying out. This step is very important, and you need to watch your dough and not the clock to ensure it has bulked enough. A baked bread that was underproofed will seem a little undercooked, be dense and have a few big and randomly spaced holes.

Shaping
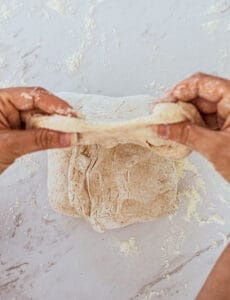
- Line a banneton basket (or other bowl) with a towel and flour it well. Tip your dough out carefully on a very lightly floured work surface and gently form it into a rectangle. Take care at this shaping stage to not squash the dough too much and lose all the gases that have been forming. Watch the short video in the post above on shaping to see how to shape as written instructions are very hard to decipher. I have tried to explain them here: Take the bottom third of the dough and fold it up so it meets the middle. Take the right side of the dough and fold it to meet the middle.

- Then take the left side of the dough and fold it to meet the middle.

- Then take the top third of the dough and bring it down to meet the bottom. Now you have a sort of ball shape.
- Stitch this ball together by grabbing a little bit of dough from the top left and a little from the top right and bring them together to meet in the middle. Carry on doing this down the length of the dough. When you get the bottom, grab a flap of dough and carry it up over top of the stitched dough to meet at the top. This will again create a sort of ball.

- Now gently grab this ball and roll it gently towards you on the bench. This will create some surface tension. All the while, take care not to de-gas your dough too much. Place in the floured bowl or basket, smooth side down.

Cold Proof
- Cover with a floured tea towel and place in the refrigerator for 8-20 hours.

Baking
- Preheat oven and cast iron pot at 230 C fan-bake /446°F (or 250°C/482°F if using a regular oven).Once the oven and the pot are at temperature, flour the bottom of the pot well or use baking paper. Take the dough from the fridge and carefully flip the dough out of the basket and brush with flour (this flour is optional). Score the dough using a razor blade or very sharp knife.

- Bake in the pot covered with the lid for 20- 35 minutes.I find that cast iron pots hold the heat very well and don't need quite as long as other dutch ovens. Remove the lid and bake uncovered for 15-20 minutes more depending on your preference.Let the sourdough cool for at least two hours before slicing.

Notes
Are you having issues with your sourdough bread? Check out my Sourdough Bread Troubleshooting Guide.
Nutrition
Calories: 243kcalCarbohydrates: 51gProtein: 6.9gFat: 0.7gSaturated Fat: 0.1gSodium: 292mgPotassium: 72mgFiber: 1.8gSugar: 0.2gCalcium: 10mgIron: 3.1mg
Tried this recipe?Let us know how it was!