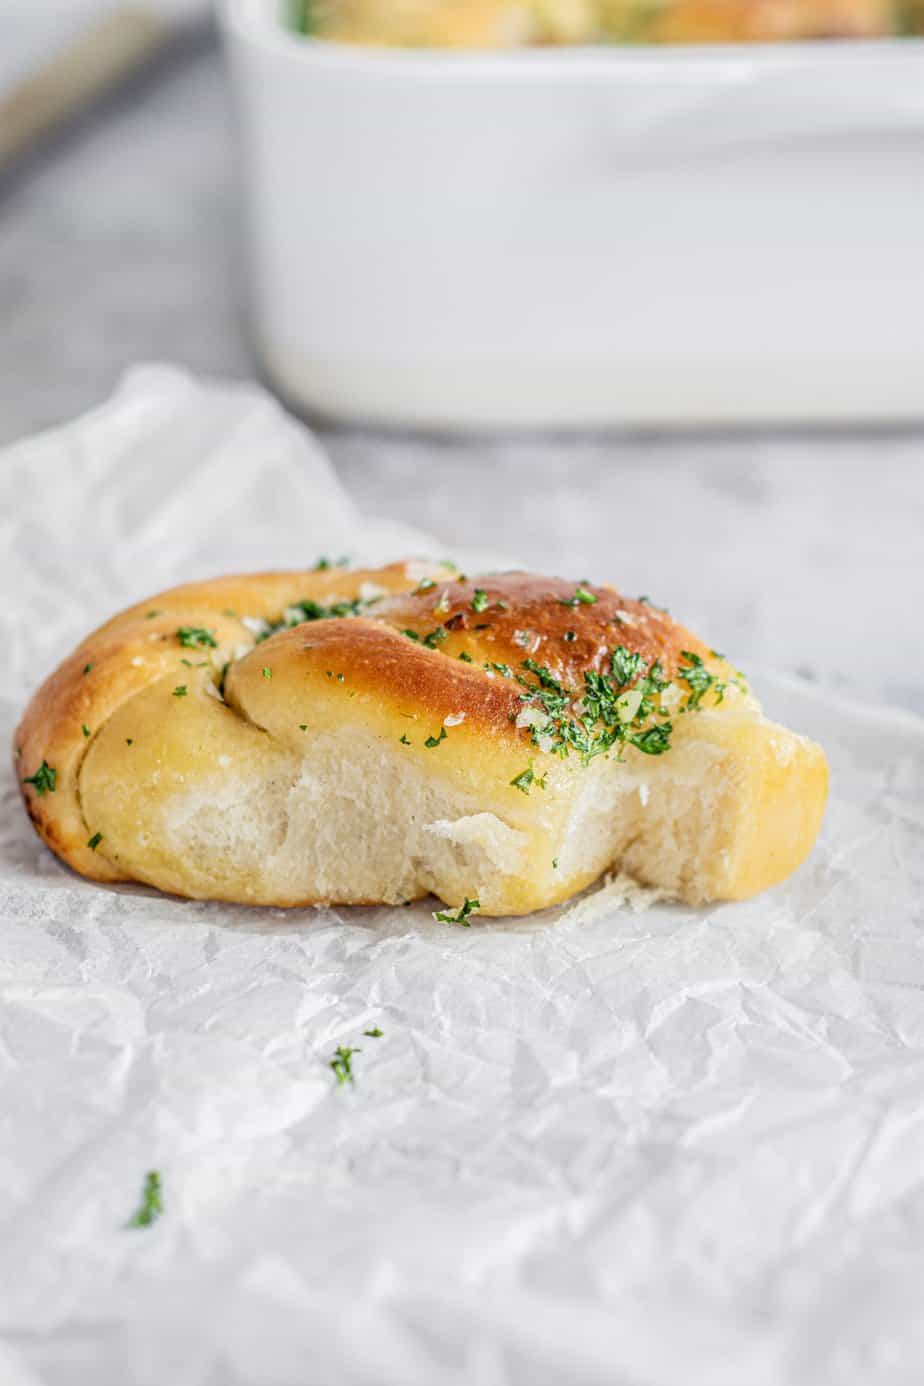
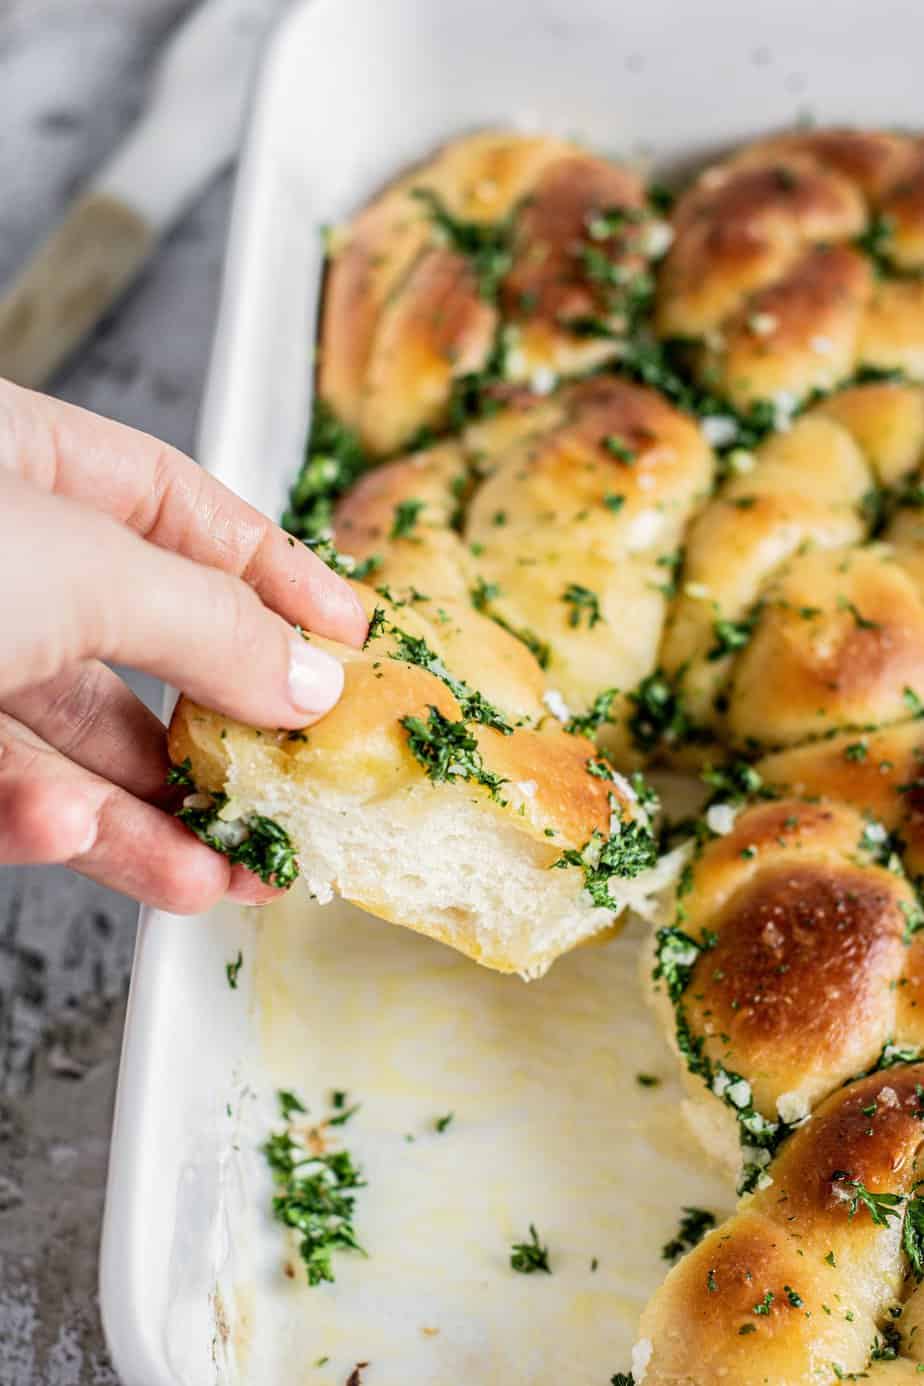
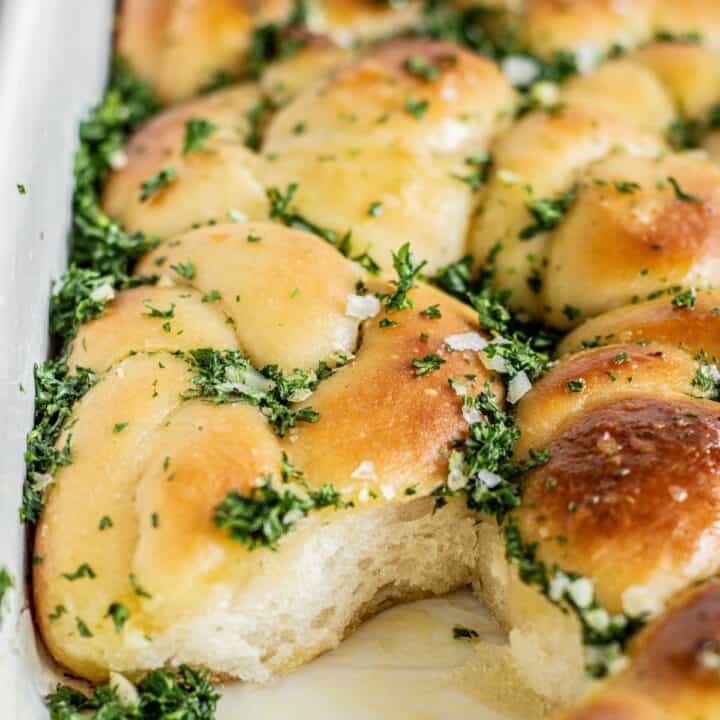
Sourdough Garlic Knots
These sourdough garlic knots are soft and fluffy on the inside with a deliciously crispy garlic butter crust.
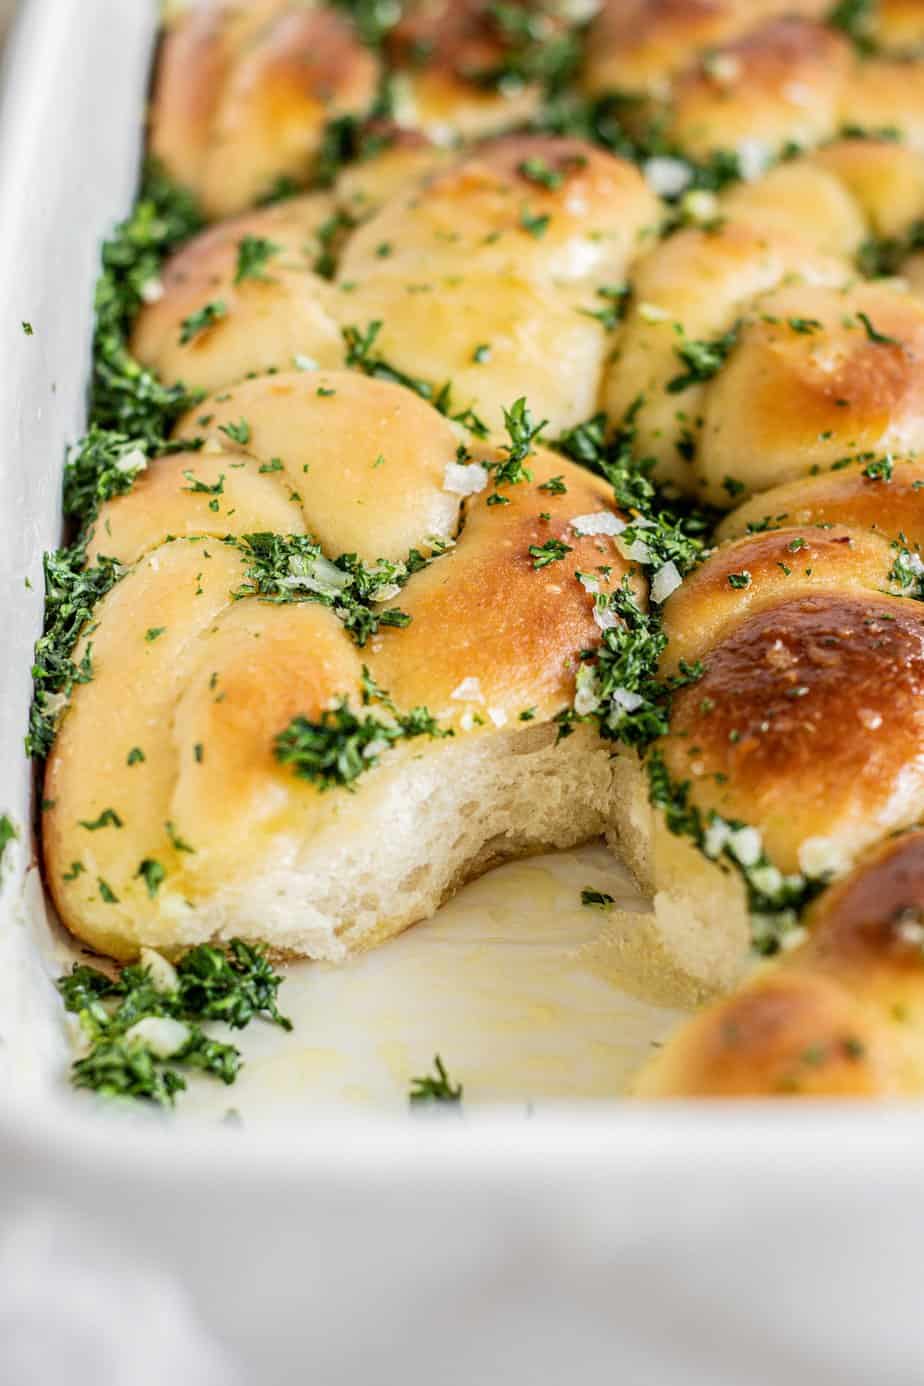
They’re a pull-apart bread perfect for serving alongside thanksgiving dinner, Christmas, or other group occasions. The main dough for these sourdough garlic knots is based on the one from these Sourdough hamburger buns. It’s a slightly enriched dough but not too much.
About the knots
The dough is shaped into 12 individual knots and slathered in garlicky melted butter twice – Once before baking and then again once the rolls have baked.
The ingredients
A loaf of homemade bread with garlic butter is great, it’s even more fun when they’re individual little knots! For the sourdough garlic knots, you will need –
- Bread flour or strong all-purpose flour with a protein level of at least 11%.
- Salt
- Water
- Granulated sugar – just a little bit
- Milk – helps to enrich the dough
- Butter – softened butter is worked into the dough to bring flavour and tenderness.
- Active sourdough starter – This leavens the knots to make them light and fluffy.
- Fresh garlic – 4-5 cloves.
- Fresh herbs – I like parsley but you can also use fresh thyme, chives, or coriander.
- Flaky salt – for serving
Equipment
If you have a stand mixer fitted with a dough hook you can use that, but this recipe can easily be made by hand.
You will need a 9x13inch baking pan to bake the knots in if you want them to be a pull-apart style. You can also bake them spaced apart on a larger baking sheet if you prefer.
Baker’s schedule
There are two options for making garlic knots. One is a same-day bake (not including the starter feeding the previous night), while the other has a cold dough ferment overnight.
The cold ferment gives the best flavour to the sourdough bread. You can change these timings to suit your own schedule.
Option 1
- 9 am – feed the starter
- 3 pm – mix the dough
- 3:20 pm – bulk ferment in a warm spot until bulked out by 40-50%
- 7:30 pm – cover the dough and refrigerate (for up to 24 hours)
- The following day 9 am – Shape the garlic knots
- 9:30 am – Rise in a warm spot
- 12:30pm – Bake
Option 2
- In the evening – Feed the starter
- 9 am – Mix the dough
- 9:20 am – Bulk ferment in a warm spot until bulked out by 40-50%
- 1:30 pm– Shape garlic knots
- 1:45 pm – Rise in a warm spot
- 4:45 pm– Bake.
Proofing temperatures
A warm place is needed to ensure the dough rises efficiently, ideally around 25°C/77°F. The temperature of your room will affect the rise time.
If your room temperature is cold, you can create a warm spot by placing a mug of boiled water into a turned-off oven alongside the bowl of dough. This creates both a warm and humid area so that the dough doesn’t dry out.
Method
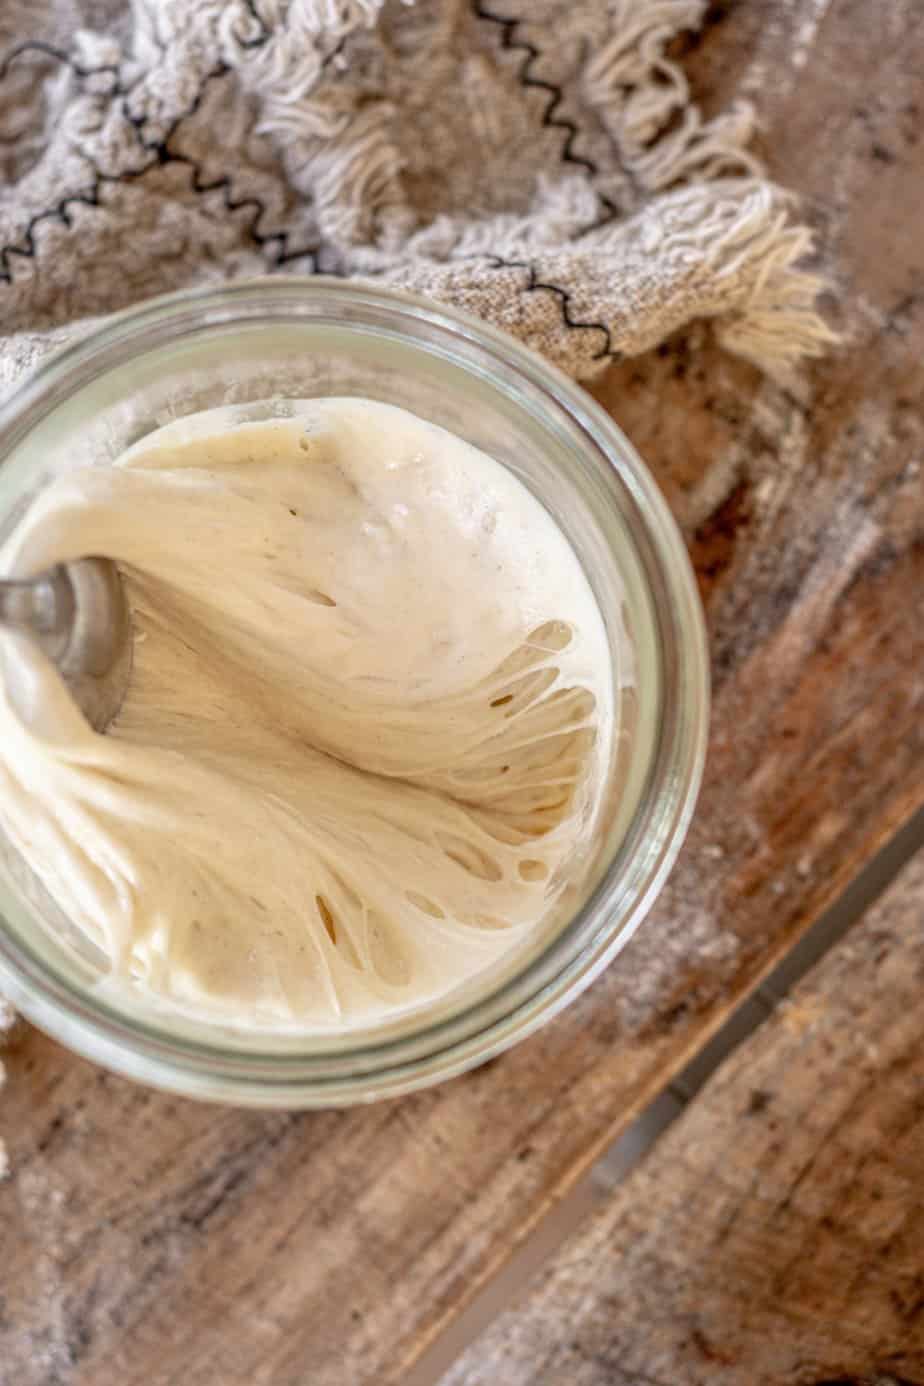
The starter
Firstly, feed your starter. The amounts will change depending on if it’s being fed overnight, or during the day.
If you’re making the knots following option 1 and giving an overnight cold dough ferment, the starter can be fed at a ratio of 1:2:2 (starter:flour: water) This is equal weights of the starter, flour, and water. Place it in a warm spot to rise. Feeding an active starter at this ratio means it should double or triple in around 6 hours.
If you’re following option 2 and feeding the starter the evening before, it will be fed a bit differently as it needs to rise slowly overnight and not pass its peak. In this case, it can be fed 1:3:3, or if your kitchen is warm overnight, feed it 1:4:4. Adding extra water and flour slows down the rise so the organisms in the starter don’t run out of food.
Mix sourdough starter, flour, and water in a small bowl until well combined. Then tip it into a clean jar to rise.
The dough
When the starter has risen, mix together the flour, sugar, and salt in a medium bowl. Add to this the water, milk, and sourdough starter and mix into a shaggy dough. You can use a wet hand, a fork, or a wooden spoon for this.
Tip this dough onto a floured work surface and bring the dough together. Knead it for a few minutes to give it some strength.
Once the dough is kneaded, add in the cubed butter, a few small cubes at a time, and knead them in. Continue kneading for a further 6-8 minutes.

Fermenting
Add the dough to a lightly greased large bowl and let the dough rest in a warm spot (ideally around 25°C/77°F) for 3-4 hours, covered with a damp kitchen towel with compostable plastic wrap.
You can create a warm and humid spot by placing the dough into a turned-off oven alongside a large cup of boiled water. Replace the water as needed when it cools down.
By the end, the dough should feel lighter and puffier. At a warm room temperature 3 hours may be enough, but extend the ferment if it’s cooler.
After this period, the dough can be tightly covered and placed in the fridge overnight.
Shaping
Line a 9x13inch baking dish with parchment paper.
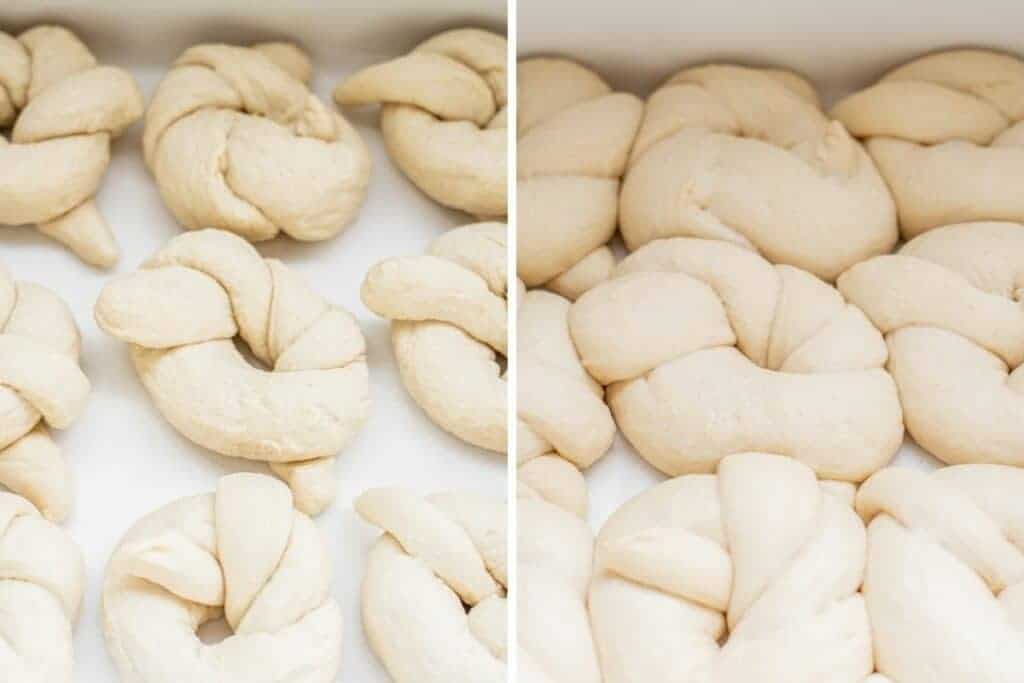
Pull the dough from the bowl onto a lightly floured work surface. Shape it into a dough ball and weigh it on a scale. Divide the total weight of your dough by 12. That’s how much dough is needed for each knot.
Cut the dough into 12 equal pieces and take some from one piece to give to another until they’re all the same size.
Shape each piece into a rough ball and set them onto a lightly floured surface. The next step is to make the knots.
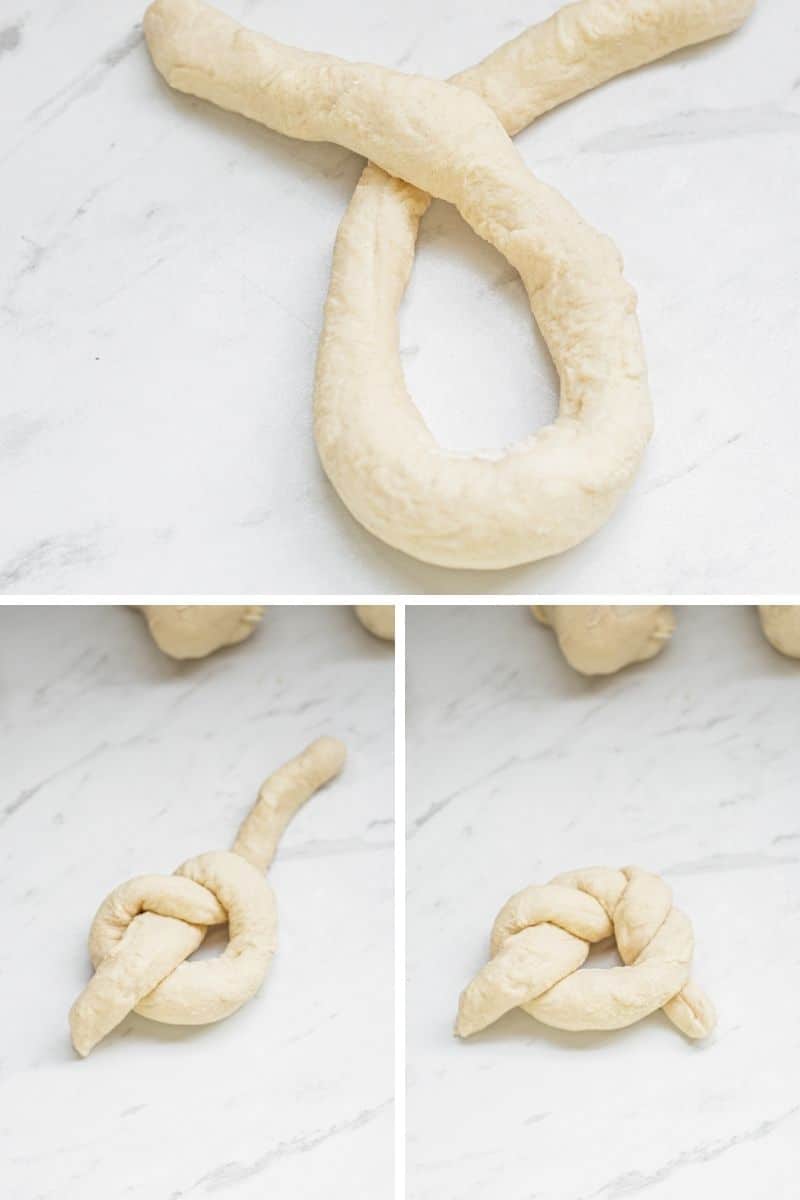
To shape a knot – Take one dough ball and on a lightly floured surface, roll it into a long rope, around 30cm/12inchs. If the rope gets sticky, dust it with flour.
Shape the rope into a U shape. Cross one end over the other, then take one side and fold it underneath the loop at the bottom to make a loose knot. Repeat with the other side.
Second rise
Place the shaped knots into the prepared baking dish.
Cover the dish with a damp towel or compostable plastic wrap and let the knots rise in a warm spot until doubled in size, about 3-4 hours. Again, how long this takes will depend on the room temperature.
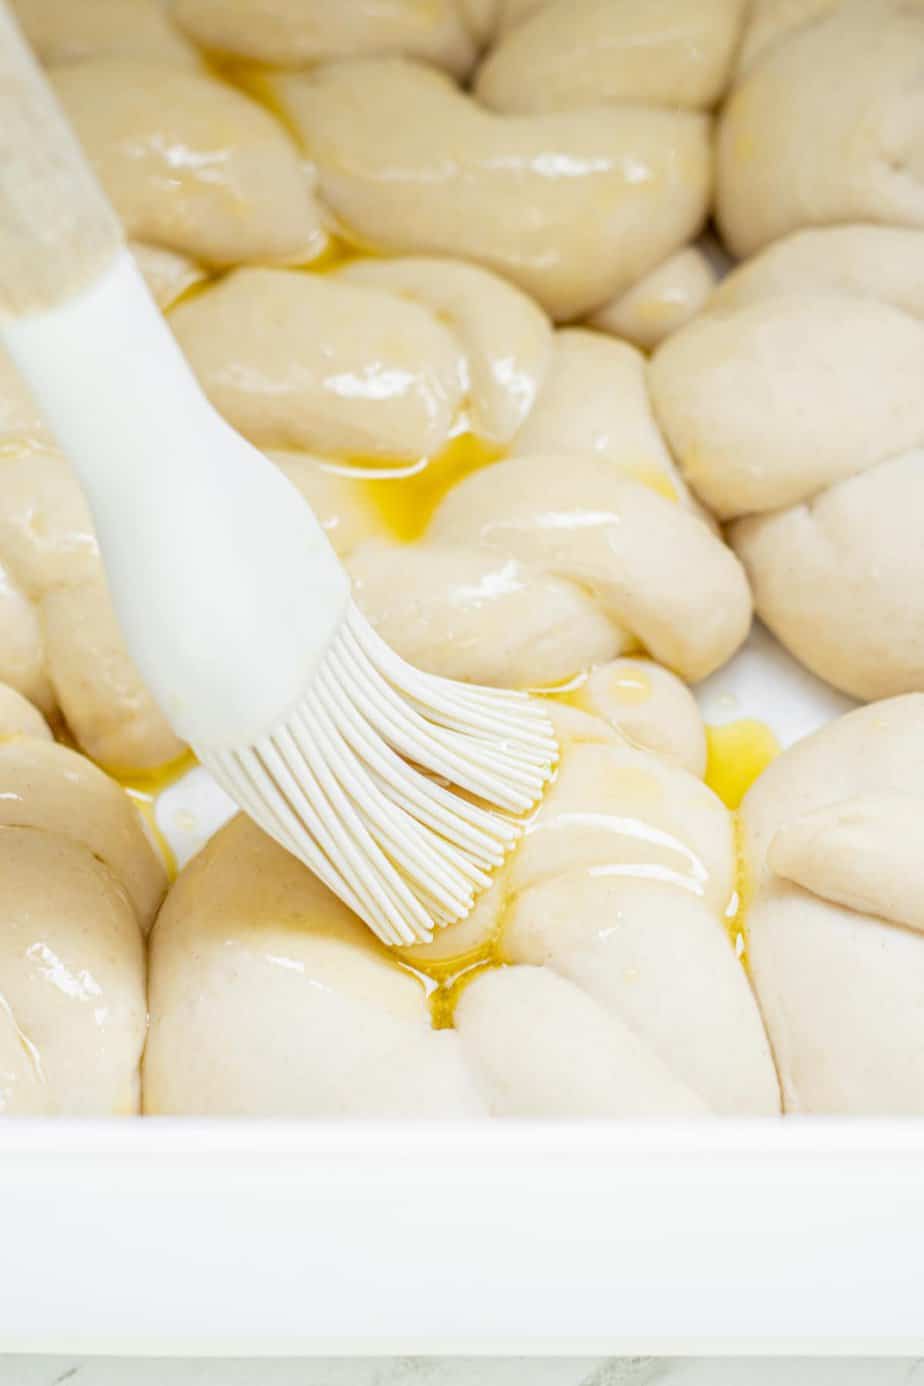
The garlic butter glaze
When the knots have nearly finished rising, preheat the oven to 190°C/374°F.
Finely grate or chop 4-5 garlic cloves or use a garlic press to mince it.
In a small saucepan over medium-low heat melt together the butter and the garlic. Let it come to a simmer and simmer the garlic in the butter for around a minute. Take it off the heat and let it cool for at least 5 minutes.
When the knots have finished rising, use a pastry brush to liberally brush them with about 1/3 of the garlic butter. The remaining butter will be used after baking. There’s lots of butter used but it’s so worth it!
Baking
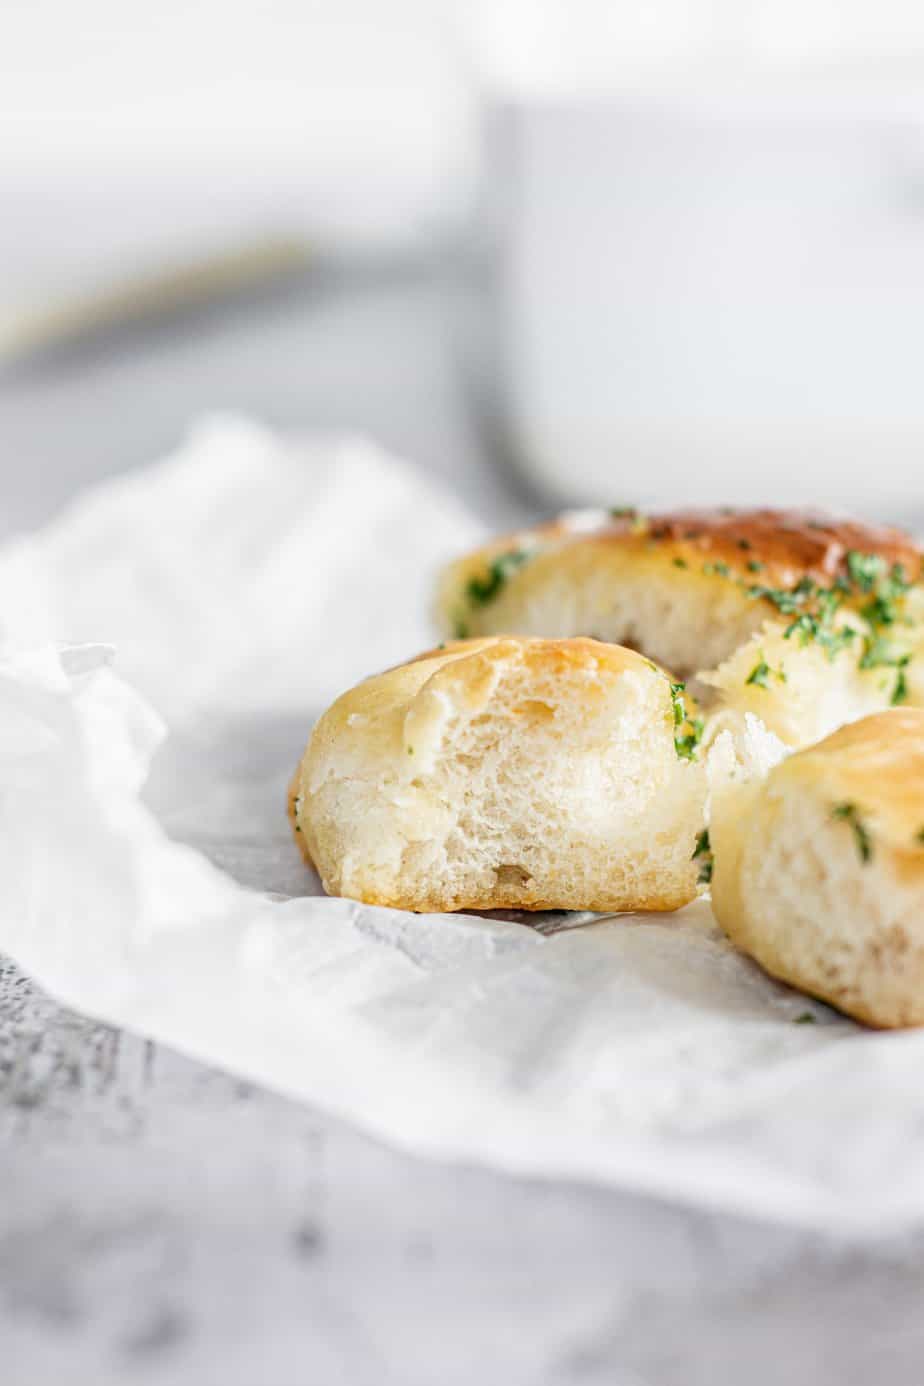
Bake the knots for around 22-25 minutes until golden brown on top. While they are baking, finely chop parsley or other fresh herbs of your choice.
Serving
If serving right away, when the knots come from the oven, liberally brush them with the remaining butter. Ensure you get all the chunks of garlic on there too. Sprinkle with herbs and flaky salt.
If you’re not serving the knots straight away, hold off with adding the remaining butter and toppings. When it’s time to serve, meltdown the remaining butter again and coat the knots. Then top with the herbs and salt.
Storing
Leftover sourdough garlic knots can be stored in an airtight container for up to 3 days. After day 1, reheat them in the microwave before eating to get them all nice and soft again.
Sourdough Garlic Knots
These sourdough garlic knots are soft and fluffy on the inside with a deliciously crispy garlic butter crust.
Ingredients
Starter
- 20g starter
- 40g all-purpose flour
- 40g water
Dough
- 450g all-purpose flour with protein level of at least 11%
- 20g granulated sugar
- 8g salt
- 160g water
- 130g milk
- 90g sourdough starter
- 40g unsalted butter, room temperature
Butter topping
- 100g salted or unsalted butter
- 4-5 cloves garlic
- 2-3 Tablespoons finely chopped parsley
- Flaky salt
Instructions
- Mix sourdough starter, flour, and water in a small bowl until well combined. Then tip it into a clean jar to rise. Let this rise in a warm spot until at least doubled, if not tripled in size.
- When the starter has risen, mix together the flour, sugar, and salt in a medium bowl. Add to this the water, milk, and sourdough starter and mix into a shaggy dough. You can use a wet hand, a fork, or a wooden spoon for this.
- Tip this dough onto a floured work surface and use a slap and fold kneading method to bring the dough together. Knead it for a few minutes.
- Once the dough has been kneaded, add in the cubed butter, a few small cubes at a time, and knead them in. Continue kneading the dough for a further 6-8 minutes.
- Add the dough to a lightly greased large bowl and let the dough rest in a warm spot (ideally around 25°C/77°F) for 3-4 hours, covered with a damp kitchen towel or compostable plastic wrap.
- You can create a warm and humid spot by placing the dough into a turned-off oven alongside a large cup of boiled water. Replace the water as needed when it cools down.
- By the end, the dough should feel lighter and puffier. At a warm room temperature 3 hours may be enough, but extend the ferment if it's cooler. After this period, the dough can be tightly covered and placed in the fridge overnight.
Shaping
- Line a 9x13inch baking dish with parchment paper.
- Pull the dough from the bowl onto a lightly floured work surface. Shape it into a dough ball and weigh it on a scale. Divide the total weight of your dough by 12. That's how much dough is needed for each knot.
- Cut the dough into 12 equal pieces and take some from one piece to give to another until they're all the same size.
- Shape each piece into a rough ball and set them onto a lightly floured surface. The next step is to make the knots.
- To shape a knot - Take one dough ball and on a lightly floured surface, roll it into a long rope, around 30cm/12inchs. If the rope gets sticky, dust it with flour.
- Shape the rope into a U shape. Cross one end over the other, then take one side and fold it underneath the loop at the bottom to make a loose knot. Repeat with the other side. Place the shaped knots into the prepared baking dish.
- Cover the dish with a damp towel or compostable plastic wrap and let the knots rise in a warm spot until doubled in size, about 3-4 hours. Again, how long this takes will depend on the room temperature.
- When the knots have nearly finished rising, preheat the oven to 190°C/375°F.
- Finely grate or chop 4-5 garlic cloves or use a garlic press to mince it.
- In a small saucepan over medium-low heat melt together the butter and the garlic. Let it come to a simmer and simmer the garlic in the butter for around a minute. Take it off the heat and let it cool for at least 5 minutes.
- When the knots have finished rising, use a pastry brush to liberally brush them with about ⅓ of the garlic butter. The remaining butter will be used after baking.
- Bake the knots for around 22-25 minutes until golden brown on top. While they are baking, finely chop parsley or other fresh herbs of your choice.
- If serving right away, when the knots come from the oven, liberally brush them with the remaining butter. Ensure you get all the chunks of garlic on there too. Sprinkle with herbs and flaky salt.
- If you're not serving the knots straight away, hold off with adding the remaining butter and toppings. When it's time to serve, melt down the remaining butter again and coat the knots. Then top with the herbs and salt.
Nutrition Information:
Yield: 12 Serving Size: 1Amount Per Serving: Calories: 224Total Fat: 5gSaturated Fat: 3gTrans Fat: 0gUnsaturated Fat: 2gCholesterol: 13mgSodium: 319mgCarbohydrates: 37gFiber: 1gSugar: 2gProtein: 7g
Nutrition information isn’t always accurate.


Thank you so much for your fantastic recipe! I am always looking to other sites for information and inspiration!
Have an awesome sunny day!
Rick Smith
This is an incredibly easy recipe with an EXTREMELY fabulous result! Loved the knots, they came out so fluffy and garlicky. I did an overnight ferment which conveniently fit my schedule and that elevated the flavor even more. Just perfect when having friends over!
Will be making them many more times over!