The Best Sourdough Brioche Bread
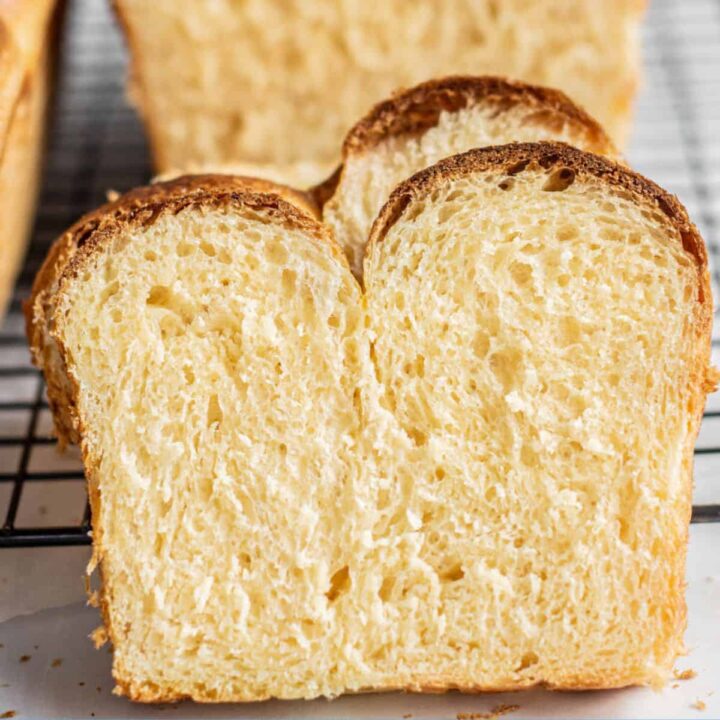
Soft and tender, this sourdough brioche bread recipe is so good. Brioche dough is enriched with butter and lots of eggs, making the crumb wonderfully rich and tender.
Reader Lisa says: “This is the best brioche sourdough. We use it for loaves, but most of the time we shape it into hamburger buns. So delicious!”
This sourdough bread is leavened with wild yeast from a sourdough starter. There’s no need for commercial yeast. It’s made from an enriched dough with a lovely soft texture, tender crumb and subtle sourdough tang. It makes the perfect base for sweet recipes like these brioche cinnamon rolls. It’s great for savory bread too!
Once you’ve got the hang of sourdough brioche recipe, this rich dough can be made into many different things. Think sourdough brioche buns, brioche savory swirls, hamburger buns, brioche rolls…
And leftover brioche the next day makes delicious brioche French toast. For more sourdough recipes, check out my sourdough collection!
Ingredients
Here’s a rundown of what you need for this sourdough brioche recipe. Check the recipe card at the bottom of this post for the amounts.
- Strong all-purpose flour with around 11% protein
- Granulated sugar
- Large eggs
- Sourdough starter
- Milk
- Salt
- Butter – This can be salted or unsalted butter

Stiff starter
I prepare my starter differently for this enriched sourdough brioche dough because it’s much stiffer than my usual 100% hydration starter. I usually feed equal parts (in weight) of water and flour, but I use half the water this time.
A stiff starter is slower to rise than those with a higher hydration. They undertake a slow but steady growth, with less risk of peaking too early. However, the main reason for this stiffer starter is so I could pack more starter into the dough without making it too wet. This brioche is an enriched bread that appreciates a long fermenting time. After a few tests, I found that the extra oomph from the extra starter won’t go amiss.
Because of this different feeding ratio, I make a separate levain for this dough at a 1:2:1 ratio (1 part starter, 2 parts flour, 1 part water).

Baker’s schedule
There are a few timings that can be used for this brioche. Here are two examples.
Example 1
- The night before
- Feed the starter
- Day 1
- 11 am – Mix the dough
- 11:30 am – Let it rise in a warm spot until bulked out by half (approx 4 hours, depending on temperature)
- 3:30 – Refrigerate the dough overnight.
- Day 2
- Shape the brioche and let it rise in a warm spot until it has doubled. Bake.
Example 2
- The night before
- Feed the starter
- Day 1
- 9 am – Mix the dough
- 9:30 am – Let it rise in a warm spot until bulked out by half (approx 4 hours, depending on temperature)
- 1:30 pm-8:30 pm – Refrigerate the dough
- 8:30 pm – Shape the sourdough brioche and let it rise overnight. This one works if your kitchen isn’t too warm.
- Day 2
- Bake brioche
Method
The evening before
- Mix the starter with flour and water. Knead it together into a soft dough ball. Place it into a jar or bowl and allow it to rise for 8-10 hours until doubled in size.
- If your kitchen is warm overnight (above 20°C/68°F), you can halve the starter added to slow the rise overnight. Change the ratios to 1:4:2, e.g., 30g starter, 120g flour, and 60g water.
The next morning
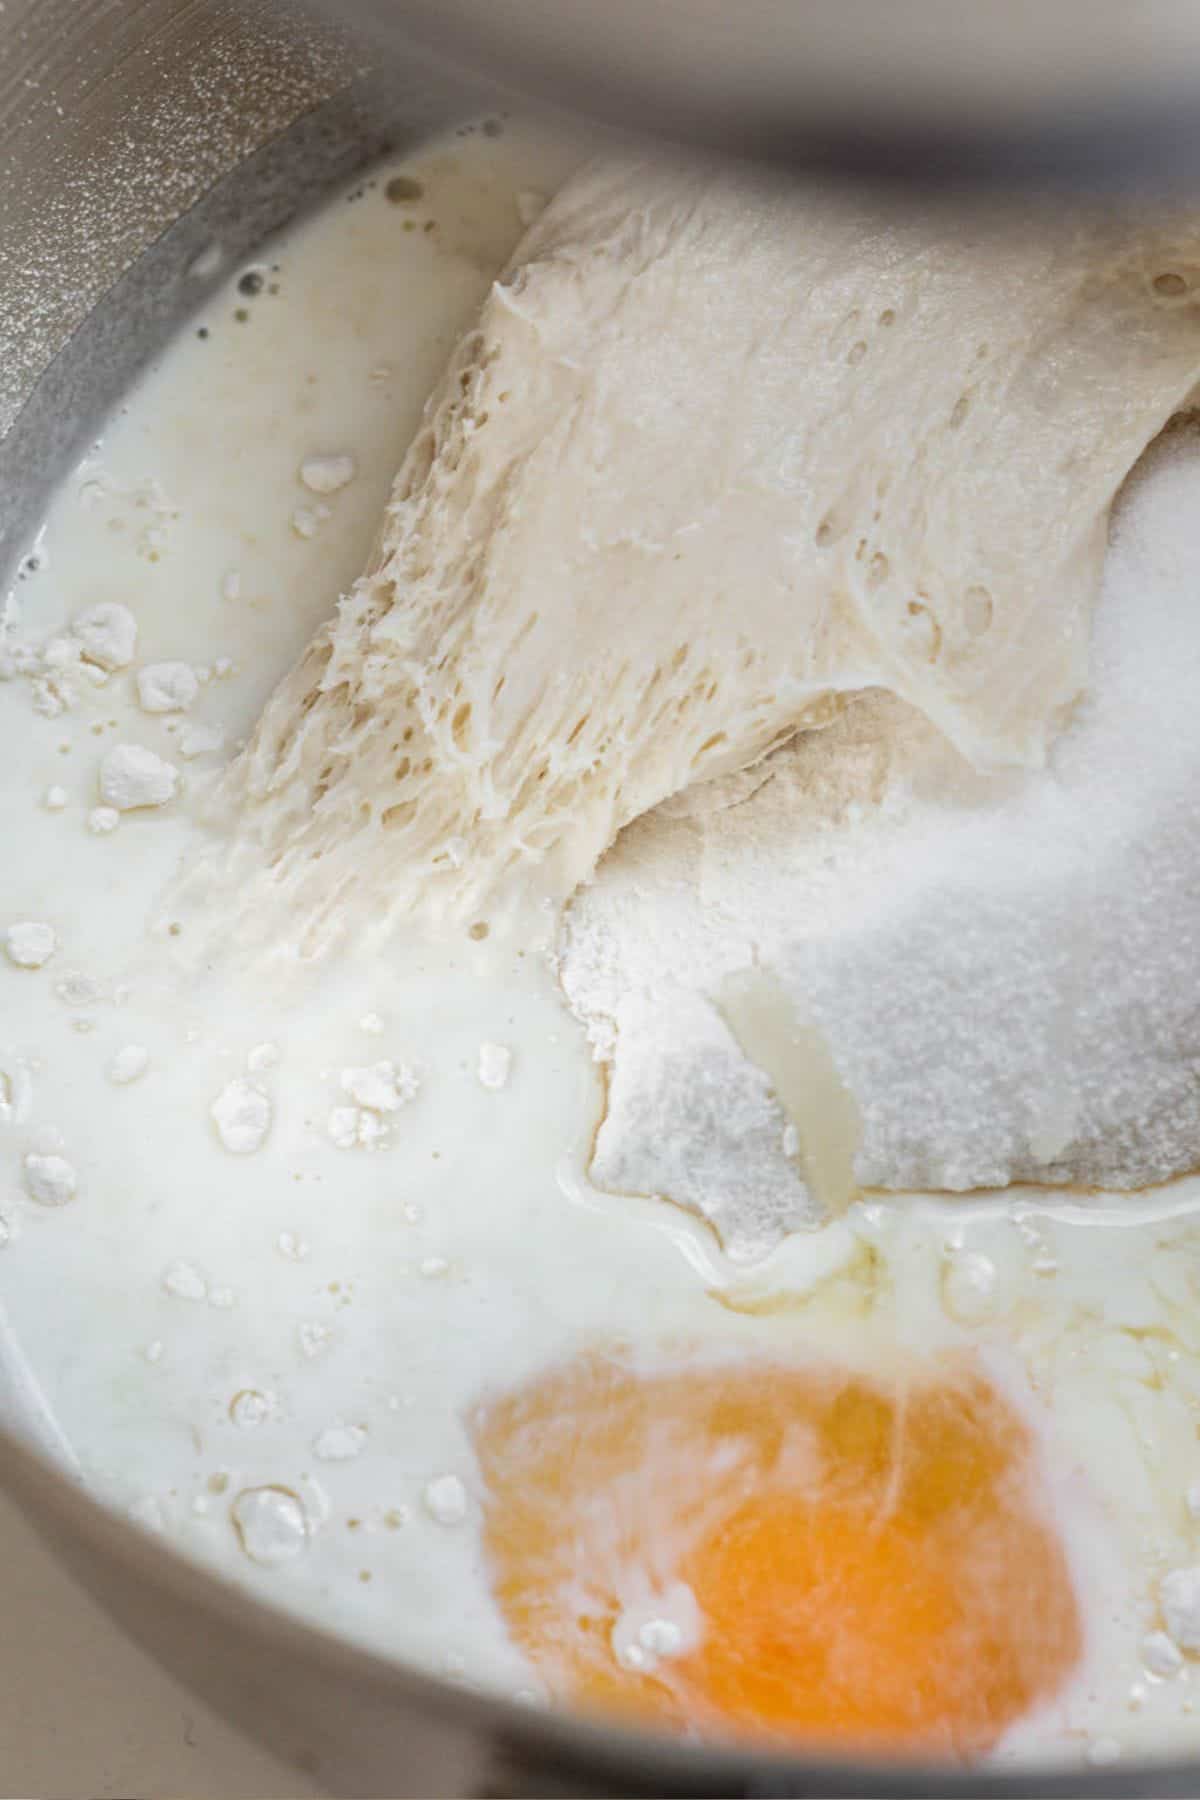
- Add the flour, sugar, salt, eggs, milk, and starter in a stand mixer bowl with a dough hook attachment.
- Turn the mixer on low speed and combine until it forms a thick but slightly sticky dough.
- Mix this dough for around 5 minutes to begin developing the gluten.
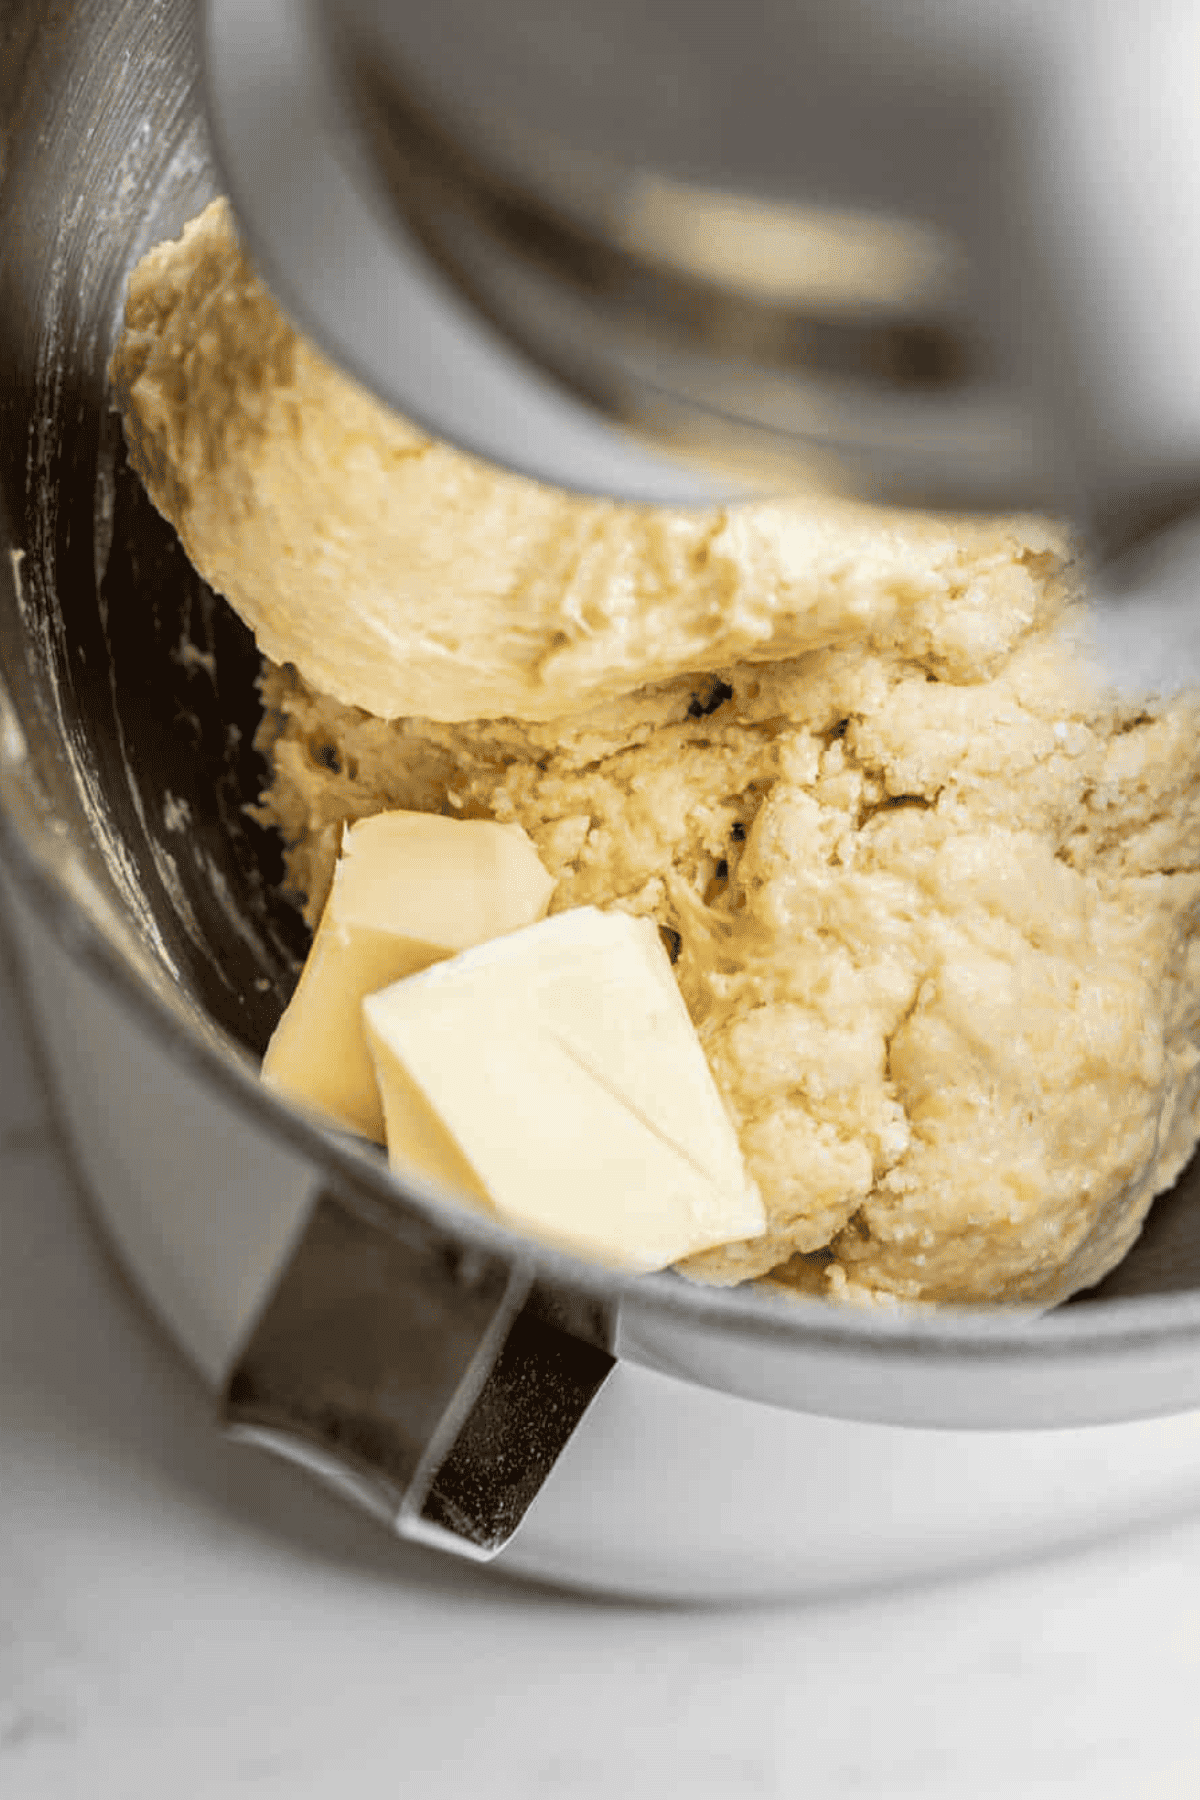
- Add in the cubed butter, a few pieces at a time. Incorporate each cube before the next addition.
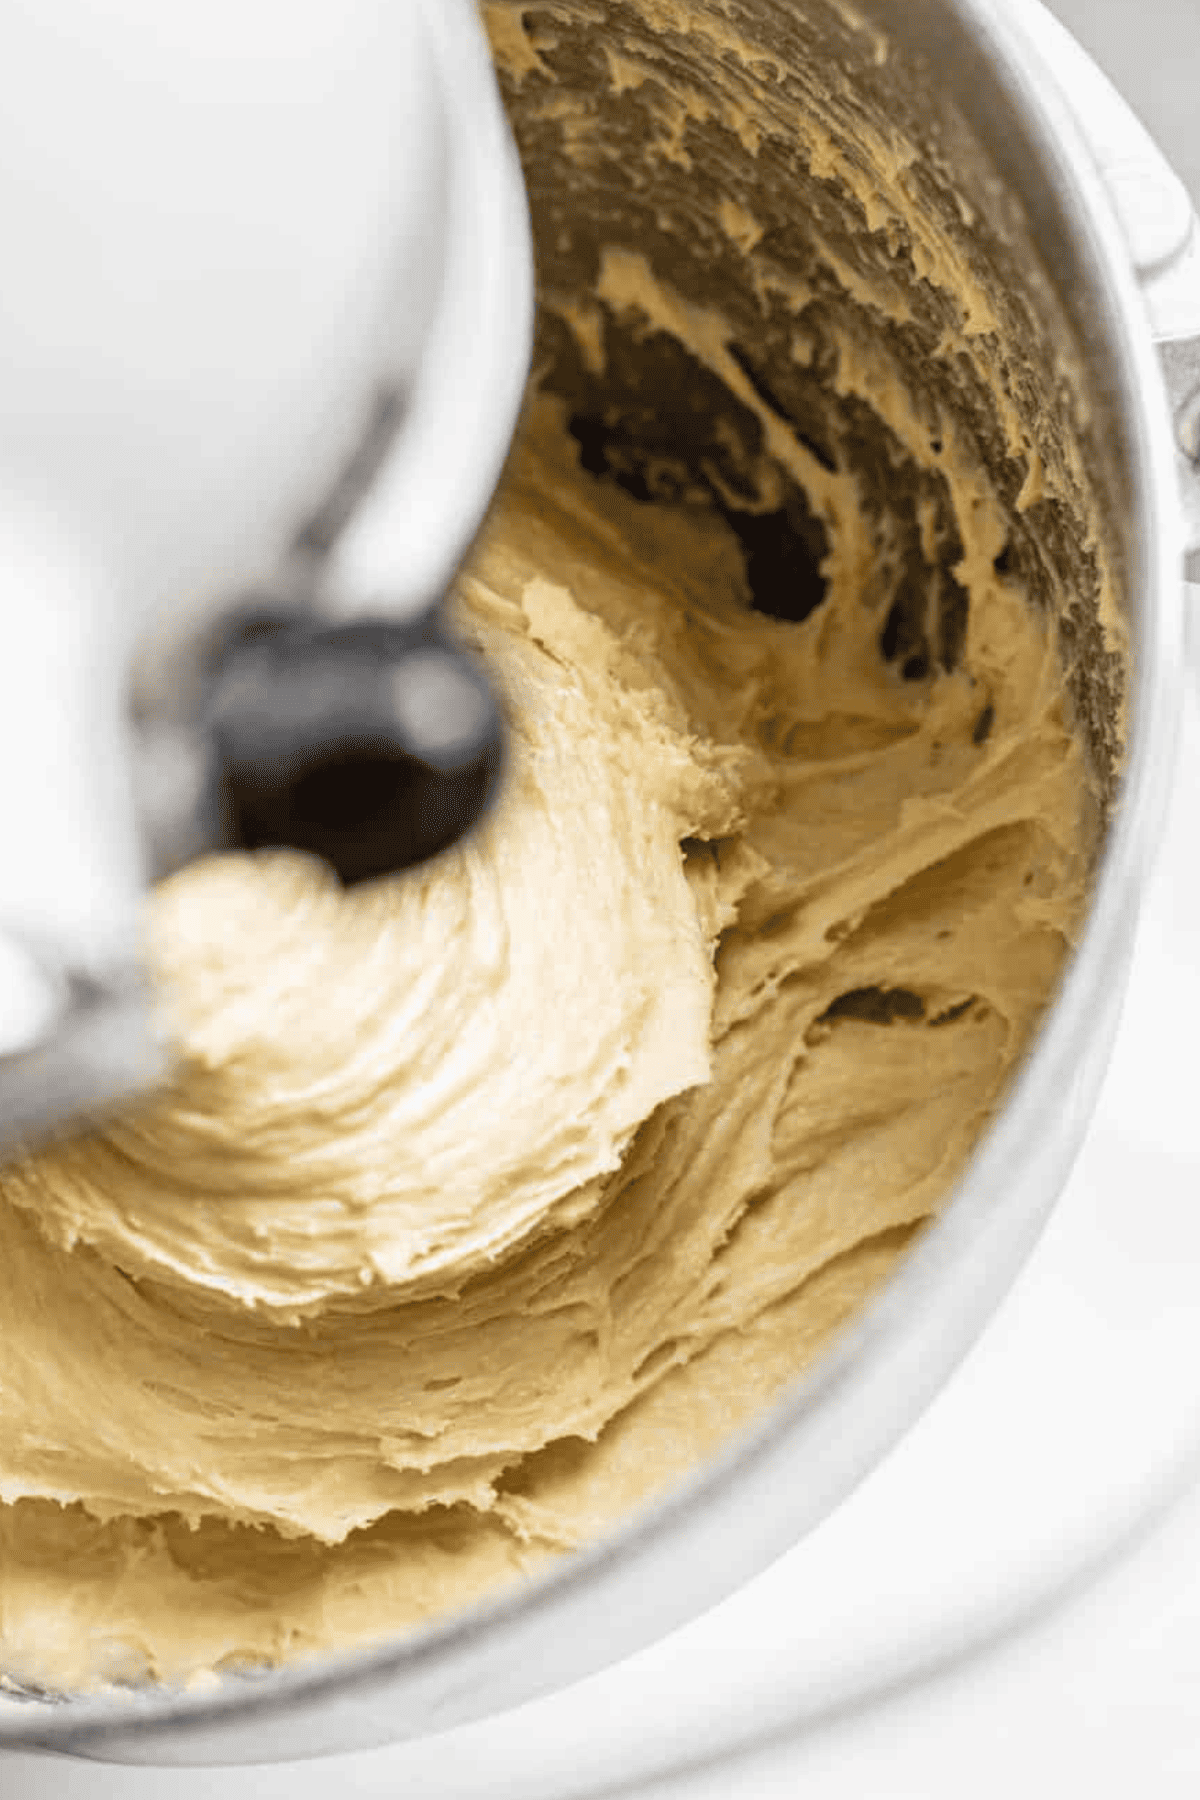
- Turn the mixer on medium sped and mix it for 10-15 minutes.
- Mix until the sticky dough strengthens and comes together, and pull away cleanly from the sides of the bowl.
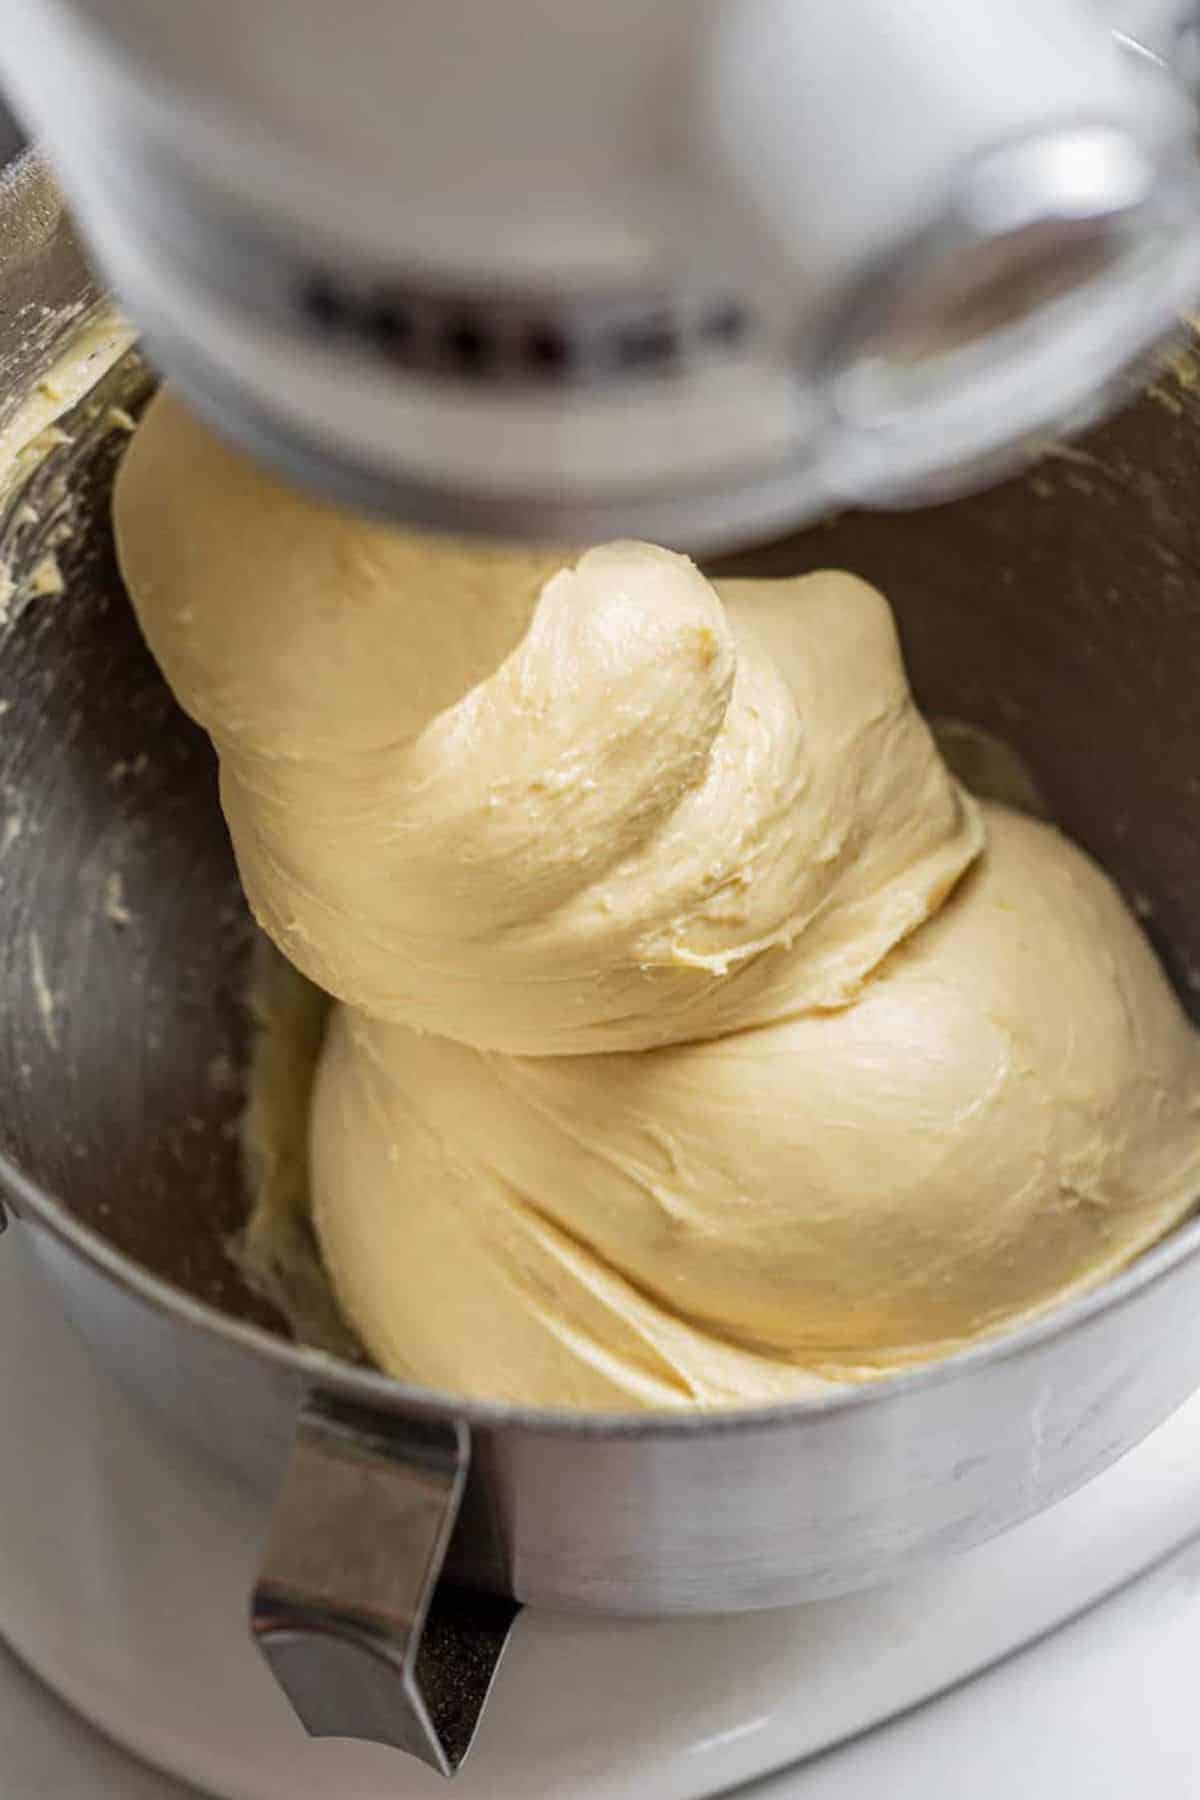
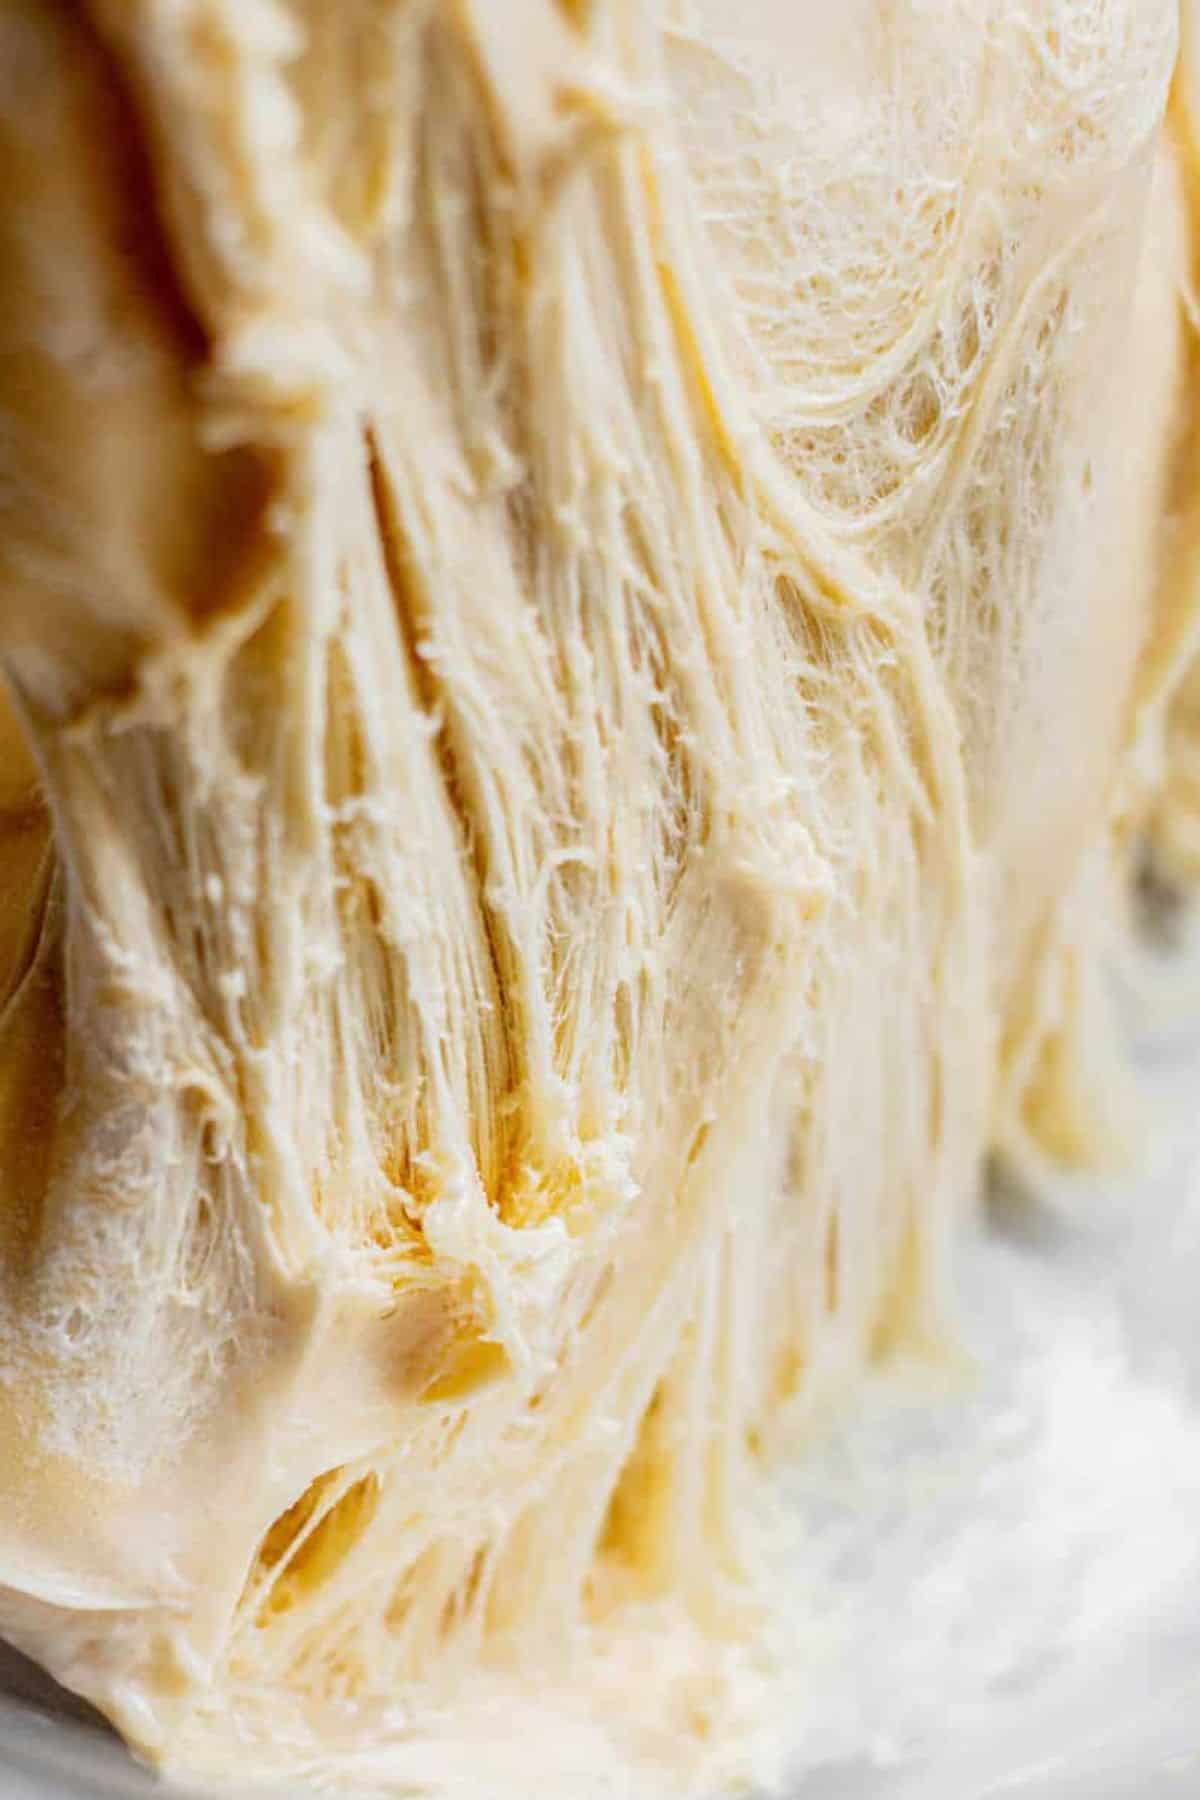
- Let the dough rest for a few minutes, then grab a piece and see if you can stretch it out thin so it’s almost see-through, without tearing. This is called the ‘windowpane test’ and shows proper gluten development.
Kneading by hand
You can mix this dough by hand on a work surface instead, though this takes a long time and lots of arm muscle. If you get too tired and need a break, do it! The dough will respond well to a few minutes of relaxation. Take time, wash the mixing bowl and your hands, and return to the dough.
It can seem daunting and like it’s not coming together, but it will. Here is a video of the kneading by hand.
If you can’t view the video here, click this link to watch it on YouTube.
Bulk fermentation
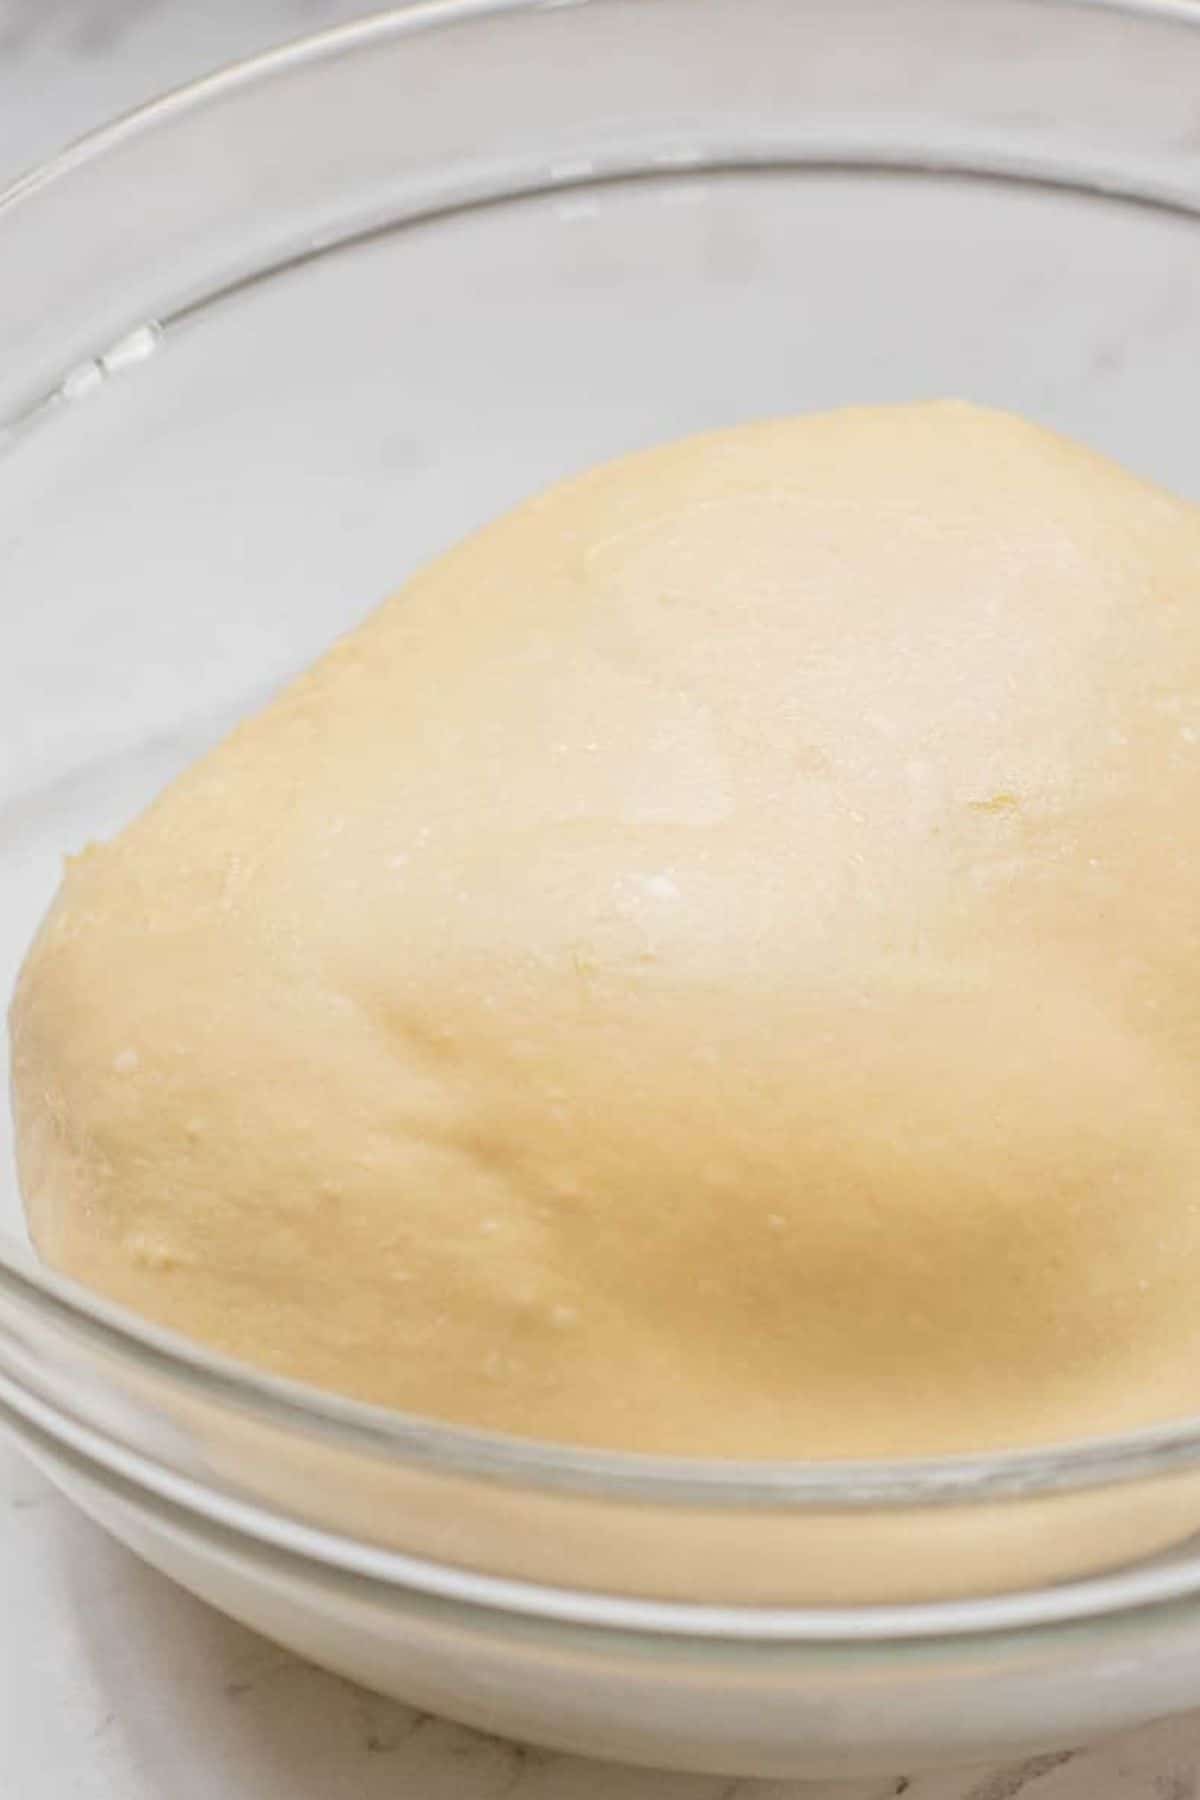
- Place the dough into a greased bowl and cover it with plastic wrap or a damp towel.
- Place it in a warm place, ideally around 76°F (25°C), and let the dough rise.
- It needs to bulk out by at least 50-60%. This will take around 4-6 hours, depending on temperature.
- Don’t rush this rise. It’s an important one and will set the standard for any future rising the dough will do.
Cold proof
- Once risen, place the dough in the fridge until you’re ready to shape it.
Shaping
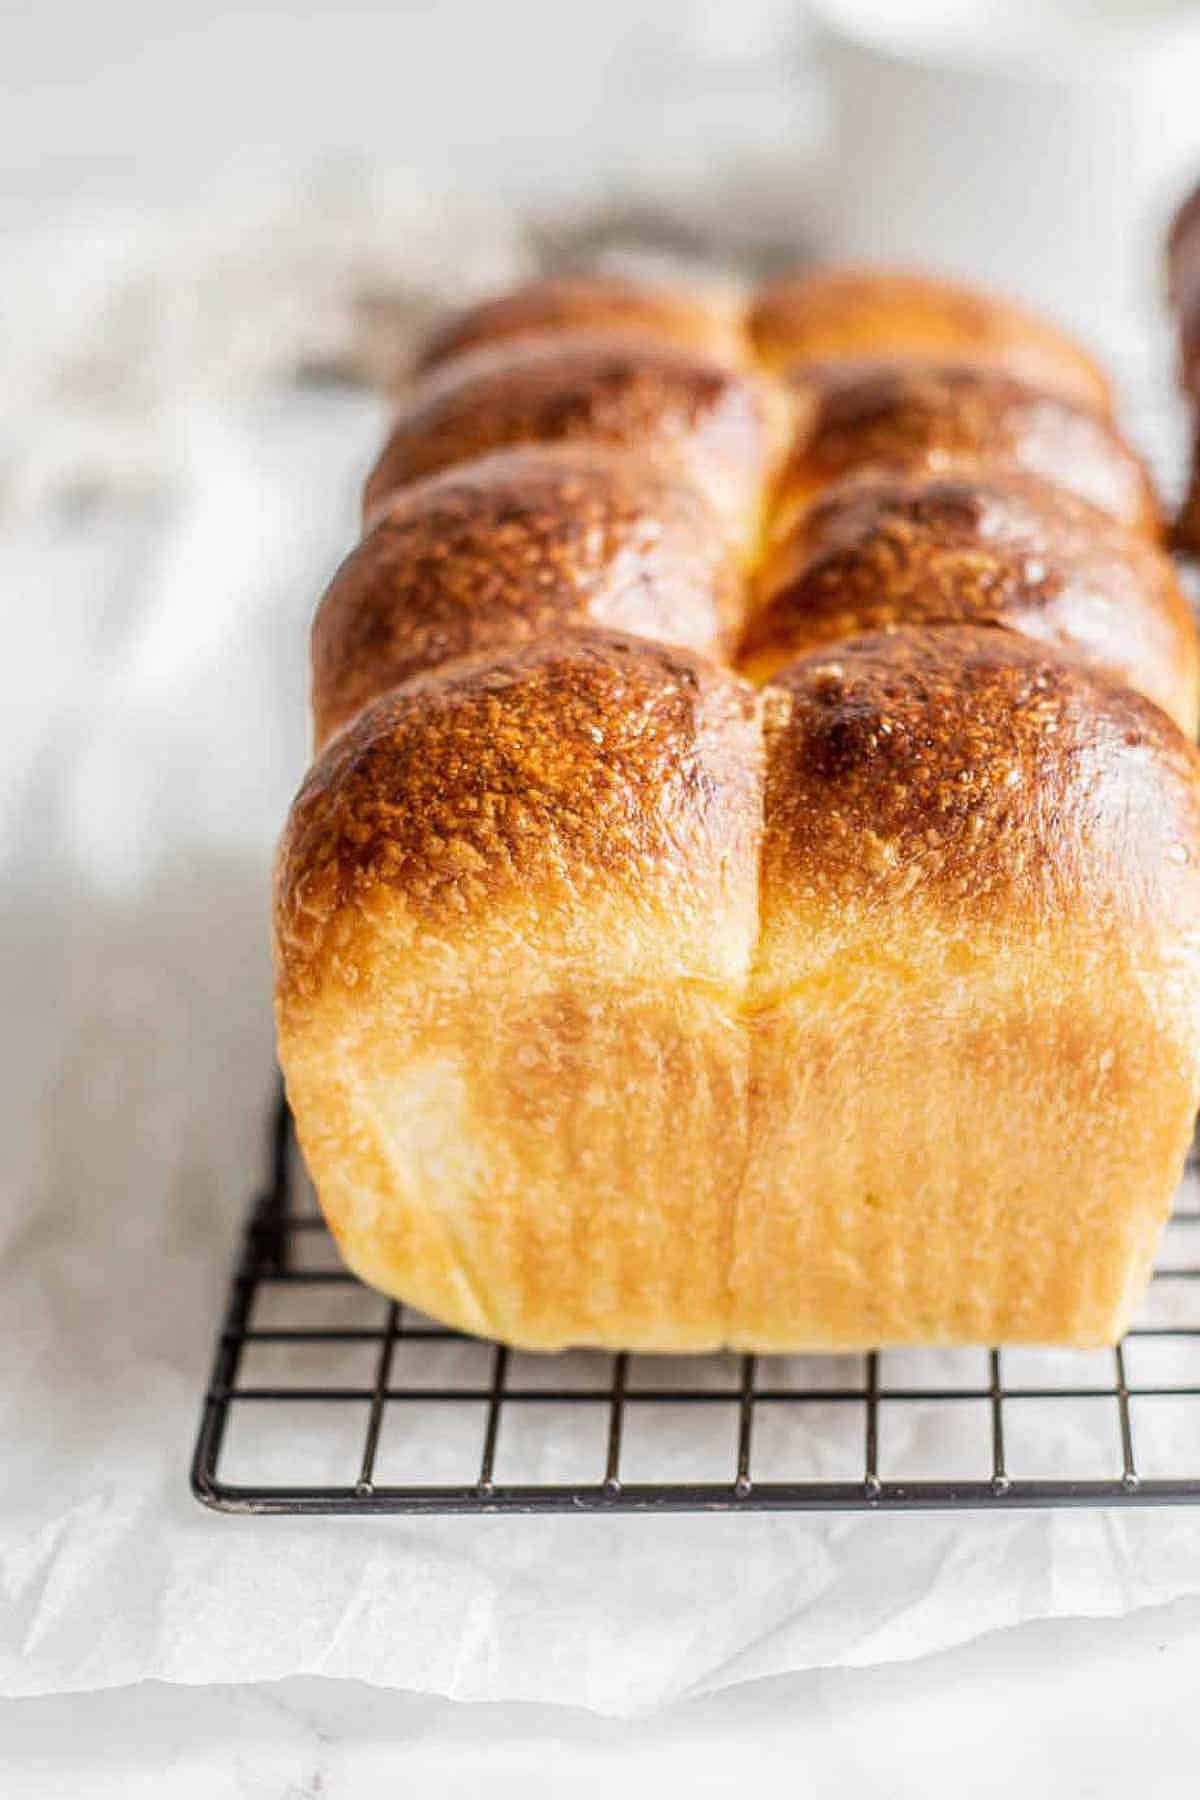
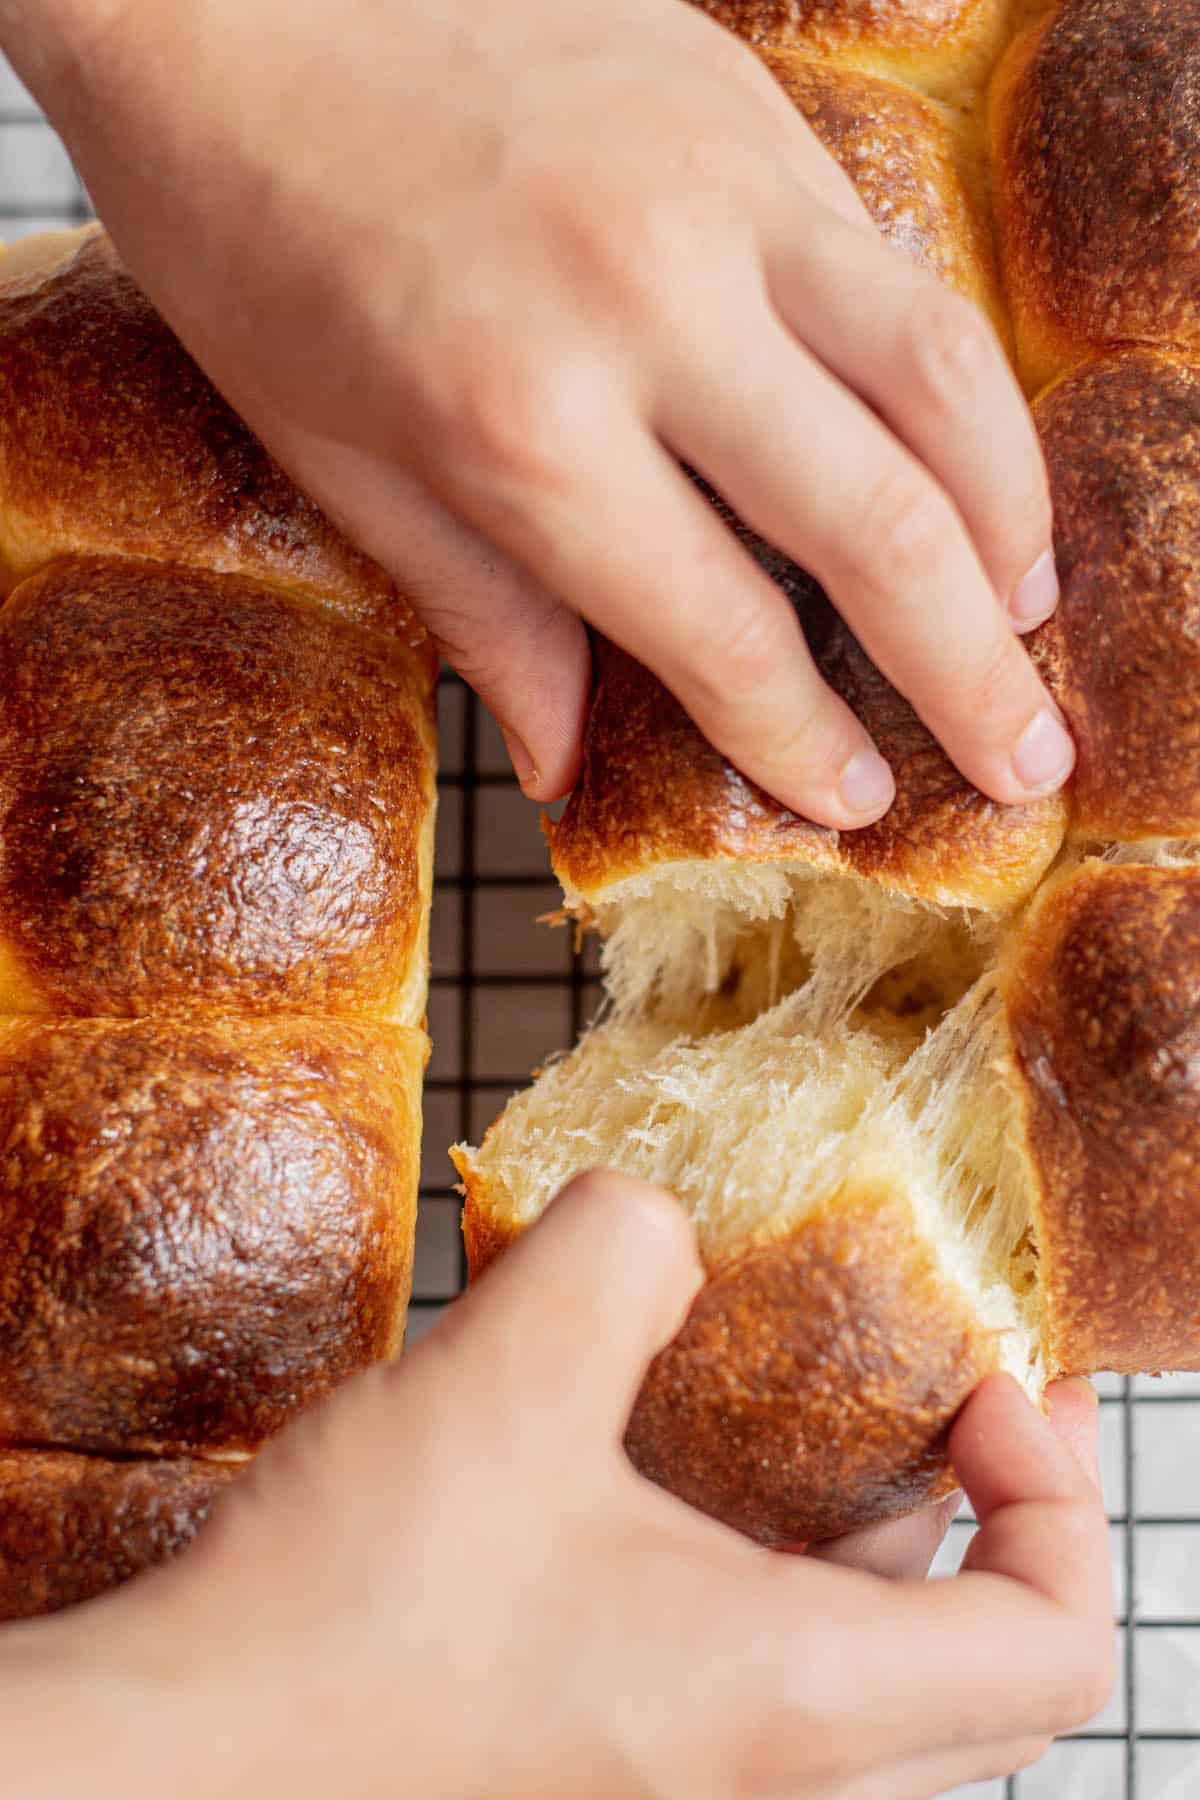
- After the cold proof, the dough will be quite firm. All that butter in there has stiffened up. Pull it out of the bowl and onto a clean bench—line two 8×5-inch loaf pans with parchment paper.
- Divide the dough into two equal pieces with a bench scraper.

- Split each piece into 8, and shape into tight dough balls.
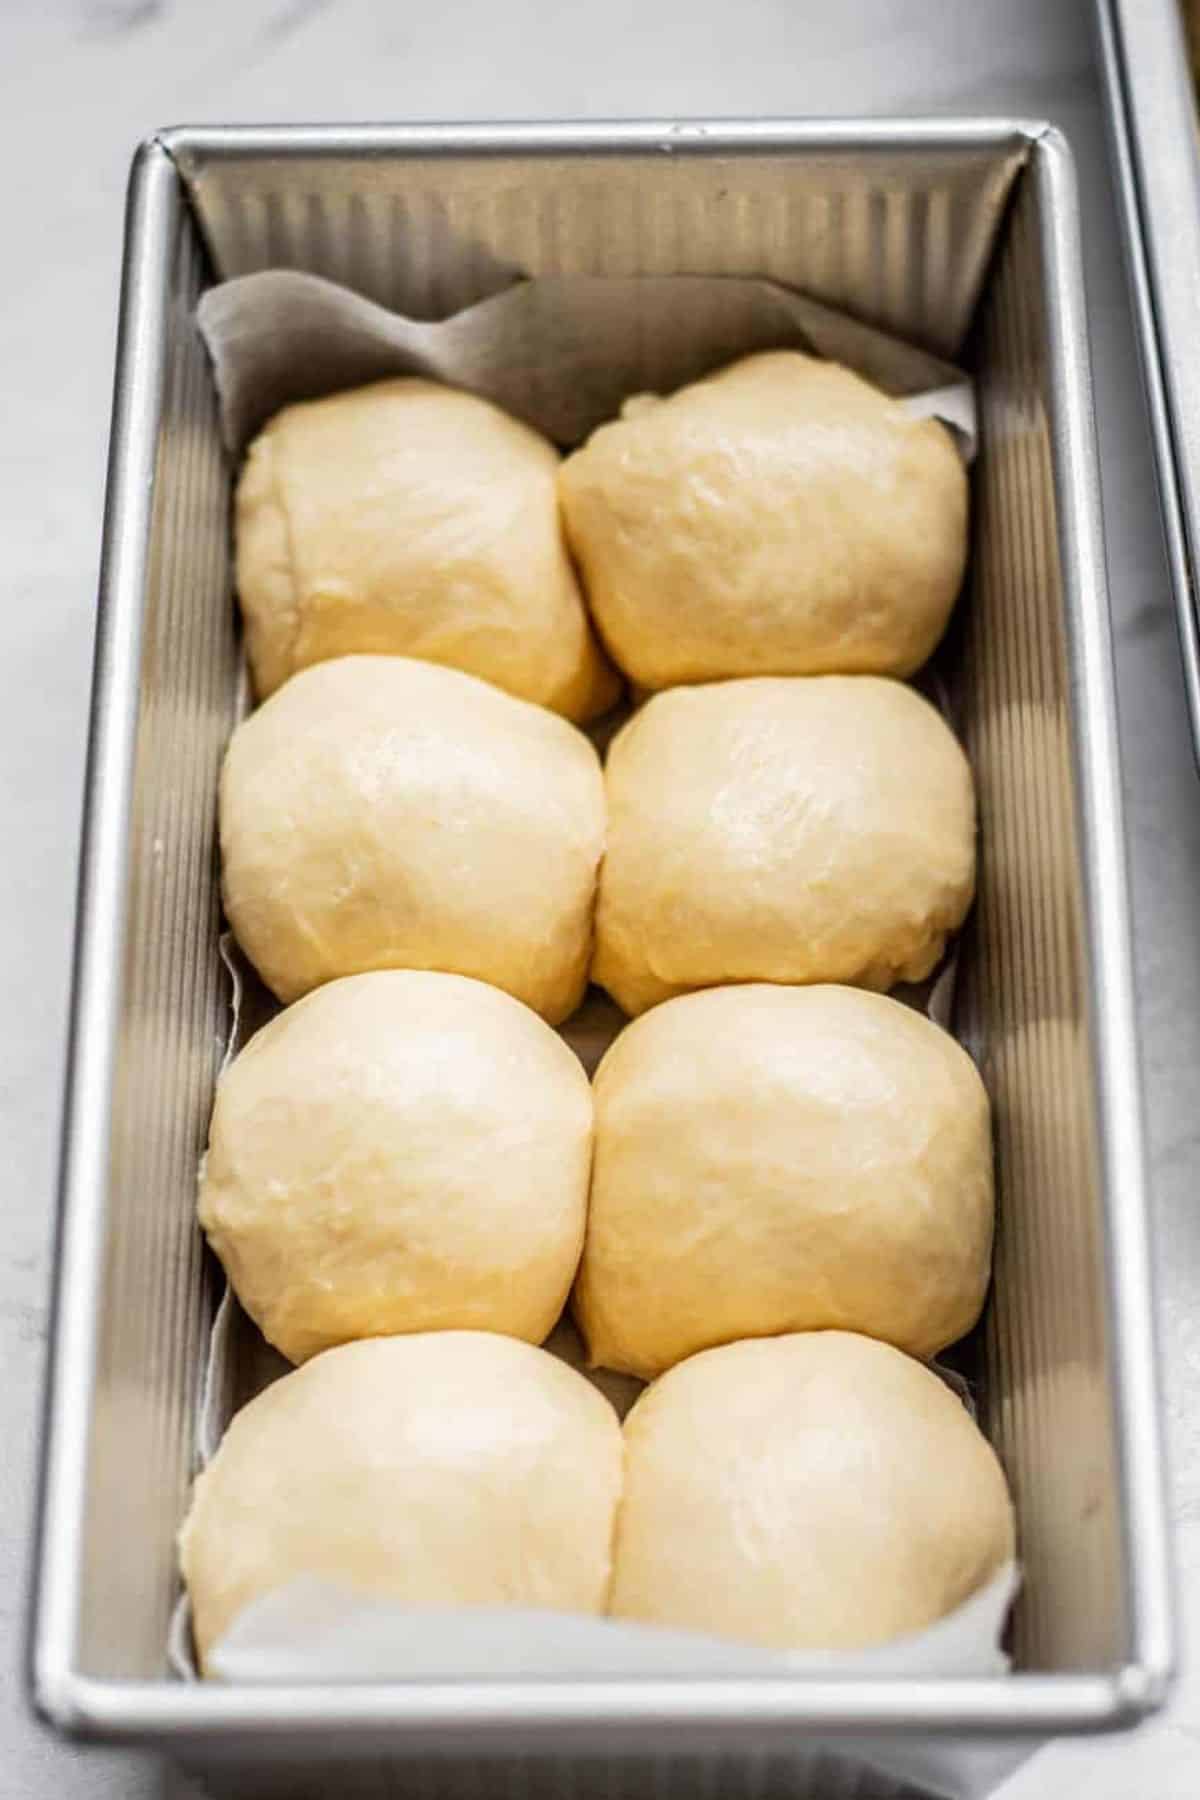
- Fit eight balls into each lined pan. They’ll fit snugly in the loaf pan but with room to expand upwards.
Second rise
- Let the brioche bread rise again in the loaf pans until it doubles in size.
Baking
- Pre-heat the oven to 400°F(200°C)
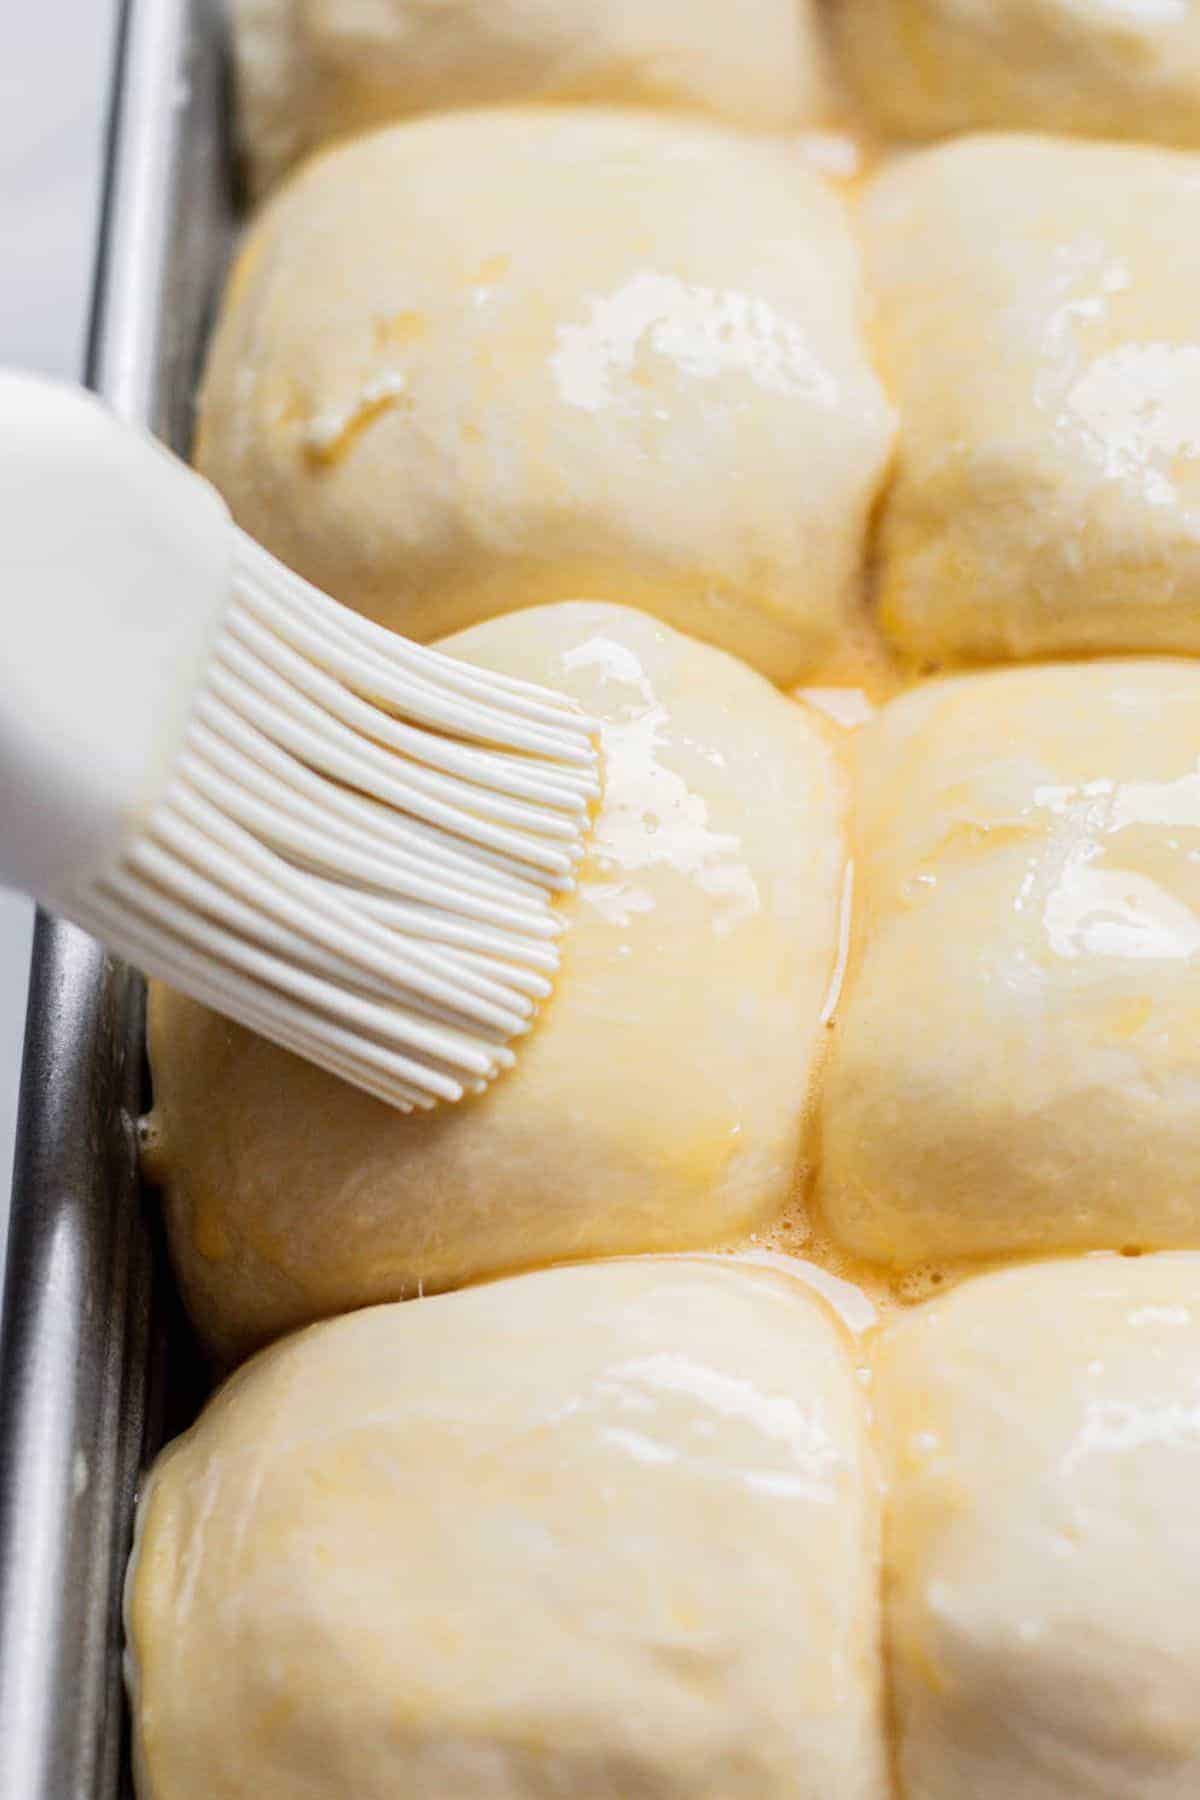
- Brush the top of the dough with egg wash.
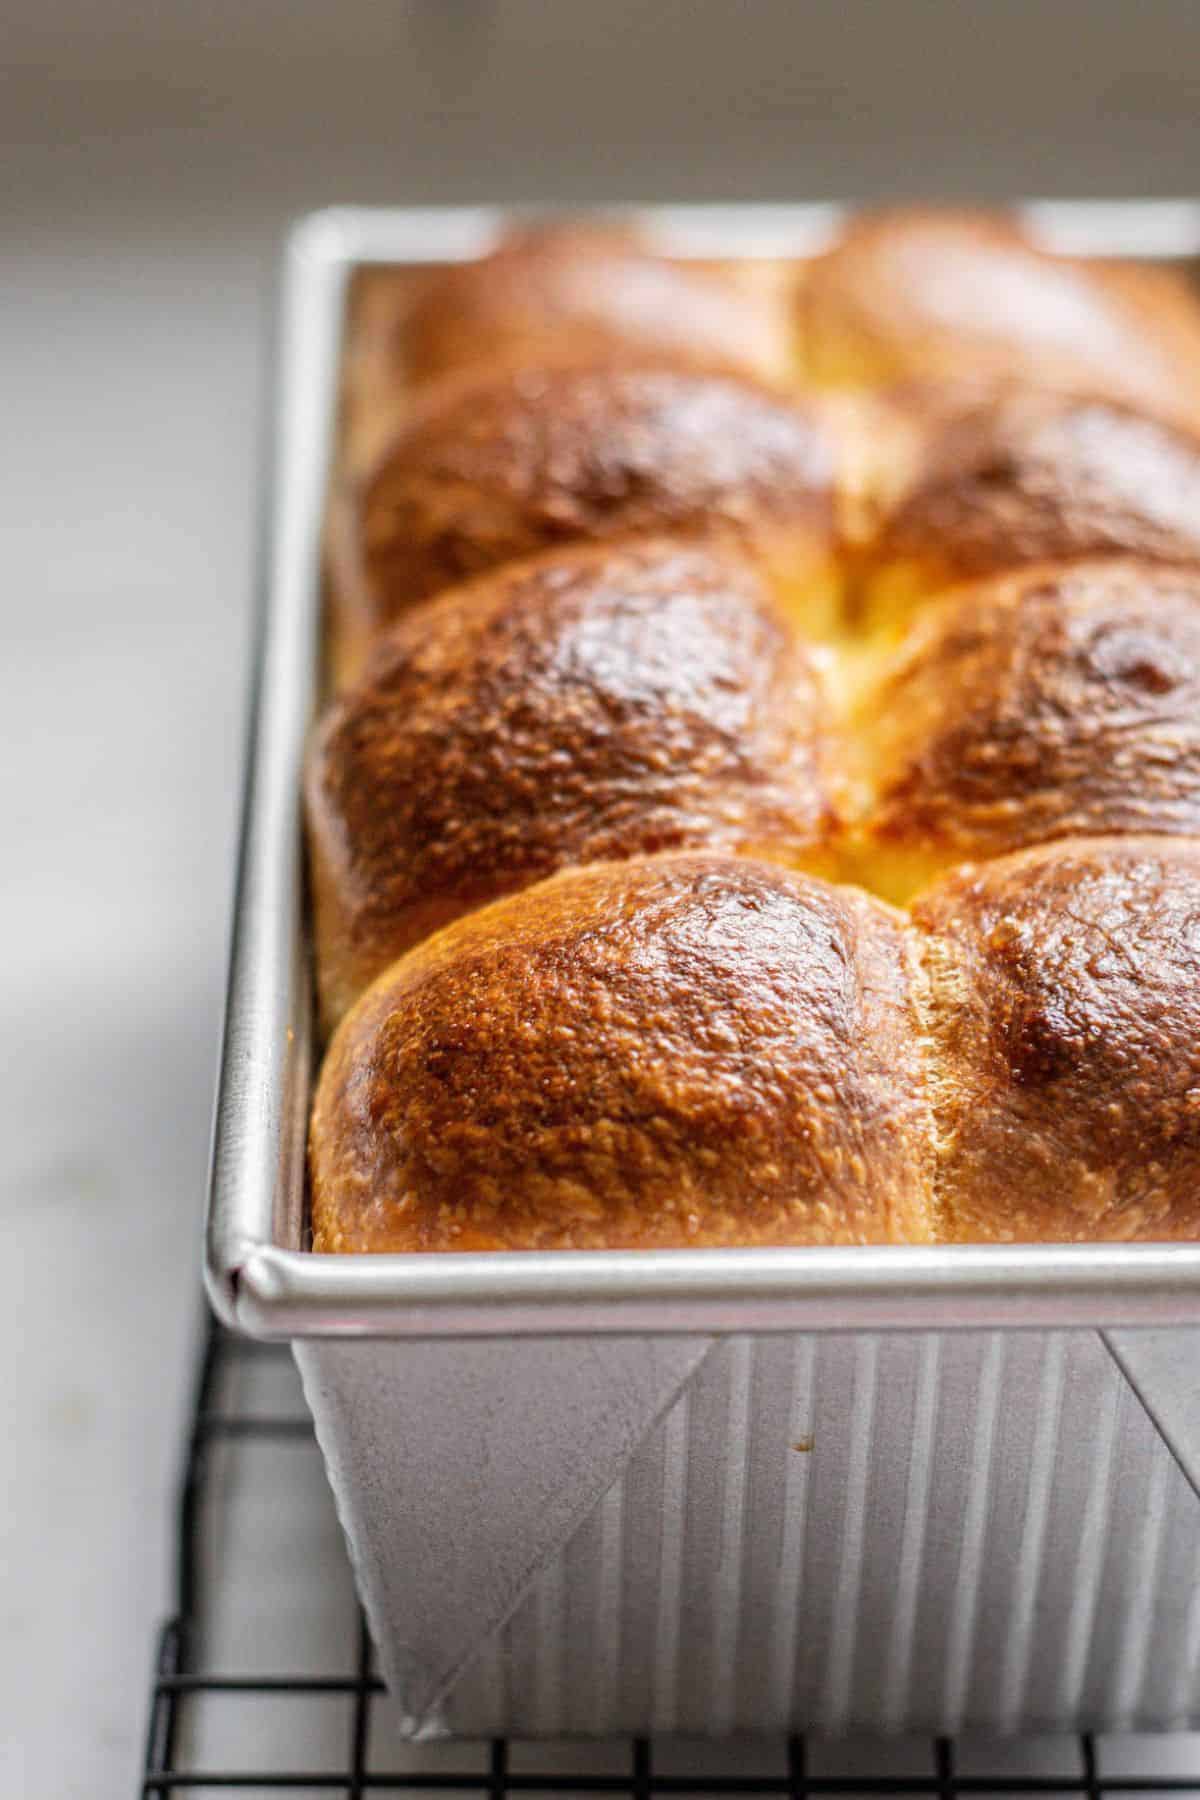
- Bake for 25 minutes until deep golden brown.
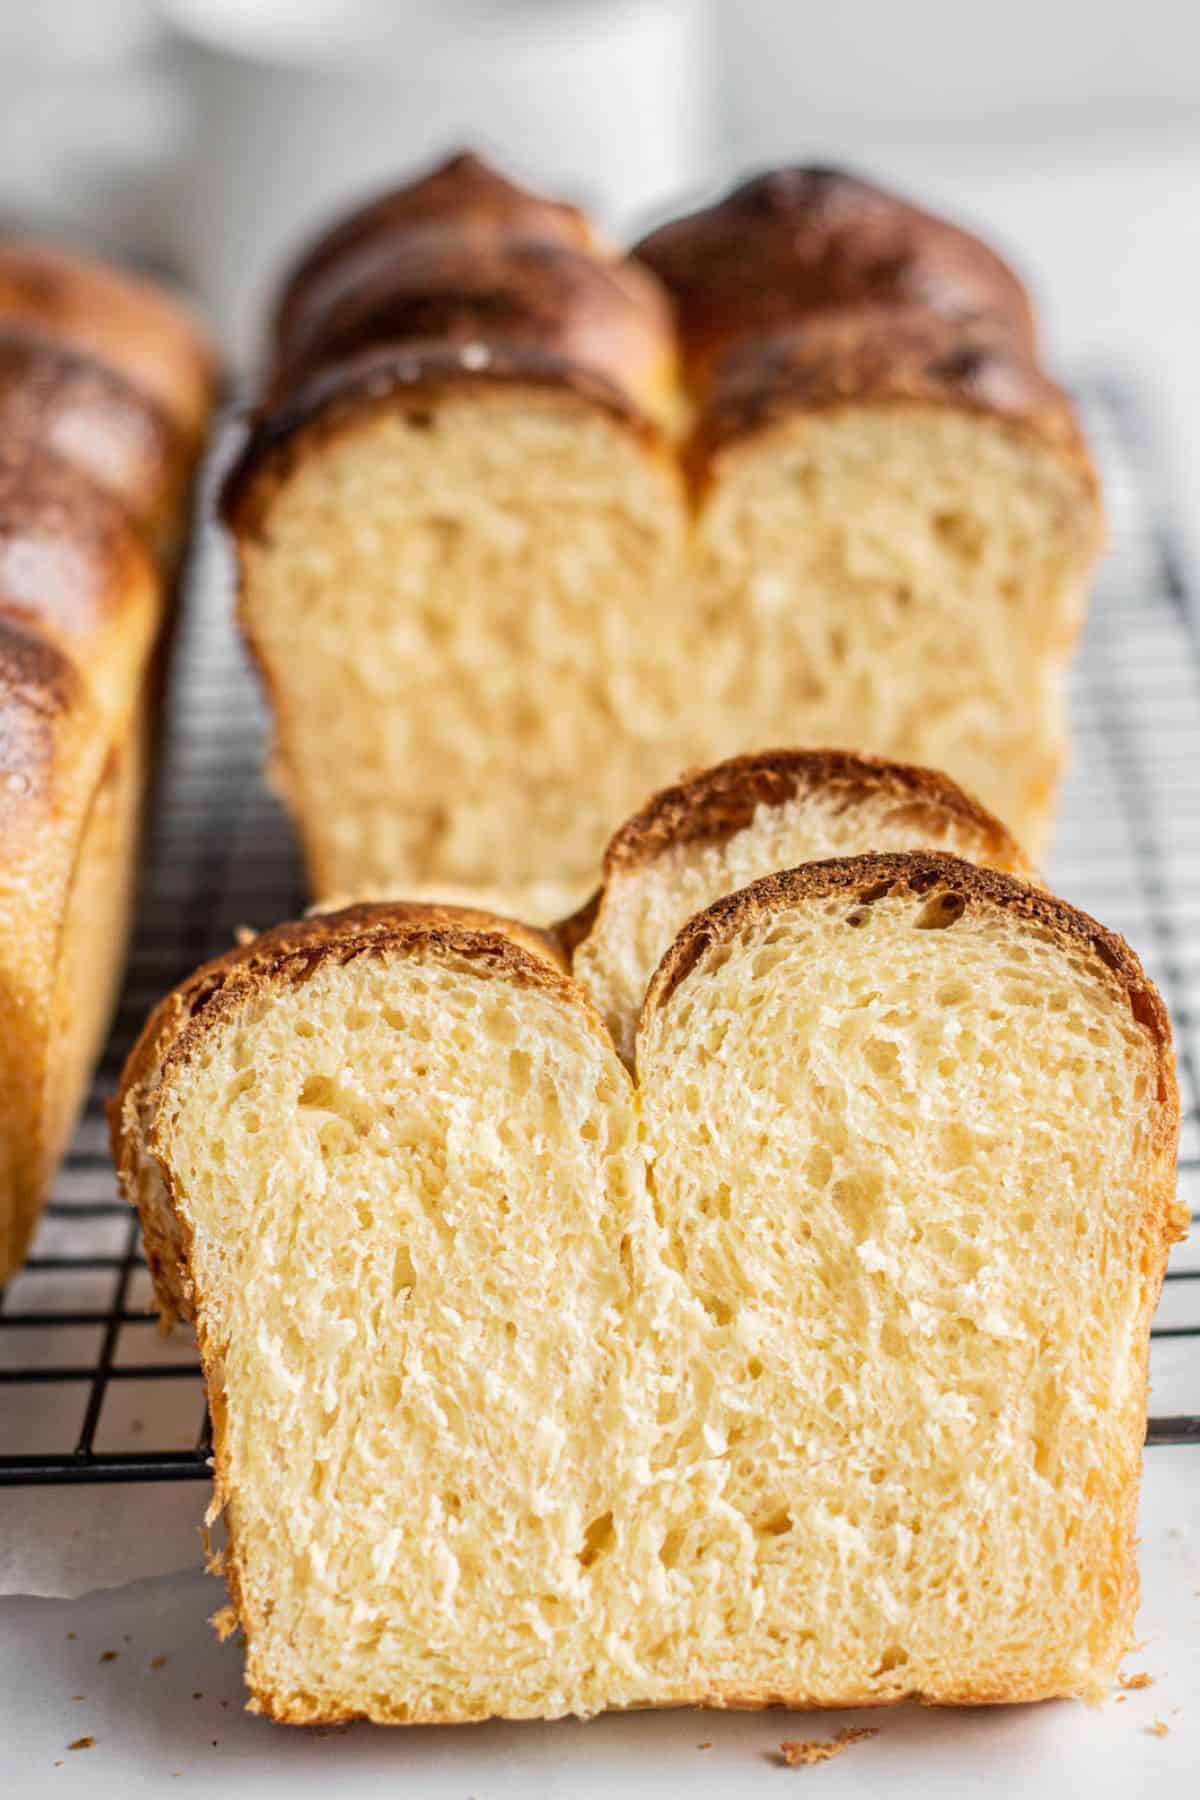
Once baked, let it cool to room temperature to slice it like bread. Or don’t wait and rip off pieces!
FAQS
Several factors could be responsible: your sourdough starter might need to be more active, the dough may be kept in a too-cold environment, or you might need to give it more time to rise. Sourdough takes longer to rise than doughs made with commercial yeast, and this is especially so with an enriched sourdough dough.
If your dough wasn’t proofed enough it will result in a dense dough.
You can shorten the cold-proof, but I wouldn’t skip it entirely. It helps to stiffen the butter in the dough for easier shaping.
You can use a regular 100% hydration starter, but this will make your dough a bit stickier as it’s introducing more water.
At the shaping step, divide the dough into 8-10 pieces. Shape these pieces into balls and space them apart in a lined oven tray. Press them down slightly with a floured palm. Let them proof until about doubled, then egg wash and sprinkle with any sesame or poppy seeds if you like, and bake for 20-22 minutes.
Related recipes
If you enjoyed this sourdough brioche recipe, you might like these too!
- Sourdough english muffins
- Sourdough sticky buns
- Multigrain Sourdough Bread
- Step-by-Step Sourdough Baguette Recipe
Sourdough Brioche Bread
A recipe for a light and tender, buttery sourdough brioche.
Ingredients
Stiff Starter
- 50g sourdough starter
- 100g all-purpose flour
- 50g water
Dough
- 550g all-purpose flour with around 11% protein
- 50g granulated sugar
- 4 large eggs
- All the stiff starter
- 125g milk
- 8g salt
- 225g room temperature butter, cut into cubes
Egg wash
- One egg yolk + 1 Tbsp water, whisked together
Instructions
The Night Before - Stiff starter
- Mix 50g starter with 100g flour and 50g water. Knead it together into a soft dough ball.
- Place it into a jar or bowl, covered with a damp cloth or plastic wrap. Allow it to rise for 8-10 hours until it is doubled.
Day 1
- Add the flour, sugar, salt, eggs, milk, and stiff starter in a stand mixer fitted with a dough hook.
- Turn the mixer on low and combine until it forms a thick but slightly sticky dough.
- Mix this dough for around 5 minutes to develop the gluten.
- Add the cubed butter, a few pieces at a time. Incorporate each cube before the next addition. Turn the mixer on medium and mix it for 10-15 minutes.
- Mix until the sticky dough strengthens and comes together, and pull away cleanly from the sides of the bowl. Don't be tempted to add more flour.
- Leave the dough to rest for a few minutes, then grab a piece and see if you can stretch it out thin so it’s almost see-through, without it tearing.
- This is called the 'window pane' effect and shows proper gluten development.
Kneading by hand
- You can mix this dough by hand instead, though this takes a long time and requires lots of arm muscle.
- If you get too tired and need a break, do it! The dough will respond well to a few minutes of relaxation. Take time, wash the mixing bowl and your hands, and return to the dough. Don't be tempted to add more flour.
Proofing
- Place the dough into a greased bowl and cover it with a damp tea towel or lid.
- Place the dough in a warm spot, ideally around 76°F (25°C), and let it rise. It needs to bulk out by at least 50-60%. This will take around 4-6 hours, depending on temperature.
- Don't rush this rise. It's an important one and will set the standard for any future rising the dough will do.
Cold proof
- Once risen, place the dough in the fridge until you’re ready to shape—at least 4 hours or up to 24 hours.
Shaping
- After the cold-proof, the dough will be quite firm. All that butter in there has stiffened up. Pull it out of the bowl and onto a clean bench—line two 8x5-inch loaf pans with parchment paper.
- Divide the dough into two equal pieces. Split each piece into 8, and shape them into tight balls. Fit eight balls into each lined pan. They'll fit snugly in there but with room to expand upwards.
Rising
- Let the brioche bread rise in a warm spot until it doubles in size. This can take between 5-8 hours, depending on temperature.
Baking
- Pre-heat the oven to 400°F(200°C)
- Brush the tops of the loaves with egg wash. Bake for 25-30 minutes until deep golden brown.
- Once baked, let it cool down to room temperature.
Notes
Storing - Keep at room temperature in a sealed container for 2-3 days. For longer storage, slice and freeze for up to three months. Thaw at room temperature or gently reheat in the oven/toaster.
Uses - Classic uses include French toast and bread pudding. It's excellent as a luxurious sandwich bread. The dough can be used as a base for cinnamon rolls, sticky buns, or monkey bread. Incorporate fillings like chocolate chips, nuts, or fruit before the final shaping for a sweet treat.
Rising - The amount of time needed for rises can vary greatly depending on the temperature and the activity of your starter; patience is key.
Brioche buns - Divide the dough into 8-10 pieces at the shaping step. Shape these pieces into balls and space them in a lined oven tray. Press them down slightly with a floured palm. Let them proof until about doubled, then egg wash and sprinkle with any sesame or poppy seeds if you like, and bake for 18-22 minutes.
Nutrition Information:
Yield: 10 Serving Size: 1Amount Per Serving: Calories: 478Total Fat: 22gSaturated Fat: 13gTrans Fat: 1gUnsaturated Fat: 7gCholesterol: 143mgSodium: 497mgCarbohydrates: 58gFiber: 2gSugar: 6gProtein: 13g