How to Cure Olives in Salt Brine (Step by Step)
At the end of autumn it is olive picking time in NZ. If you’ve got access to olives, preserving some is definitely the way to go. My favourite way to preserve them is through making salt brine cured olives. This post will show you how to cure olives in a salt brine.
Salty, flavourful little morsels that beat store-bought by a mile. Many store-bought olives are lye-cured which changes the real olive texture and taste.
Making your own cured olives feels like such an accomplishment. Tending to your olives, refreshing the brine, tasting and testing…
Once they’re finished the taste will outweigh the effort spent on the brining. If you have an olive tree (or a few) on your property you’ll know how abundantly they can produce. Unless you’re planning on pressing for oil, in which case you’ll usually need 50kg minimum, there’s not much else to do with olives except for curing them.
Picking the Olives
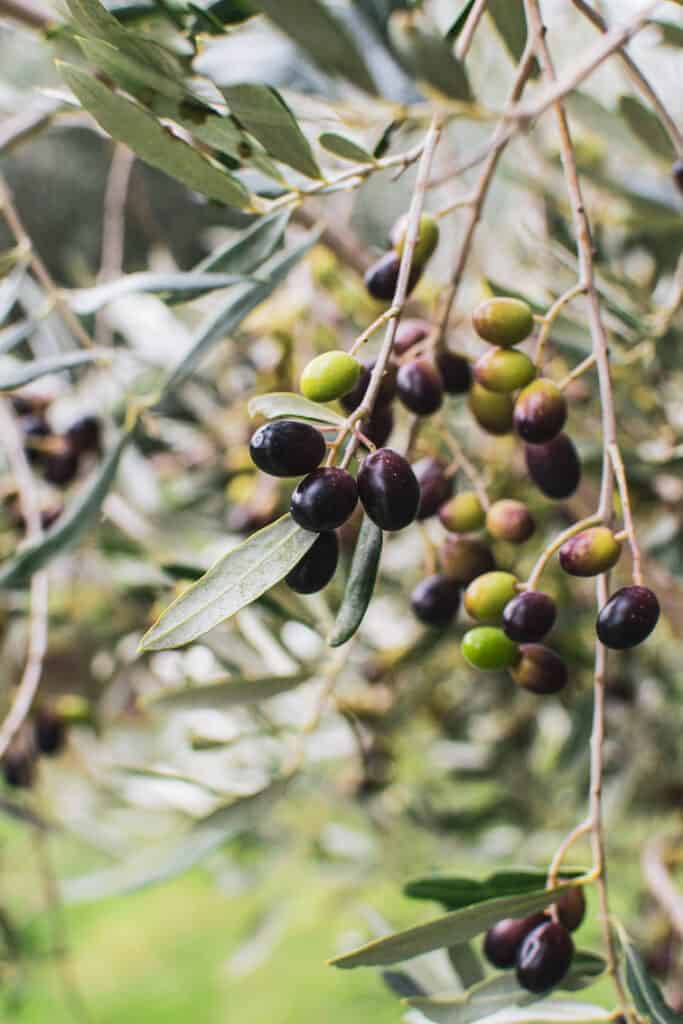
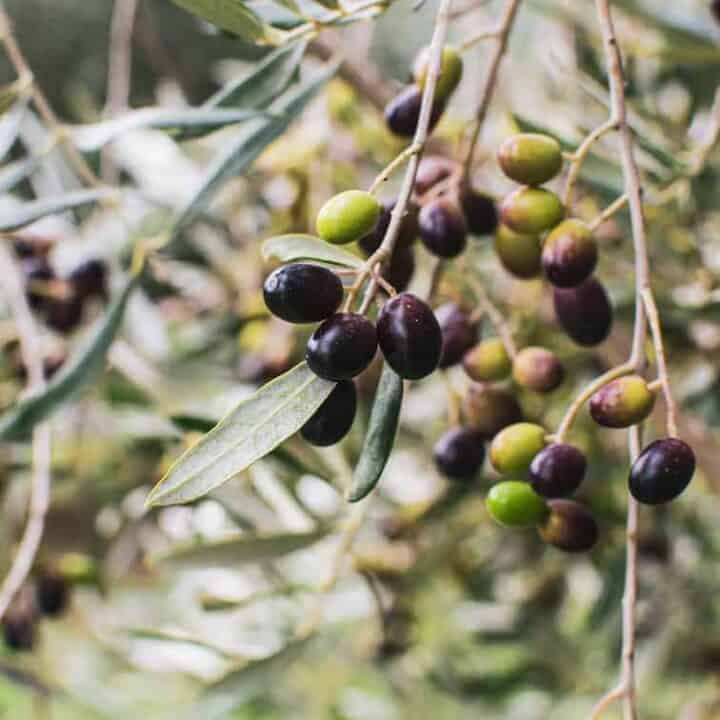
The process for cured olives takes patience but the effort involved is not difficult. Start by picking your olives. Choose the darkest, fattest olives that are unblemished.
If you squeeze one, it should release a milky liquid if it’s ready to brine.
Once you have your selection, if you have a real difference in colours, you can sort the greener ones away from the black ones. This is because the green ones are less mature and will need a little longer to brine and lose their bitterness.

Washing the Olives
Once your olives are sorted, wash them well and remove any really damaged olives you missed while picking. A little bird pecked is fine, but if they are starting to rot then take those out.
The same goes for any dry and shrivelled looking olives. You want them as plump and damaged free as possible.
Slitting and Soaking the Olives
Now here’s the bit that will determine how long your cured olives will take. You can choose now to slit your olives, or leave them whole. Slitting each olive will allow the water and salt to penetrate it faster and remove the bitterness.
If you leave them whole, they’ll need to sit in a brine a lot longer.
To slit the olives, use a sharp knife to cut a little slit into each olive. Alternatively, you can carefully ‘crush’ your olives with a heavy object such as a meat tenderiser or a flat stone. Crush them enough to just break the skin but not to completely flatten the olives.
Now, give them an initial soak in plain water for a 2-3 days, changing the water daily. Keep the olives completely submerged in the water (use a plate or weight to hold them under).

How To Cure Olives
After soaking in water, it is time to soak your olives in brine. You can make a simple brine solution using a ratio of 1 parts salt to 10 parts water. Use an unprocessed salt such as rock salt or sea salt.
Cover the olives with the brine in a bucket, jar or container with a lid. Make sure the olives are again completely submerged. I put mine in a bucket and an upside down plate works to hold them down. Loosely seal the jar or container with a lid. You may need to open it every couple of days for the first week to release some of the gases. Alternatively an airlock can be used.
If you have slit or crushed your olives, they may only need to sit in brine for 1-2 months depending on taste. If you have left them whole they can sit in brine for 6 months or longer.
Changing The Olive Brine
Check the olives weekly to see if the brine needs changing.
How often you change the brine is dependant on the environment and how quickly you want them to be ready. If the olives stay submerged and there is no sign of mould, the brine doesn’t need to be changed. If mould is growing, tip the brine out, rinse the olives really well and make fresh brine.
Changing the brine weekly will leach out the bitterness faster.
Taste your olives after a month or so. If they are still too bitter, keep soaking them until you are happy.
Bottling the Olives
Once the bitterness has gone, it is time to jar up your olives in sterilised jars.
My vinegar brine is at a ratio of 2:5:20 salt, vinegar, water. For example, 40g salt, 100g vinegar and 400g water makes about half a litre of vinegar/salt brine.
Cover the olives with the vinegar brine and flavourings. Ensure the olives are submerged under the brine. Pour over a thick layer of olive oil which will stop oxygen touching the olives. Screw the lid on the jars, and let them sit for a week to infuse the newly added flavours before sampling.
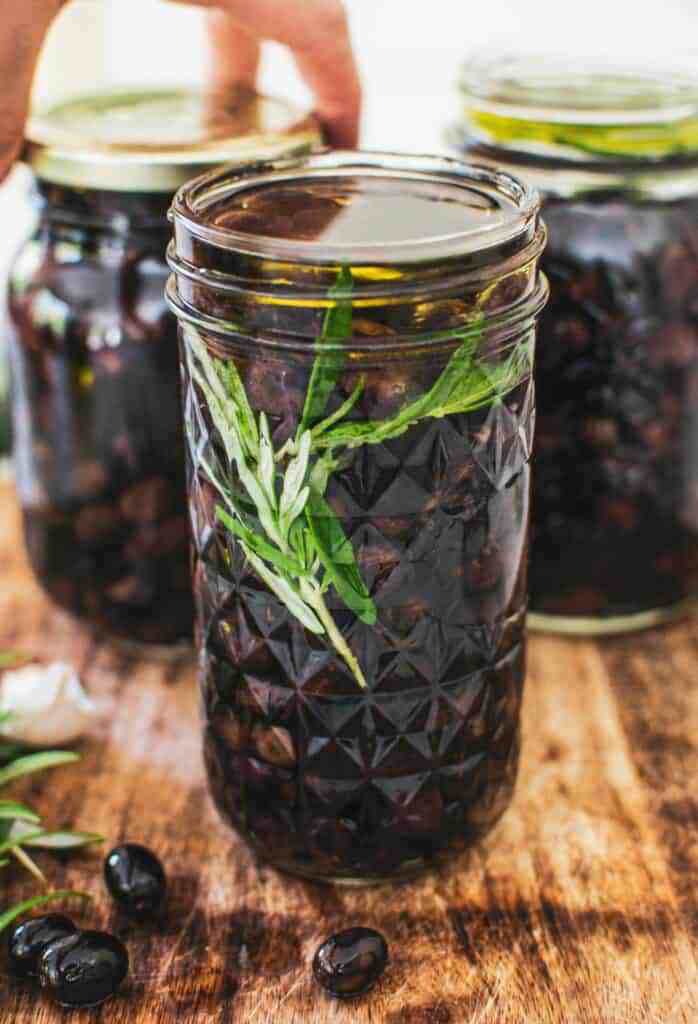
Olives like this can store in a sealed jar for up 6 months in a cool dark place, or in the refrigerator for up to a year. Once opened (meaning, once the olives are no longer kept under the olive oil), use within 3 weeks. Try them on focaccia bread! Here’s a sourdough version too.
Happy curing!
Brine-Cured Olives
A simple brine cured olive recipe
Ingredients
- Olives
- Uniodized salt
- Water
- Apple cider vinegar
- Flavourings (lemon, garlic, herbs, chili..)
Instructions
- Pick your olives, choosing the fattest, darkest olives. Squeezing an olive should release a milky liquid if it's ripe enough to brine.
- Once picked, if you have a real difference in colours, sort the green ones away from the black ones. The green ones are less mature and will need a little longer to brine and lose their bitterness.
- Wash them well and remove any really damaged olives and dry shrivelled olives.
- You can choose now to slit your olives, or leave them whole. Slitting each olive will allow the water and salt to penetrate it faster and remove the bitterness. If you leave them whole, they'll need to sit in a brine a lot longer.
- To slit the olives, use a sharp knife to cut a little slit into each olive. Alternatively, you can carefully 'crush' your olives with a heavy object such as a meat tenderiser or a flat stone. Crush them enough to just break the skin but not to completely flatten the olives.
- Now, give them an initial soak in plain water for a 2 days, changing the water each day. Keep the olives completely submerged in the water (use a plate or weight to hold them under).
- Now soak the olives in brine using a ratio of 1 parts uniodized salt to 10 parts water, measured in weight.
- Cover the olives with the brine , making sure the olives are again completely submerged. Loosely seal the jar or container with a lid. You will need to open it every couple of days to release some of the gases if the lid is on tightly.
- If you have slit or crushed your olives, they will only need to sit in brine for 3-6 weeks depending on taste. If you have left them whole they can sit in brine for up to 6 months or longer.
- How often you change the brine is dependant on your environment and how quickly they cure. Changing the brine weekly will leach the bitterness out faster, but if the olives stay submerged and there is no sign of mould, the brine doesn't need to be changed as often. This will slow down the process though.
- If mould is growing, tip the brine out, rinse the olives well and clean the olive container and make fresh brine.
- Remove the lid and check the olives weekly.
- Taste them after a month or two. If they are still too bitter, keep soaking them until you are happy with it.
- Once the bitterness has gone, it is time to jar up your olives in sterilised jars.
- I use a vinegar brine, at a ratio of 2:5:20 salt, vinegar, water. For example, 40g salt, 100g vinegar and 400g water makes about half a litre of vinegar/salt brine.
- Add in any other flavourings you like such as lemon, lime, garlic, oregano, rosemary, chilli.
- Cover the olives with the vinegar brine and flavourings. Ensure the olives are submerged under the brine. Pour over a thick layer of olive oil which will stop oxygen touching the olives. Screw the lid on the jars, and let them sit for a week to infuse the newly added flavours before sampling.
- Olives can store in a sealed jar for up 6 months in a cool dark place, or in the refrigerator for up to a year. Once opened keep in the fridge and use within 3 weeks.
Nutrition Information:
Serving Size: 1 gramsAmount Per Serving: Unsaturated Fat: 0g

I liked your pickle recipe for olives. I hope when I do so in brine they will last longer. Cool post!
Hi Elien, thank you for posting these simple directions. A question about the vinegar brining though, when you instruct to seal the jars, do you mean “process in boiling water for x minutes”, or simply put the lid on tight?
Hey Pip, I just mean to seal the lid on tight by hand
It is almost a year since I cure my batch of olives from this recipe and I have 1 jar left. All I did was screw lids on tight as. And have no issues with mold. I think the combo of salt and the layer of oil on the surface of the liquid prevents the mold. Hope this helps
Thank you for this amazing recipe, it was so simple to follow. I loved the results from last year’s batch of olives so much. And my husband usually hates olive and he likes these, they weren’t as bitter as typical olives, yet soo flavoursome. I cured mine with chilli, preserved lemons and thyme.
Have just started the brine process for this years picking and am excited to trial some new flavors. For one jar I’m going go wild and try chilli and cinnamon sticks to flavour. What do you think?
Ooh I think I would love to know how that flavour combo turns out! I love that idea!
I think your instructions are wonderfully clear and I’m looking forward to curing my first ever batch of olives. Is it a good idea to pit the olives prior to curing, instead of slitting them? I have an olive pitter and thought this might be easier than individually slitting each fruit.
Hey Jan, you can pit the olives instead of slitting them 🙂
How do you keep the olives below the brine level after they have been bottled. They keep popping up above the brine and oxidise some of the olives, even after I have added olive oil to seal them
I would try adding a bit more olive oil
The process above is clear and helpful, but I couldn’t find anywhere the amount of fresh olives used, I mean how many kilograms have used? Thanks
Hey, it doesn’t matter how many you’ve got as knowing the ratio of salt to water for the brine means you can make any amount of brine needed. Just ensure you have enough brine to cover the olives with it 🙂
Can I do this in 5 gallon plastic buckets?
Yes you can 🙂
Hi there. Our black olives have lost a lot of colour after their first week in brine. I’m worried we didn’t let the brine cool enough before adding to the olives. Could this be the case? It was a little cooler than luke warm.
Hey mine always lose their colour too and it’s nothing to worry about, It’s due to the salt.
Best method I have tried. This is a keeper.
Very clear and easy to follow instructions. I had about a jam jar sized amount of olives, grown on my London balcony. I bought an olive tree with olives already there and left them on the tree for about 8 – 9 months to ripen. After about 6 – 8 weeks in the brine, changing the solution roughly every 2/3 days I put them in sterlized jam jars (wash the jars in hot soapy water and put them wet face down on a baking tray in the oven at 180º for about 15 minutes). I made up half the amount of brine specified in the recipe, using white wine vinegar, garlic, lime and home-grown oregano as flavourings. Now I have to wait a week to sample them. Can’t wait!!
Great recipe, I brined for 3 months in a vacuum sealed bag, I didn’t change the brine during this time. I actually forgot all about them and then remembered. Taste great, instead of the vinegar brine I just marinade in a flavoured oil blend.
1ltr olive oil
50g Orange zest
50g Lemon zest
4 each cinnamon quill
6 cloves garlic
2 chillies split and deseeded
Method:
Heat oil to 35degrees and infuse the aromats
Hi, I always find that if adding cloves of garlic , the garlic goes blue! Not very appetising, so I avoid doing that now but I miss the garlic flavour! can the “blue” be prevented ?
Hey the garlic turning blue can be due to the acid in then brine. It’s perfectly safe to eat, and in fact Laba is a northern Chinese dish of pickled blue garlic where it’s case of the bluer the better!
I’m not sure how to avoid it happening though. Some to use say use older garlic, some say the opposite. Or it could be the type of garlic or how it was grown.
Hi – is the brine 1 part salt and 10 parts water by weight or by volume? 1 litre salt and 10 litres water or 100 g salt and 1 kg water? Thanks!
Hey Greg, it is by weight 🙂
My olives started off black but as they brined they became more mottled green and black
They look really pretty
I separated out the green olives before I brined
Did I pick them too early? They had some give to them.
Heya it’s normal that they lose a lot of colour in the brine 🙂